| Construction Rating: | starstarstarstarstar_border |
| Flight Rating: | starstarstarstarstar_border |
| Overall Rating: | starstarstarstarstar_border |
| Manufacturer: | Mercury Engineering  |
 Brief:
Stubby, MPR, 3FNC, Parachute. The RDR 1 is listed by the manufacturer as a Skill Level 3 rocket. Personally, I think
it is much easier than that. It's a stubby thing made for mid power. The components are of good quality but surprising
in that the fins are balsa and the shock cord mount is nothing more than a tri-fold.
Construction:
Construction begins simply enough with the motor mount. The first step is to take a strip of provided metal foil,
peel off the back and wrap it around one end of the motor tube. The stuff is very sticky so be careful with your
initial alignment.
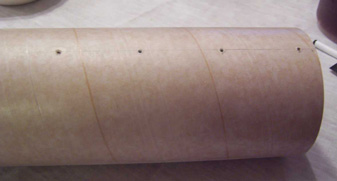
With the foil in place, the instructions directed me to place two marks on the motor tube to be used to locate the centering rings. The marks are made from the end with the wrap. That would be aft.
 The centering rings slid right into place. They were neither
too tight nor too lose. The instructions said to glue them in place with carpenter's glue and this was done. I did make
a modification at this point. I looked around and found nobody pointing a gun at my head and telling me I HAD to use
the trifold so I decided not to do so. Instead, I took a length of Kevlar®
and tied it around the motor tube with a square knot. I then tucked it down into the glue and appled a layer on top of
the Kevlar®.
I made sure that the bitter end led away from the motor tube at a tangent since I wanted to run the Kevlar®
to the outside of the mount. That being done, I put some glue down to hold it in place. The top surfaces of both rings
were then filleted.
The centering rings slid right into place. They were neither
too tight nor too lose. The instructions said to glue them in place with carpenter's glue and this was done. I did make
a modification at this point. I looked around and found nobody pointing a gun at my head and telling me I HAD to use
the trifold so I decided not to do so. Instead, I took a length of Kevlar®
and tied it around the motor tube with a square knot. I then tucked it down into the glue and appled a layer on top of
the Kevlar®.
I made sure that the bitter end led away from the motor tube at a tangent since I wanted to run the Kevlar®
to the outside of the mount. That being done, I put some glue down to hold it in place. The top surfaces of both rings
were then filleted.
As I waited for the top fillet to set up, I decided to work on the next thing on the list. That would be the fins. I almost decided to laminate them with paper but, on second thought, decided to see how they help up built as designed.
 I cut the fins out of the balsa sheet. There were six pieces:
- three large trapezoids
- three small triangles.
 Reversing the motor mount to
apply a fillet to the underside concluded the first build session.
Reversing the motor mount to
apply a fillet to the underside concluded the first build session.
The next morning, I went over the fillets and the glue stabilizing the Kevlar® again in the hope that it would be dry for the evening build session. It was.
My next step was to use a razor knife to cut a small slot for the Kevlar® in the edge of the forward centering ring. This was easily done and the shock cord slipped into place.
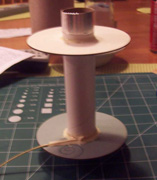
 Next up, the entire motor mount assembly was test fitted into the body tube. The
direction of both the motor mount and the BT makes a difference here. The motor mount for obvious reasons but the BT
because it is pre-marked for the fins. I found that the forward ring slipped in fine but the after one was very tight.
A bit of effort with some sandpaper soon rectified that.
Next up, the entire motor mount assembly was test fitted into the body tube. The
direction of both the motor mount and the BT makes a difference here. The motor mount for obvious reasons but the BT
because it is pre-marked for the fins. I found that the forward ring slipped in fine but the after one was very tight.
A bit of effort with some sandpaper soon rectified that.
Upon verifying that the motor mount fit, I removed it and got out the ruler. I used a pencil to mark the inside of the BT 1.5" from the after end. This is where the after centering right was supposed to end up.
When I was happy with the marks, I took a long swab and made a ring of glue around the interior of the BT about 3 inches in. I then dropped the Kevlar® through and pushed in the motor mount until the forward ring was past the 1.5" mark but the second one had not yet entered the BT. I then swabbed in another ring of glue at the 1.5" point and shoved the motor mount home. After it was in place, I reinforced the seam with a fillet of yellow glue.
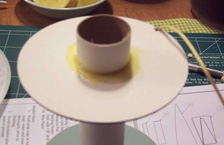
 The next step in the directions requires that everything done thus far be dry. Since
it was not, I elected to work on the nosecone. I washed it in detergent, as per the instruction and then towled it dry.
There were seam lines along both sides. I used an exacto to remove excess but was still left with a crease along each
of the seams. I got out the putty and started to fill it in.
The next step in the directions requires that everything done thus far be dry. Since
it was not, I elected to work on the nosecone. I washed it in detergent, as per the instruction and then towled it dry.
There were seam lines along both sides. I used an exacto to remove excess but was still left with a crease along each
of the seams. I got out the putty and started to fill it in.
I don't have much experience with putty. It seemed to start drying very fast, faster than I could press it down into the grooves. I wetted my fingers with a bit of rubbing alcohol and that allowed me to work the putty into place. The result was a mess but that should be taken care of when I sand it smooth.
I decided on one final act for this build session. Along each of the fin lines, I was instructed to make marks in four places strategically chosen to keep from interfering with the motor mount. These marks are intended as guides for drilling, which was the next step.
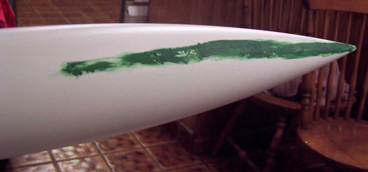
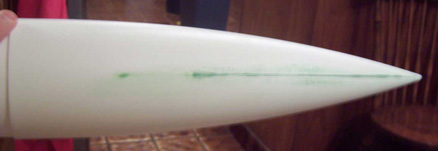 When next I worked on this rocket, I had little opportunity to do much except sand
the putty I had put on the NC. I wet sanded with #320 and, as expected, most of the putty came off, leaving just some
in the valleys I was trying to fill and a bit in a few other rough places. I had forgotten how messy this stuff can be
and I did manage to give most of the NC a sickly green stain that mostly came up with the paper towels. I planned to
kill the rest of it with Kilz when I got around to priming. That stuff will kill anything.
When next I worked on this rocket, I had little opportunity to do much except sand
the putty I had put on the NC. I wet sanded with #320 and, as expected, most of the putty came off, leaving just some
in the valleys I was trying to fill and a bit in a few other rough places. I had forgotten how messy this stuff can be
and I did manage to give most of the NC a sickly green stain that mostly came up with the paper towels. I planned to
kill the rest of it with Kilz when I got around to priming. That stuff will kill anything.
While rereading the instructions at this point, I noticed that they recommended a 1/4" rod six feet long. I have a 4 footer and have looked for longer ones but have struck out at Home Depot, Lowes and the other usual suspects. Partly because of this I made the decision at this point to switch to rail buttons since I do have a rail and only one other rocket right now equipped with buttons.
 It took a couple of days before I could get back to
work but when I did, the first thing to do was to drill some holes. In the previous session, I had made four marks at
specified places along each of the premarked fin lines. Now, I had to drill holes at these locations with an 1/8"
bit. This was easily done with a power drill and I drilled a pair of holes on the launch lug line as well. The
instruction was to only penetrate 1/4" and recommended using some type of stop on the drill bit. I just used my
eyes.
It took a couple of days before I could get back to
work but when I did, the first thing to do was to drill some holes. In the previous session, I had made four marks at
specified places along each of the premarked fin lines. Now, I had to drill holes at these locations with an 1/8"
bit. This was easily done with a power drill and I drilled a pair of holes on the launch lug line as well. The
instruction was to only penetrate 1/4" and recommended using some type of stop on the drill bit. I just used my
eyes.
The purpose of drilling the holes in the previous step was to enable the formation of "rivets" from the epoxy to strengthen the fin attachment. I had done this before with low power models but this is the first time I ever tried it with epoxy.
 The instructions said to use 5 minute epoxy and force a little into each of
the holes. A bead of epoxy was then placed along the root edge of the fin. The fin was put in place, and held for
straightness until the epoxy could set up. I gave each fin about 15 minutes before moving on to the next one.
The instructions said to use 5 minute epoxy and force a little into each of
the holes. A bead of epoxy was then placed along the root edge of the fin. The fin was put in place, and held for
straightness until the epoxy could set up. I gave each fin about 15 minutes before moving on to the next one.
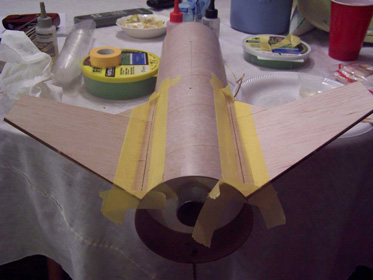
I decided to take care of the filleting while I was at it and decided to use 20 minute epoxy along with a method I had read about. I used making tape the run lines along the BT and the fins for the distance of the fillet. I then dammed up either end with a piece of tape. The epoxy was mixed and poured into the joint with a plastic mixing cup.
I sat back and read for a while, periodically checking the epoxy that was left in the mixing cup. After about 20 minutes, it started to gel. When it stopped running to any extent and was still plastic, I ripped up all of the tape except for the dams at either end.
The jury is still out on this method but, so far, it looks much better than any epoxy fillet I have tried thus far. I only got 1 pair of fillets done in the first session and decided to save the rest until after some sleep.
 Finishing:
The finishing of this rocket is fairly basic. I gave it a coating of Elmer's filler on both the fins and the spirals
and then proceded to sand the stuff off. This was the incident in which SHE WHO MUST BE OBEYED layed down the law and
forever banished my rocketry activities from inside the house.
With the sanding done, I gave it 2 coats of Kilz® primer and sanded it smooth. I noticed when doing this that the spirals were still rather prominent. I should have given it another round with the filler but the chaos of looking for a new venues and dodging the rolling pin caused me not to notice.
After sanding the primer, I painted the entire rocket with Krylon Gloss White®. After it had a chance to dry, I sprayed it again and deemed it ready for masking.
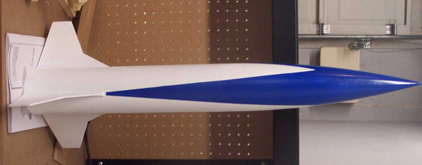
I decided to go with the livery on the facecard. This is a simple but effect blue pattern starting on the nose cone and tapering down to 3 points at the fins. The rocket was masked with Frog Tape and sprayed with Krylon Royal Blue®.
 I waited anxiously to take the tape off. I had been well pleased with Frog
Tape thus far and this was the most serious masking job I had tried it on. It didn't let me down. I peel the tape and
foil off to find no bleeding. There were a coulpe of places where my lines could have been straighter but that was me,
not the tape. Then I noticed a miracle. No matter how I rotated the NC, the lines always matched up. I got it right for
a change!
I waited anxiously to take the tape off. I had been well pleased with Frog
Tape thus far and this was the most serious masking job I had tried it on. It didn't let me down. I peel the tape and
foil off to find no bleeding. There were a coulpe of places where my lines could have been straighter but that was me,
not the tape. Then I noticed a miracle. No matter how I rotated the NC, the lines always matched up. I got it right for
a change!
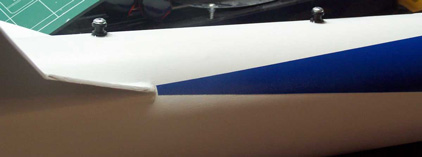 Before putting on the decals, I decided to put the rail buttons in place. I
have only ever used buttons once before and I adopted a procedure similar to what I had used before. Previously, 2
holes had been drilled on the launch lug line. I test fitted the screws and found that, while tight, they did fit into
the holes I had drilled. I mixed a small amount of 5 minute epoxy and used a popsicle stick to force a bit into each of
the holes. I then screwed the buttons down and allowed it to set up.
Before putting on the decals, I decided to put the rail buttons in place. I
have only ever used buttons once before and I adopted a procedure similar to what I had used before. Previously, 2
holes had been drilled on the launch lug line. I test fitted the screws and found that, while tight, they did fit into
the holes I had drilled. I mixed a small amount of 5 minute epoxy and used a popsicle stick to force a bit into each of
the holes. I then screwed the buttons down and allowed it to set up.
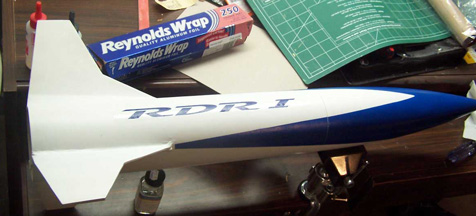 The decals were simple. There were to strips of text reading "RDR 1".
I cut them apart and applied them to the 2 white spaces between the fins opposite the rail buttons. When dry, a coat of
Future meant the rocket was ready to go.
The decals were simple. There were to strips of text reading "RDR 1".
I cut them apart and applied them to the 2 white spaces between the fins opposite the rail buttons. When dry, a coat of
Future meant the rocket was ready to go.
PROs: simple design makes for easy finishing, simple paint scheme looks good.
CONs: some of the spirals are brutal.
Construction Rating: 4 out of 5
 Flight:
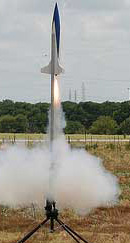
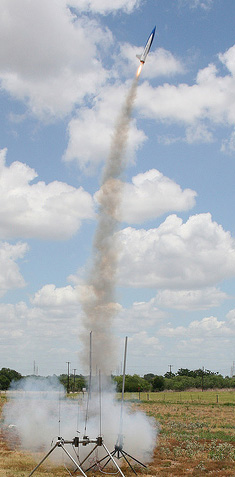
The RDR1 looked good sitting on the launch rail. It was loaded with an F20-4W for its maiden flight and took off
quite handily. It got the requisite oos and ahs and deployed at apogee. It then began a long drift down. It looked good
the whole way down until I realized that it was landing behind a security fence.
I thought I would have to leave it there until Monday to try and get access but a few hours later, we heard some voices. There were some people working at the business and they had gather a few rockets. One of them was mine so I got it back. It had a bit of nicking from landing on the asphalt but was fliable again. I had another F20 so off it went.
The second flight was every bit as good as the first one and a bit more vertical. The rocket again drifted a long way and this time seemed to land in the fence separating the launch field from highway 87. I decided to recover it on the way out later but, again, that did not prove necesaary.
 After a while, a car drove onto our field and the driver got out with my rocket.
He said it was just about to drift onto the hiwhway so he grabbed it. What had fooled me was a red sales pennant in the
fence. I got lucky today and didn't ever have to walk more than a few yards to get this one even though it drifted a
great deal.
After a while, a car drove onto our field and the driver got out with my rocket.
He said it was just about to drift onto the hiwhway so he grabbed it. What had fooled me was a red sales pennant in the
fence. I got lucky today and didn't ever have to walk more than a few yards to get this one even though it drifted a
great deal.
I never did get a chance at a third launch but it will fly again.
Flight Rating: 4 out of 5
Summary:
I like this rocket. Even the balsa fins don't bother me as much as I thought they would although I wish they were a
bit tougher. It flies well and is not too difficult to build. It would be a great intro to mid power.
Overall Rating: 4 out of 5
 |
 |
Flights
Sponsored Ads


|
|