Merlin Missile Solutions The Sword
Merlin Missile Solutions - The Sword {Kit}
Contributed by Chan Stevens
| Construction Rating: | starstarstarstarstar_border |
| Flight Rating: | starstarstarstarstar_border |
| Overall Rating: | starstarstarstarstar_border |
| Diameter: | 1.80 inches |
| Manufacturer: | Merlin Missile Solutions  |
| Style: | Sport |
 Brief:
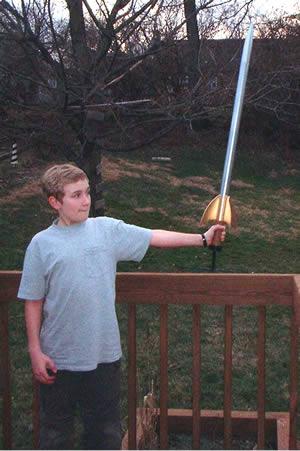
A very unusual design from a new entrant into the rocketry field, this sword is
definitely going to carve a niche for itself. With its sweeping curved fin
pattern, the RSO could easily mistake this rocket for an attempt on his life,
so brandish this one with care.
Construction:
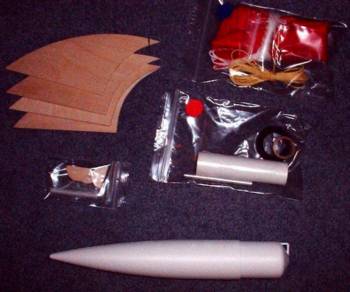
The kit arrived a couple days after ordering, carefully packaged in a good sized box. Components were complete, and very good quality.
The parts list includes:
- 34" BT60 body tube
- 4 large pre-cut plywood fins
- 4 smaller pre-cut plywood fins
- 1 LOC/Precision resin cast nose cone (8")
- 24mm motor tube, centering ring set
- 18" Top Flight chute
- 12 feet of heavy-duty Kevlar®
- templates, launch lugs, etc.
- Limited edition color header card (mine was #6 of 50)
The instructions were clear and fairly easy to follow. Most of the construction techniques are high-power oriented, so if your experience is strictly modrocs, this will be a bit of a stretch.
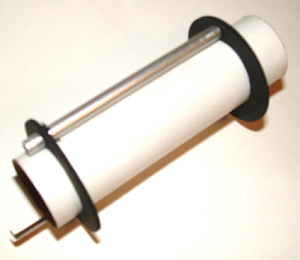
Construction begins with the motor mount assembly. Merlin has come up with an innovative shock cord retention technique that adds some complexity to this. Most of the better kits today call for anchoring a Kevlar® loop around one of the centering rings. This can make replacement difficult should the cord ever wear or fray. Merlin's innovation to this is to bond a small metal tube along the motor tube, thread the Kevlar® through this, and then tie the Kevlar® to a retaining clip which can be unscrewed later for easy replacement (see photo).
The motor mount assembly includes an E-sized clip, motor block, and a
couple of centering rings which must be drilled to accommodate the metal tube.
Since the holes can be difficult to line up, I drilled both at the same time
(warning--there are two different sized holes, so drill the smaller dimension
first if you try this, then open up one of the rings to the larger diameter).
 You'll need some uncommon drill bits for this--5/32" and 13/64",
though 7/32 could work for the larger. The centering rings are epoxied in place
(with the metal tube inserted for alignment), then the metal tube is epoxied.
One potential "gotcha" on this - before epoxying the metal tube, the
instructions suggest chamfering the end. Note that there is a big hole and a
small hole, and you want to chamfer the big hole (which goes forward). The
smaller hole is for the shock cord retaining screw, and must go on the aft end.
You'll need some uncommon drill bits for this--5/32" and 13/64",
though 7/32 could work for the larger. The centering rings are epoxied in place
(with the metal tube inserted for alignment), then the metal tube is epoxied.
One potential "gotcha" on this - before epoxying the metal tube, the
instructions suggest chamfering the end. Note that there is a big hole and a
small hole, and you want to chamfer the big hole (which goes forward). The
smaller hole is for the shock cord retaining screw, and must go on the aft end.
The fins were cut from very nice 1/8" birch plywood, and after a light sanding, I tacked them on with thick CA. I chose to only lightly round the leading edge, figuring an airfoil would be practically impossible to sand into this pattern. For those of you who like alignment fixtures, this kit is right up your alley - there are templates that can be glued to cardboard stock, with slots for the fins and body tube, which can be used for perfect fin alignment. I went the quick route, marking fin lines at 90-degree angles and eye-balling the alignment. Fins are filleted with epoxy, making this a very durable bird.
The big fins are mounted 10" up from the aft end, and there are 4 tiny nub fins mounted flush to the aft end, which provide the visual effect of the sword handle.
There are 2 3/16" launch lugs to mount, though my particular set of instructions failed to call out where to draw the mounting line (this has since been corrected).
Shock cord attachment, as previously noted, is pretty unusual. After feeding one end through the metal tube on the motor mount, the other end (sticking out the back of the rocket) is knotted, then fed through a small clip, which is then screwed to the metal tube. The result is a good, stiff retention, though easily offering portability and ease of replacement. The Kevlar® was supplied in a very generous 12-foot length.
Construction is wrapped up by loading the chute and attaching the nose cone. The instructions point out that the nose cone might need some masking tape to offer a snug fit. In my case, that was an understatement, as the nose cone was almost 1/4" smaller OD than the ID of the tube. I applied a lot of masking tape, and would suggest using a BT60 tube coupler for a better fit.
This was a very easy kit to build, and it was ready to paint after only about 5 hours spread out over 4 evenings, with the epoxy fillets being the most time-consuming portion of the build.
Finishing:
I decided to fill the tube spirals with Elmers Fill N Finish (who wants to see grooves on the sword blade?). With a 34" tube, that's a good bit of work.
The finished product calls for at least 3 colors, so the paint is a lengthy process, but well worth the work. I applied two coats of gray primer, followed by a base coat of Rustoleum Silver Metallic to the whole rocket. I then painted the lower handle portion a dark brown. After the brown had dried, I masked it off and masked off the upper silver portion, painting the large fins a gold metallic. The bottom nub is also supposed to be gold, but I went with black (wasn't paying close attention, and will probably touch it up with gold after a few flights).
Construction Rating: 4 out of 5
Flight:
Weighing in at over 8 ounces, I was very surprised that a D motor would even be considered, so I opted for an Estes E9-6. Lift-off was smooth, and the long, slow burn offered plenty of time to enjoy the very good flight. I flew in roughly 8mph winds, so the sword weathercocked a bit, but not too much. After a flight of 300-400 feet, it arced over and deployed nose-down just past apogee. I think this would also do well on a 4-second delay.
Recovery:
The bright red Top Flight chute came out fine, bringing the rocket gently back to the field. It's a very nice chute, and a pleasure to watch gracing the sky. On my flight, the Kevlar® created a very minor zipper, which I have since repaired. Reinforcing the inside of the tube with CA would have been a good idea...
Flight Rating: 4 out of 5
Summary:
This is a very impressive rocket, that's either a small HPR-type bird or a very heavy-duty modroc (I can't quite decide what it wants to be). It's definitely got an eye-catching design, and is absolutely top-notch quality.
Look for more innovations from this up and coming company.
Overall Rating: 4 out of 5
 |
 |
Flights
Sponsored Ads

|
|