| Manufacturer: | U.S. Rockets  |

(Contributed - by Peter W. Clay)
 Interroc, at 43"
long, 2.25" diameter, weighs only about 9 oz empty and is not too heavy
for a D12-3, but can fly with a 29mm motor or a cluster of 24mm motors as well,
because of the "host mount" arrangement. It has a huge open payload
section. For the two-stage version that is seen on USR's logo, check the
Advanced Model Rockets button in the online website: it's called AR-2B and
apparently trades off the host mount feature for the booster stage..
Interroc, at 43"
long, 2.25" diameter, weighs only about 9 oz empty and is not too heavy
for a D12-3, but can fly with a 29mm motor or a cluster of 24mm motors as well,
because of the "host mount" arrangement. It has a huge open payload
section. For the two-stage version that is seen on USR's logo, check the
Advanced Model Rockets button in the online website: it's called AR-2B and
apparently trades off the host mount feature for the booster stage..
This kit came to me free as a prize in DesCon V. It arrived promptly and in perfect condition by US Mail, packed in plastic peanuts in a long white cardboard box, heavily taped.
Large Model Rocket, not High Power Rocket
 Construction is strictly "model rocket" throughout -- note that
USR has a separate line of high power rockets with heavier parts. Interroc's
tubes are fairly thin, though thicker than Estes, with a white glassine
covering. The nose cone is a balsa ogive, although the illustration on the USR
website would seem to indicate an elliptical shape. The fins are Lite-ply, and
are surface mounted using yellow glue: in fact, I used yellow glue throughout
and no epoxy at all on this rocket. The "host mount" motor mount
arrangement precludes any kind of TTW fin mounting. The coupling between the
main body and payload tube consists of a tube coupler with a plywood bulkhead
glued on the end, rather than fitted inside, an arrangement I found
uncomfortable. Personally, I like the light construction, in keeping with the
NAR safety code; others may not, especially if they are accustomed to HPR.
Construction is strictly "model rocket" throughout -- note that
USR has a separate line of high power rockets with heavier parts. Interroc's
tubes are fairly thin, though thicker than Estes, with a white glassine
covering. The nose cone is a balsa ogive, although the illustration on the USR
website would seem to indicate an elliptical shape. The fins are Lite-ply, and
are surface mounted using yellow glue: in fact, I used yellow glue throughout
and no epoxy at all on this rocket. The "host mount" motor mount
arrangement precludes any kind of TTW fin mounting. The coupling between the
main body and payload tube consists of a tube coupler with a plywood bulkhead
glued on the end, rather than fitted inside, an arrangement I found
uncomfortable. Personally, I like the light construction, in keeping with the
NAR safety code; others may not, especially if they are accustomed to HPR.
Safe high power construction for this rocket, IMHO, would involve fiberglass or other reinforcement, which would neutralize its basic character as a large, light, "finesse" structure.
Nose Cone
The large balsa nose cone was one of the pleasant surprises that came in this kit. I've gotten so used to plastic ones that I had almost forgotten what nose cones are really supposed to be made of. Incidentally, because of the thinner body tube, this nose cone is NOT interchangeable with 2.14" HPR nose cones. It was well made from a medium to hard grade of balsa and took a nice finish. It fits so smoothly in the tube that, when you push the cone into the payload quickly, air pressure pushes it partway back out.
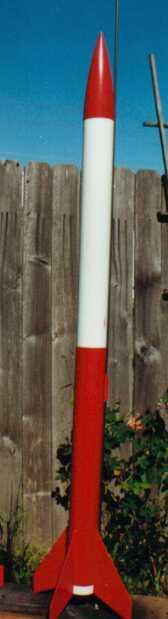
Separation Point
The sep point (marked in photo at right, courtesy of my six-year-old drawing circles with a marker) is at the midpoint of the body tube; that is, the booster and payload tubes are of equal length. This struck me as structurally questionable, and also I would have preferred more parachute space and less payload, especially since I won't be flying payloads in this rocket. Then again, the low sep point does provide a lot of payload for those who want it; it reduces the moment of rotation for the booster section, reducing the chance of zippering the thin tube; it allows the rocket to be shipped and stored in a shorter box; and it makes it unnecessary to splice tubes together into a longer-than-standard length. It would be easy to splice the tubes at this coupler and blow the nose cone directly, if you prefer that arrangement.
The Host Mount
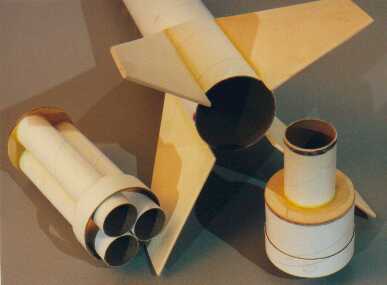 The motor mount is a
module that plugs into the back of the rocket as an adapter. The kit includes a
single 29mm mount, a cluster mount for 3 24mm motors, and a 24-in-29 adapter,
which curiously had its own packaging and was not mentioned in the
instructions, as if it were an afterthought. The instructions hint that mount
kits are or once were available for a single short 54mm, a 38mm, a 24mm, and
for a cluster of four 18mm; however, these kits were not listed on the website
and may or may not remain available by special request. I think four C6-5's
would give this thing a really nice flight.
The motor mount is a
module that plugs into the back of the rocket as an adapter. The kit includes a
single 29mm mount, a cluster mount for 3 24mm motors, and a 24-in-29 adapter,
which curiously had its own packaging and was not mentioned in the
instructions, as if it were an afterthought. The instructions hint that mount
kits are or once were available for a single short 54mm, a 38mm, a 24mm, and
for a cluster of four 18mm; however, these kits were not listed on the website
and may or may not remain available by special request. I think four C6-5's
would give this thing a really nice flight.
Replacement and scratch-building parts are also absent from the online catalog, and I wonder what I'll need to do if I buckle a body tube.
Motor Retention
Motor retention is by taping motors to the ends of the MMT's, but more importantly, the adapter is installed in the host mount the same way. Because of fin position, it's not possible to apply one solid wrap of tape around the base of the body. You have to use four short strips, and it had better be quality tape. I found myself wishing that some sort of pin or hook was in place to do this job. In flight, the outer mount was "no problem," but the cluster taping arrangement suffered a lot of heat damage, and one of the D12's was just barely retained: I pulled it out easily after recovery..
Plywood Parts
Fins are nicely cut and were tightly taped together to prevent warpage. The soft inner layer of the Lite-ply did require some edge repair when finishing.. Internal plywood parts were die-cut and were crushed and splintery around the edges. This proved to be no problem at all after assembly. Some parts required a bit of sanding to fit properly. There was one extra part, a perforated bulkhead that might have been part of an ejection baffle, that was not referred to in the instructions.
Parachutes and Shock Cord
The parachutes that came in this kit are paper (two were provided). Some other USR kits supply a very basic cloth 'chute. Both work, but both look to be token efforts; anyone serious about their parachutes will easily find or make a better one. The paper ones, on the positive side, are very lightweight and extremely interesting, and one has worked fine in three flights.
The shock cord is an ample length of 5/16" wide braided polyester elastic. This is clearly not up to HPR standards, and doesn't look very adequate for clusters, either. I left it in there, though, because I wanted to evaluate the kit in its completely stock form, and because the minimal shock cord is one of the features which together serve to keep the weight down. I have a heavier rocket which has flown many times with a similar cord, so I expect it to be satisfactory under nominal conditions.
Motors
I will be flying my Interroc with Estes and Aerotech motors, and F20-7 Econojet proves to be an excellent match for it. I would not recommend more than about 125 n-sec for this bird without reinforcement of the tubes. That would take you to a "baby G" or a cluster of E15's. Motors up to H80 are recommended by the manufacturer, which I consider excessive but have not tested.
The motors offered by USR are not NAR certified, and their performance, origin, and legal status is unknown to me as I write this; and in any case it is outside the scope of this review.
Instructions and Literature
Instructions were clear and well-written, on two double-sided 8-1/2 x 11 sheets. The front appears to be color bubble-jet, the remainder offset or possibly good photocopies. This gives a good opportunity to add color and new information on the front page of an economical stock sheet. There were a few points where updates were incomplete, and an occasional tinge of irrationality.
To me, the most interesting line was this one: "With the optional 38mm Interchangeable Motor Mount, the speed of balsa is yours for the discovery." (And well within the range of any 38mm motor I know of.) Also notable -- and extremely interesting -- was the included Ace Information Report set "By Jerry Irvine and Korey Kline, Copyright 1984." It covers motor installation, clustering, and staging. Lest you doubt, it's good reading: full of sound technique but a bit heavy on the Thermalite. Had it been written more recently, I'm sure there would have been more emphasis on electronic methods..
The date on the report set me wondering if the whole kit was that old. It did give the impression of having been in storage for a while, but if so, was none the worse for it.
Several black-image decals were packed with the rocket, not in the package but thrown into the plastic peanuts. There were decals for several USR kits including AR-2B but curiously none that said "Interroc." There were no instructions for the unusual-looking decals and I haven't attempted to use them. I believe they are waterslide decals made on an ink-jet or laser printer. They appeared to have been cut with scissors from a larger sheet.
Mods
I wanted my Interroc stock and made only a couple of very minor changes. I peeled a strip of glassine from the body where each fin attaches. I also put a hefty screw eye in the base of the nose cone, drilled two small holes in the bulkhead at the base of the payload, and ran a loop of braided nylon shoelace cord through those holes to connect the nose cone directly to the shock cord. This took some of the potential stress off the bulkhead and also provided a safety line in the event the nose cone should become separated from the payload tube in flight. (With the payload built "airtight" and a lot of power underneath, the stock rocket is a candidate for pressure differential separation of the nose cone.)
Flight Report
I flew the Interroc twice on April 15, 2000. The first flight was on an Econojet F20-7W, and it was awesome!Due to the light weight construction of this rocket, it got off the pad quickly and easily and put up twice the flight I was expecting. Ejection was just after apogee. The paper parachute worked quite nicely, thank you, and the Interroc came back to me undamaged and begging for more.
So, for the second flight, I packed up a cluster of three Estes D12-5's. All three motors fired. The three together are less total impulse than the single F20, but the Interroc climbed away smartly anyway, still climbing at ejection.Once again, the paper parachute worked very well. The cluster mount suffered some cosmetic heat damage at the nozzle end, but there was no other visible damage.
The third flight was at Brothers, OR, May 21, 2000, on a single D12-3. I wanted to find out if a single D would give it a reasonably safe flight. No problem: good, smooth, impressive flight, not extremely high but certainly adequate. Again, the paper parachute worked fine, although this time one fin broke loose on landing. (This was easily repaired.)
Value
Interroc is a bit spendy for a model rocket at close to $40, but it's a large rocket with some uncommon features, especially the large balsa nose cone and the multi-option "host" motor mount. If you build this rocket you will learn some unusual techniques and see a different approach to rocket design than is common either in Estes kits or in HPR. In some respects it is a throwback to the sixties, in others it is innovative even today. I call it a moderately good value, not quite a bargain, but an insightful build worth the effort.
 |
 |
Flights
Sponsored Ads


 Pullover Hoodie.")


|
|