| Construction Rating: | starstarstarstarstar_border |
| Flight Rating: | starstarstarstarstar |
| Overall Rating: | starstarstarstarstar |
| Manufacturer: | Clone |
Brief:
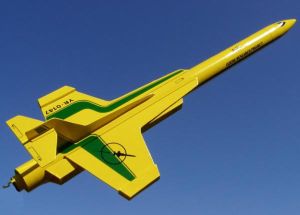
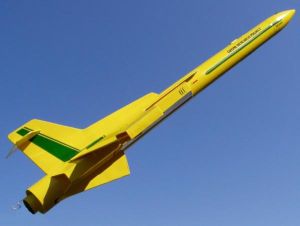
Over a period of seven months, I have been busy cloning a set of truly classic Centuri kits. Finally, the ESS Raven represents the last installment in my endeavor to bring back to life all four of these amazing Centuri Super Kits.
The ESS Raven is a single stage model rocket that recovers in Centuri’s signature dual parachutes horizontal recovery configuration. The original kit was classified as a skill level three kit.
As described by Centuri in their 1977 Catalog:
 "The E.S.S. Raven is the proud flag ship of the Earth Science Service (E.S.S.). The Service was founded in 1981 when leading scientists united in a world federation that cuts across national boundaries and politics. The E.S.S. Raven has pushed the frontiers of science ever outward with recently announced Faster-Than-Light drive and the rumors of time travel! The Raven is part of the E.S.S. Ozone Research Project, which tests the upper stratosphere. Based somewhere in the Sierra Mountains, the Raven can fly to the very limits of the atmosphere. The huge lower scoop gathers air samples to be analyzed by the vast shipboard computer buried within the huge vessel."
Imagine, how many youngsters in 1977 jumped on the opportunity to fork out nine bucks to get their sweaty paws on this classic! Amazingly, what seems to me to be the most popular of the four Super Kits, the Raven is probably the least expensive to clone in 2004 dollars.
Construction:
First stop in the construction process will again take you to JimZ's web site to download the very large instruction set. Like the previous Super Kits, all fin templates, parts list, and decal files are included in the instructions.
Like the SSV Scorpion, this kit utilizes the .055" card stock for all fin parts. With all the Super Kits requiring similar core parts (excluding nose cones), I will make a quick listing of suppliers:
- .055" card stock - Matting board available at local Hobby Lobby.
- Centuri Sizes Tube Supplier - Semroc Aeronautics Corp.
- Centuri Nose Cone Supplier - Mike Schmidt of Moldin Oldies. Mike sells the main nose cone for a modest eight dollars plus shipping. I recommend buying two, because you know you are going to build another of these amazing Centuri kits. Mike does a great job, but please be patient and remember that this is Mike’s hobby.
As in my past clone projects, I transferred fin patterns to the matting board using carbon paper. Here is the list of parts need to clone this great kit:
- 1 PNC-165 nose cone / cockpit
- 1 ST-16 Upper body tubes 12" (BT-60)
- 1 ST-16 Lower body tubes 13" (BT-60)
- 2 wood dowels .088" diameter x 12" length
- 1 launch lug 8" long, 7/32" diameter
- 1 ST-7 body tube 3.0" (BT-20 or Magnum "D" conversion with BT-50)
- 1 coupler HTC-13 1.5" (BT-56 Coupler Semroc Corp.)
- 1 fiber die-cut sheet 1.75"W 7.25"L .025"T (Trace from pattern)
- 1 TR-7 thrust ring .4" long (Standard thrust ring for 18mm Motor)
- 1 EL-1 engine lock (Standard Estes Engine Hook)
- 1 die-cut fiber sheets 5"W x 12.5"L x .055"T wing & stuff (Picture matting board or 1/16" balsa)
- 1 die-cut fiber sheets 5"W x 15"L x .055"T wing & rudder (Picture matting board or 1/16" balsa)
- 2 die-cut fiber sheets 6"W x 12"L x .016"T ducts & scoops (Poster board)
- 1 decal sheet 6" x 12.5"
- 1 shock cord .125" x 38"
- 2 20" parachutes
- 128" of shroud line
Instructions are clear and easy to follow. Be careful that your printer isn't scaling to fit the wing pattern on 8.5 x 11 sheet of paper. I had problems with this when printing the patterns in Windows XP picture viewer. Bottom line, both pattern sheets require an 8.5 x 14 legal size paper to be properly scaled and printed out on one sheet.
After transferring the fin tracings, I free hand cut out the two sets of the tracings with a very sharp pair of scissors. I then soaked the entire fin matting board parts in thin CA to stiffen them. After that I cleaned the edges of the parts on a belt sander. The instructions also suggest cutting these parts from 1/16" sheet balsa. I chose not to use balsa because of its lack of durability.
Side inlet ducts, wing ducts, and the center lower body duct are folded from a piece of standard poster board. Two important issues concerning poster board color and folding methods need to be addressed prior to making the poster board parts.
First you should consider color of the poster board you will be using to make these ducts. Once folded and glued into place, these ducts are very difficult to get a good coating of spray paint inside their length. That leaves a couple of choices:
- Tape and pre-paint before gluing them into place, (not my favorite choice as I struggle with assembling the new Estes Outlander).
- Pick a benign color like white, black, or your finishing color of poster board to make the ducts. Then you wont need to worry about getting a good coating of paint down into the depths of the ducts.
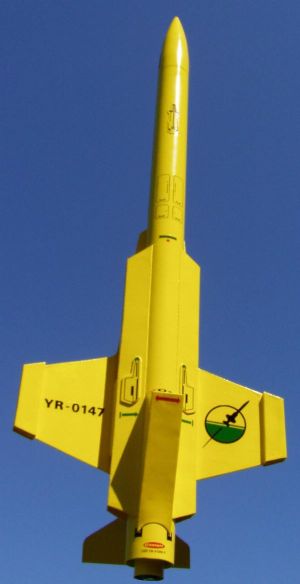
Choice B was what I settled with. I used a florescent red and green poster board. Properly locating the red ducts and green ducts according to aeronautical standards. Then I hit each inlet with the best coating I could without running the paint. The florescent material causes a slight red and green glow to emit from each duct. The eerie glow is a great visual effect that I really liked in the finished model.
Making these intricate folds cleanly can be challenging without a folding aide. I was able to achieve clean folds by folding over a twelve-inch metal ruler that had a semi-sharp edge. I would recommend using some sort of similar device and avoid free hand folding the poster board.
As in my previous attempts, I addressed the need for an 8" launch lug by using another 3/16" x .014 seamless aluminum tube purchased in packs of three from Hobby Lobby. Unlike the other three Super Kits, no cutting is required because it is mounted inside the side duct out of view.
Finishing:
Prior to writing the finishing part of this review, I considered just copying what I wrote from the SSV Scorpion review. In my opinion, the ESS Raven and SSV Scorpion have most of the same issues to deal with concerning the finishing process.
The most important step to a good finished coat is a good prime coat. As in the past, I first sprayed every thing with three coats of primer/sealer paint. My personal favorite is Kilz. This is what helps the matting boards finishing characteristics excel. I then sanded this before painting with a finishing color.
I chose to finish the ESS Raven in its original Centuri color of Yellow. This choice was driven by the decals and my desire to not have any color conflicts with paint and decal colors. For the most part, painting the Raven is easy. The only painting issues I addressed in the construction area on making the ducts. Patience is a necessity if you wish to get a good coat of paint down into the length of each inlet.
For decals, I printed my own on inkjet decal paper available from several vendors on the Internet. Unfortunately, a clean copy of the decals was not already available on Jim Z’s web site. For this I turned to the expert graphic skills of fellow rocketeer and master Outlander builder, Emmanuel Camburako. Emmanuel was able to clean up a set of the Raven decals and they are now available for all on the Ye Olde Rocket Shoppe web site. Thanks Emmanuel!!!
Even with a clean decal file in hand I was faced with a dilemma when trying to print a set. This decal file for the Raven is long, and requires a sheet of legal size decal paper to fit the set all on one sheet.
Searching the Internet for a supplier of legal size decal paper was unsuccessful. Best I could find was a supplier that sold water slide decal paper in a size that could be cut to legal size to fit in the printer. Unfortunately, this size paper is extremely pricey. The smallest quantity of this size paper will set you back a painful fifty dollars plus shipping.
Not willing to suffer to that extent I decided to break the decal into two parts and print it on two standard sheets of decal paper. The downside is that the three longest decals required a break and will need a union on the finished model. With a little care in cutting and placement I was able to mate the two halves in a union that only a critical eye will notice. The upside is I saved fifty-six dollars.
Again the only application issue of concern is removing the trapped bubbles while avoiding any stretching. Past experiences help improve on these areas. Again, keeping the application surface wet and blotting the bubbles away can minimize both issues.
Construction Rating: 4 out of 5
Flight:
Like all the original Super Kits, original specifications call for a C5-3S or C6-3. Weight considerations again forced me to perform a "Magnum D" conversion on the ESS Raven. Even though the Raven proved to be a little too hefty for an Estes "C" 18mm motor, I wasn't ready to ram a D12-3 in it for the first flight. I think the new Estes C11-3 24mm motors will be perfectly suited for it’s maiden flight.
Preparation is easy with the built in Centuri baffle design. However, I will add a few sheets of wadding to protect against anything that might slip past the baffle. Motor retention is by the standard Estes Engine hook.
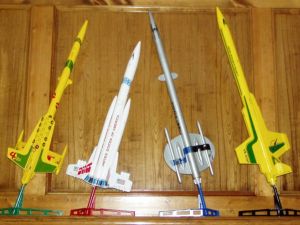 Having successfully cloned all four of the Centuri Super Kits, I think it’s now time to line them up and see how they fly. Flights for all are scheduled as soon as time off allows. Follow up flight photos and descriptions will hopefully be submitted in the near future.
Recovery:
Like all the Centuri Super Kits, the recovery harness is quite complex and unique. I chose to use the recommended horizontal recovery method illustrated in the instructions. Care should be taken to route the external recovery string over the top of the horizontal stab so that it doesn't snag on the stabilizer when the chute deploys.
Flight Rating: 5 out of 5
Summary:
Sorry to repeat myself, but I love these Super Kits! I am still crossing my fingers hoping that some Internet rocket kit provider will develop a reproduction of these kits for the public. Until then, the ESS Raven represents a simple cloning project of what many consider, the most popular of the four kits.
Overall Rating: 5 out of 5
#Related Reviews
Related Products
 |
 |
Bill Eichelberger (January 23, 2012)
Awesome! I always wondered if you ever flew these birds. Great to see that you finally gave them a shot at glory. Any pics or movies?
Sponsored Ads


|
|
Larry Zeilmann (November 29, 2011)
After a rather long break from rocketry, I decided it was time to let this rocket fly. I have log dreaded flying this because of the complex dual chute recovery system, So on a warm October da, almost 7 years after I had built it, I loaded t with a D12-3 and launched it to the sky. Surprisingly, it was a textbook flight and recovery! The rocket recovered beautifully on the signature Centuri dual chute horizontal recovery system.