Scratch Devil Ray Glider Original Design / Scratch Built
Scratch - Devil Ray Glider {Scratch}
Contributed by Todd Mullin
| Manufacturer: | Scratch |
Brief:
I love gliders! What I hate is pop-pods, ejecting motor pods, burn threads, and motor casings being spit out all over
the launch field!
I'd thought a lot about how to make a rocket glider design that deals with the things that I hate. Edmonds Aerospace came up with a great piston design for their Ecee models, but the plunger tends to gunk up over time. Don't get me wrong, it's a great design and I fly my Ecee Thunder more than any other rocket in my fleet, but I knew that there had to be a better way.
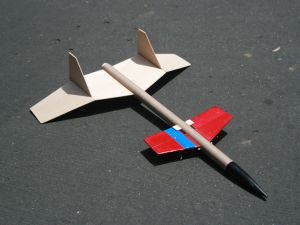
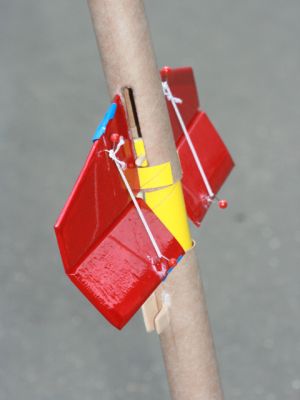
My Devil Ray glider design utilizes a telescoping nose design to actuate the elevators on the canards. On boost, the elevator is held in place by a set of retaining tabs. At ejection, the nose is pushed forward by the charge, pulling the elevators free of the tabs and they are pulled into position with elastic thread. The ejection charge is vented from the top of the airframe to help the rocket to transition from vertical to horizontal flight.
Construction:
The parts list:
- 1 18" BT-50
- 1 Plastic Nose Cone (scrounged from my parts bin, originally from my crashed Estes Echostar)
- 3 BT-20 to BT-50 centering rings
- 1 BT-20 motor tube
- 1 Yellow Quest motor spacer tube
- 1 6" 1/8" hardwood dowel
- 1 4" x 36" x 1/8" balsa
- 1 package elastic thread
- 4 straight pins
As this is a scratch build, the only instructions I had were from the little voice in my head. I ignored the part about giving up rocketry and moving to Cleveland and forged ahead. I sketched out my idea in AutoCAD after thinking it through for several months. I showed these initial sketches to a couple of glider people and a couple of rocket glider people as well. After incorporating some of their ideas, I started construction.
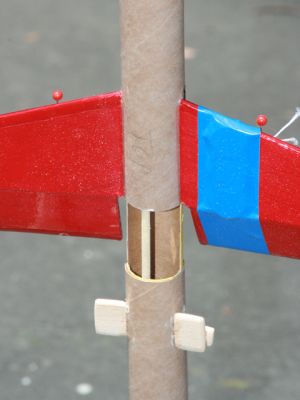
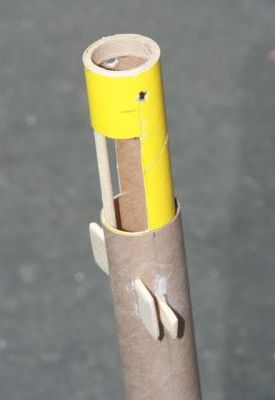
By now, you undoubtedly know how a motor mount goes together, so I won't go through that end of the glider. The interesting stuff is at the other end anyway. I trimmed about 6" of BT-50 from the overall length to use as the sliding section of the nose. I then cut the openings out that are serving as the sliding guides from the nose section of tube. I bored holes into the yellow spacer tube to allow a piece of dowel to go through the slider area to retain the nose section after ejection. I then cut the vent opening into the spacer tube and reinforced it with a centering ring at the front and a dowel in the middle of the vent to keep the tube from collapsing on a hard landing. The spacer tube was then glued in place in the main airframe.
I covered and hinged the canards and elevators with Monokote. These were then glued to the sliding nose section at a slight dihedral. I carefully glued the retaining tabs for the elevators on next, making sure that they would be straight on boost. Next came the wings and rudders. The wing was cut as multiple pieces as it was too wide to be cut from a single width of 4" balsa.
Finishing:
The only finishing that I did on the Devil Ray was sanding and Monokote on the elevator/canard assembly. The glider
came in at a reasonably heavy 2.6 ounces dry weight before trimming, and I added more weight to get the trim correct as
well so I didn't want to add more weight with paint.
Trimming this model proved to be somewhat troublesome. The left wing, even though it was cut from the same sheet of balsa as the right, weighed substantially more. After a good bit of sanding and by adding 3 washers to the right side of the canards, it balanced fairly well laterally. I still found that the glider stalled a bit on the test glides, so I added 1 small lead diving weight pellet to the nose and the stall problem was corrected.
In my test glides, I found that the flat bottom wing that I had designed along with the small amount of dihedral on the canards wasn't enough to keep the glider from rolling over in the slightest cross breeze. Once it dropped a wing tip, it invariably stalled out and crashed to that side. I corrected this by cutting off and dropping the wing tips down to approximately a 30 degree angle, which suggested the look of a devil ray.
Flight:
From the weight of the rocket, the EMRR max
liftoff weight calculator said that I needed to use a motor with at least an average thrust of 4.5 newtons. This
ruled out the Estes B4-2 that I was planning as my motor.
My next choice of motor was the Estes B6-2. I was a little leery about using a motor this small on a rocket of this size, but I was also concerned about the glider moving too fast so that the elevators wouldn't have enough spring to be pulled into place against the air stream if I went to a larger motor.
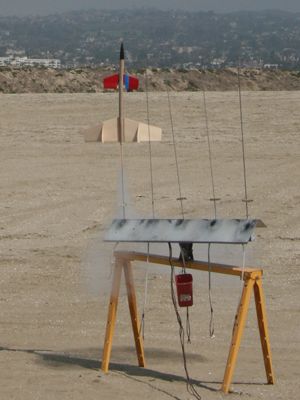
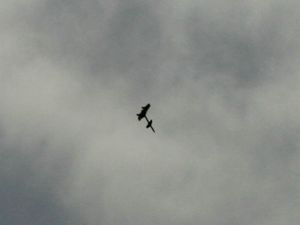
I looped the elastics onto the pins on the elevators, loaded my first motor, and loaded the glider onto the pad. The boost arched over but it still reached reasonable altitude before deploying. The glide was fast and reasonably smooth, circling around the flight line. Unfortunately, the landing was equally fast and one of the wings snapped off on landing.
 The wing was easily CAed back on and the Devil Ray was prepped for another
flight. The second flight was on a B6-2 again. The model weathercocked a bit more on the second flight than the first
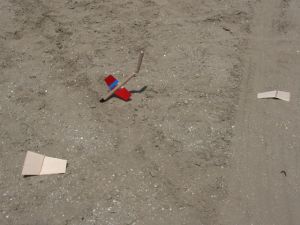
as the wind was picking up slightly. This time, however, at ejection the elevators failed to deploy and the glider
didn't. The lawn dart folded the airframe in half and snapped off both wings this time. The elevator and canard system
survived despite being the end that actually hit the ground.
The wing was easily CAed back on and the Devil Ray was prepped for another
flight. The second flight was on a B6-2 again. The model weathercocked a bit more on the second flight than the first
as the wind was picking up slightly. This time, however, at ejection the elevators failed to deploy and the glider
didn't. The lawn dart folded the airframe in half and snapped off both wings this time. The elevator and canard system
survived despite being the end that actually hit the ground.
Recovery:
The first glide of the Devil Ray was surprisingly good for a new glider. Usually it takes a few flights to get the
trim right for me. I was quite pleased with the performance of the deployment system and it seemed to take no wear and
tear from the flight.
Summary:
The Devil Ray was exactly what I was looking for in a glider. Easy recovery with a minimum of prep and re-prep time
without shooting motor casings everywhere or a pop-pod. I liked the look of the design even though there were some
inherent stability issues for its glide recovery. I believe that I will redesign the tail/wing section of the glider
before rebuilding.
Sponsored Ads


 |
 |