| Construction Rating: | starstarstarstar_borderstar_border |
| Flight Rating: | starstarstarstarstar_border |
| Overall Rating: | starstarstarstarstar_border |
| Manufacturer: | Centuri |
| Style: | Multi-Stage |
Brief:
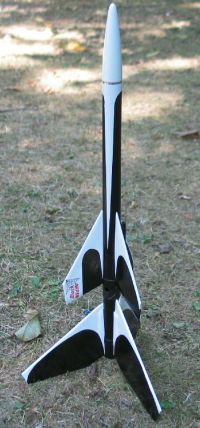
A clone of the classic Centuri two-stage Black Widow using Semroc parts. The
"unique gliding booster" feature is a great crowd pleaser. Semroc has
all the parts including the outside passport stage coupler with pre-drilled
holes, decal, and a beautiful set of laser-cut fins that includes the balsa fin
fillets for the booster.
Construction:
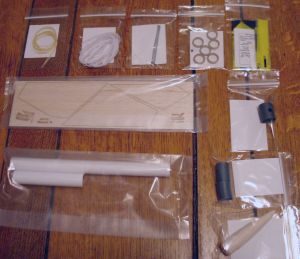
Parts list with Semroc part numbers:
- 1 BC-733 Balsa Nose Cone #7 3.3"
- 1 CP-12BY Chute Pak - 12"
- 1 EC-118 Elastic Cord 18"
- 1 FV-5 Black Widow Laser-Cut Fins
- 2 HTC-7 Tubing Coupler #7 1.0" Long
- 1 HTC-7B Tubing Coupler #7 Outside 1.0" Long
- 1 Engine hook
- 1 SCK-24 Kevlar® Thread 100# 24"
- 1 ST-740 Body Tube #7 4.0"
- 1 ST-790 Body Tube #7 9.0"
- 1 TB-7 Thrust Block #7
- 1 Black Widow decal
I also used a fiber engine hook lock ring that goes outside the #7 booster BT. This is mylar in the original kit.
 I
followed the instruction found on Jim Z's site. It is a straightforward build.
In Step 2, I cut one of the 1" couplers to 1/2" to duplicate the
original's 1 1/2" coupler. One major correction: in step 3, do not use the
1 1/4" measurement for the engine hook lock ring. Instead, lay one of the
laser-cut booster fins against the BT with the rear edge flush with the rear of
the BT and mark where the fin cut out is on the BT. I used the measurement and
the fins didn't line up so they were too far forward. I wound up lopping off
1/2" of the booster on my next try, figuring the length of the BT was
wrong (don't ask, it's a long story) and this cost me some scorching on my
first flight. The 4" length is correct--it's the lock ring measurement
that is wrong on the instructions.
I
followed the instruction found on Jim Z's site. It is a straightforward build.
In Step 2, I cut one of the 1" couplers to 1/2" to duplicate the
original's 1 1/2" coupler. One major correction: in step 3, do not use the
1 1/4" measurement for the engine hook lock ring. Instead, lay one of the
laser-cut booster fins against the BT with the rear edge flush with the rear of
the BT and mark where the fin cut out is on the BT. I used the measurement and
the fins didn't line up so they were too far forward. I wound up lopping off
1/2" of the booster on my next try, figuring the length of the BT was
wrong (don't ask, it's a long story) and this cost me some scorching on my
first flight. The 4" length is correct--it's the lock ring measurement
that is wrong on the instructions.
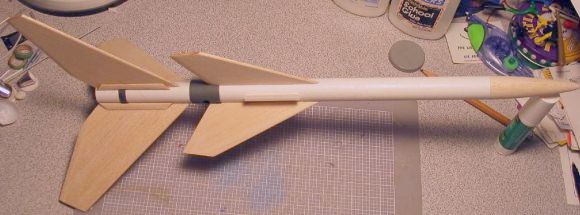
The rest of the assembly went easily. The instructions have handy fin guides. Make sure you use the correct one for each stage. The booster fins are offset slightly to allow the gliding recovery. Sanding the balsa booster fin fillets takes a bit of time, but they really add to the strength of the booster. I also used the more modern method of attaching a line of Kevlar® thread to the upper stage engine block and attaching the shock cord to that. You'll need to stack the 1" and 1/2" couplers inside the booster BT. Semroc has the passport staging outside coupler pre-drilled with two vent holes. Make sure one of the holes is not directly beneath a fin on the upper stage or you will get scorching. It's tricky to line the holes up with two holes and three fins. I would also recommend soaking the inside of all the stage couplers with CA for durability. The top of the booster BT needed a good amount of sanding down to get a not too tight fit inside the stage coupler.
Finishing:
I really wanted to duplicate the catalog picture and it was a challenge. After
applying a couple coats of Elmer's Fill 'n' Finish to the spirals and fins, I
gave it two coats of primer, masking off the top of the booster BT where it
goes inside the stage coupler. I gave the nose cone two coats of gloss white
and the rest of the rocket two coats of gloss black. Now the fun began. I
decided to use white self adhesive Trim Monokote to do the white areas on the
BT and fins. First I used paper to plot out the curving patterns through trial
and error. Then I transferred those templates to the Trim Monokote and cut them
out with a sharp hobby knife. Trim Monokote is peel and stick and permanent
once you put it on. I applied water with a few drops of dish detergent to the
areas first and this gives you time to adjust before the adhesive grabs. It was
tricky around the balsa booster fin fillets and I needed to touch those up with
white paint, but the final effect is very striking. I finished with a thin band
of chrome Trim Monokote at the top of the second stage BT, and the Semroc decal
on one of the fins.
Construction Rating: 3 out of 5

Flight:
The engine hook in the booster and passport staging make this easy to prep for
flight. For the first flight I didn't have any A8-5s and just used an A8-3 I
had in the box. The booster had a B6-0. I wrapped a bit of masking tape around
the upper stage motor. Although it flew very nicely, ejection was obviously too
early. I was lucky to avoid a zipper. The first flight was with the incorrectly
shortened booster, and the inside of the coupler on the upper stage was
seriously scorched and cracked. I am pretty sure this was because there wasn't
enough of the booster's BT in there protecting the coupler from the booster
engine's charge. After this I added a 1/2" piece of BT with an inside
coupler to the booster. I also sanded down the coupler and recoated it with CA.
I made 3 flights with a B6-0 to A8-5 combination and they were beauties. On the
first two flights, the booster fluttered down, however, after adding more clay
to the front end of it, it glides reasonably well if a bit steeply.
Recovery:
Again, I would recommend a Kevlar®
shock cord attachment. The trickiest part of recovery is getting the booster to
glide. Hand tossing wasn't really a good indicator of glide. After a couple of
flights, I got the clay weight right. It's a pretty amusing sight watching the
booster straighten out and glide down. Also make sure you coat the inside of
the stage coupler with CA as the design with the coupler attached to the upper
stage instead of the lower is prone to scorching. Also using the correct
measurements helps!
Flight Rating: 4 out of 5
Summary:
This is a classic beauty and a pretty easy build, although it takes a bit of
fiddling to get right. It's a striking looking rocket and produces interesting
flights with the gliding booster. The only real gotcha is the incorrect engine
hook retainer measurement on the instructions. Semroc makes it a breeze with
all the parts and laser-cut fins.
Overall Rating: 4 out of 5
 |
 |
Flights
Sponsored Ads


|
|