| Manufacturer: | Modification |
| Style: | Multi-Stage |
 Brief:
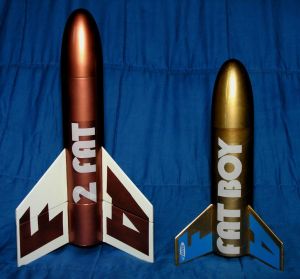
After a spell of creative scratch rocket projects, all my fun ideas seemed to have dried up. Looking around the workshop, I smiled at good old Fat Boy: both my kids and my favorite rocket. He's always good for an exciting flight and safe recovery. Why not court disaster by trying to improve upon a classic! The initial seeds for "2 Fat" had been planted.
"2 Fat" is a 2-stage 24mm Fat Boy mod. The design goals were:
- To make the final rocket resemble the original as much as possible.
- To keep him as fat and stubby as possible.
- To provide agonizingly slow initial boost to exaggerate the appeal of the original, followed by a surprising sustainer boost.
Modifications:
Fill spirals on body tubes. Sand nose cone. Cut, sand, and seal fins. The sustainer fins are trapezoidal with 3.5" root length, 1" tip length, 3.5" span, and 3.5" sweep. The booster fins are parallelograms with corresponding measurements of 2.75", 2.75", 3.5", and 1". For the sustainer fins you'll need to add root tabs and size these to match limits imposed by the lower centering ring if you are using TTW mounting. (A stock Fat Boy has a pre-slotted tube but you'll need to widen the slots to accommodate 1/8" thick fins.) Slotting and TTW fins can be added to the booster if desired. (If using TTW fin mounting, don't glue the bottom centering rings in place in the following steps until after the fins have been glued to the engine mount tubes.)
Assemble E9 sustainer motor mount using 3.75" BT-50, engine block, 3.75" engine hook, 2 centering rings. Engine tube ends 1/8" above bottom of airframe. Hook extends 1/4" beyond engine tube, i.e., 1/8" beyond airframe. Engine block is glued flush with top end of engine tube. Upper centering ring should be positioned to fit above airframe fin slots, about 3" above bottom of airframe. Attach Kevlar to upper centering ring if desired. Lowest centering ring must be about 0.75" above bottom of airframe. [Note: this means a portion of the sustainer fin slots won't be used.]
Assemble D12 booster motor mount using 2.25" BT50, 2.75" engine hook, 2 centering rings. Hook extends above and below engine tube 1/4" each. Wrap with tape and glue to affix it. Top centering ring positioned at about 1.75" below top of booster airframe. Bottom centering ring is flush with bottom of engine tube about 1/8" above bottom of booster airframe. If positioned correctly, the top of the booster engine hook should extend 1/8" above the top of the booster airframe. There should be at least 1.25" available between the rings for TTW fin slots if desired.
Test fit booster and sustainer with coupler. The two engines hooks should be flush against each other if assembled correctly (but rotate the tubes to offset hooks before gluing; this makes the two engines flush). Glue tube coupler to top of booster assembly.
Glue and fillet all fins. Glue aft centering rings for each stage engine mount in place after filleting TTW fins.
Assemble parachute and recovery system as desired. Recommended: replace Estes 3-fold shock cord mounting with Kevlar® thread attached to top centering ring and elastic tied to Kevlar thread.
RockSim suggested 1.25 oz nose weight. I chose 1.5oz. Glue this to the interior tip of the nose cone. My finished rocket was 5.25oz for the sustainer and 1.5 oz for the booster, giving a total weight of 6.75oz without engines. (Since the loaded sustainer is heavier than a standard Fat Boy, you may want to swap out the parachute for a larger one.) Fully loaded, the rocket weighs 11.2oz, giving the D12-0 a real workout.
Construction:
"2 Fat" was designed on paper, with a stability check in Rocksim 8. The plan was to use a D12-0 boost followed by a E9-4 sustainer. RockSim projected a slow boost to 150 feet, followed by a long fast ascent to 1175 feet for the sustainer. The sustainer could also be loaded with a removable 1" portion of a 24mm casing (or engine block) and a D12-3 motor for much lower flights. Engine hooks are used in both stages, but don't really interfere with direct staging.
Parts list:
- 1 Fat Boy kit
- 6" BT-50 tube
- 2.75" BT-80 tube
- 1.5" BT-80 tube coupler
- 4 50-80 centering rings
- 1 3.75" engine hook
- 1 2.75" engine hook
- 1 24mm engine block
- 1/8" x 4" x 48" balsa sheet
Finishing:
Several coats of primer, a little spot filling, sanding, and we're ready for paint. The rocket is finished in copper and gloss white I designed the F, A, and T letters to span the two-stage combined fin surfaces while matching the style of the original. The "2" is crafted from portions of the B, O, and Y. The FAT portion of the name sticker is used as is.
Flight:
RockSim says the CP for the whole unit is about 11.25" from the nose, giving 1.12-1.25 calibers of stability. For the sustainer alone, it is 9.1-9.65" from the nose, giving 1.09-1.30 calibers.
With the engines loaded, my heart sank as I placed it on the launch pad. Could the D12-0 really get this bird off the ground? Yes! Liftoff was slow but steady, gently arcing into the drifting breeze. Perfectly stable with no spin, it looked like a classic arcing Fat Boy flight. Suddenly, with a loud pop the booster separated and tumbled fairly well back to the ground, receiving only a slight scratch on one fin tip.
The sustainer didn't accelerate much, but burned long and steady as the rocket continued stable arcing flight over 1000 feet. Ejection was slightly early. Had the flight been plumb vertical (which never happens with Fat Boys I have seen!), a 6-second delay might have been as nice as the 4-second I used.
Recovery:
On its 18-inch chute, 2 Fat drifted back past us and landed about 300 yards downwind. In fact, it set down so gently that it sat upright on the ground as if someone had placed it there. Perfect flight and recovery! Swifter descent might have been preferred in windy conditions.
Alas, this same day was the final flight for our beloved stock Fat Boy, who came in ballistic when I knocked off the ejection cap on its 18mm RMS D engine. But now "2 Fat" promises many flights in the Fat Boy style with a little extra flair.
Summary:
PROs: Great flights "high and slow" with a sturdy, reliable design and easy to find parts and build
CONs: Sticker didn't turn out great, with different opacity in regions of overlap
#Related Reviews
- Excelsior Rocketry Der Fat Max By Bill Eichelberger
I always loved the versatility of the Estes Fat Boy, and over the years I bought quite a few of them for different projects, most of them of the Goony persuasion. When a fellow club member decide to move away from low power and offered one for sale from his stash, I jumped at the ...
- Fat Boy to AttaBoy Modification By Tad Scheeler
The ATTABOY is a boattailed FATBOY with 24mm upsized motor mount that can be flown in two different configurations--both with and without upper payload tube. Modifications: I was inspired by Michael Bade's " Big Bad V-2 Daddy ", Kevin Johnson's " OY!FATBOY ", and David Fergus' " Boattail FATBOY ...
- Modification 24mm Fat Boy By Morgan Hendry
This project began when I read several posts from rec.model.rockets on placing a 24mm motor mount in a Fat Boy, normally a 18mm kit. I first looked at the instructions and made a list of what I needed to do. Replace the 18mm motor tube with a 24mm one Make bigger motor mount with modified ...
- Modification Fat Boy - 24mm By Morgan Hendry
This project begun when I read several posts from rec.model.rockets on placing a 24mm motor mount in a Fat Boy, normally a 18mm kit. I first looked at the instructions and made a list of what I needed to do. Replace the 18mm motor tube with a 24mm one Make bigger motor mount with modified ...
- Modification Fat Boy - 24mm By Colin Westgarth-Taylor
An Estes Fat Boy modified with a 24mm MMT for D and E motors. External dimensions are stock. These modifications change one of Estes best packaged kits into a true performer. Modifications: Construction sequence was pretty normal for a MPR capable rocket: forward CR epoxied to the MMT, shock ...
- Modification Fat Boy - 29mm By Scott McLeod
An Estes FatBoy modified with a glassed body tube, 29mm MMT and G10 fins for F, G, and H motors. External dimensions are stock. Best "bang-for-buck" rocket that I ever built. Modifications: When glassing the tube, I used a long section of PML 2.6" coupler tube wrapped in greaseproof ...
- Modification Fat Boy to Schnoz By Larry Brand
The problem with overpowering a "stubby" design like the C-powered Estes Fat Boy with heavier engines is the CG dilemma -- the more power, the more nose weight is needed to keep the CG in limits, negating the Oomph you thought you were adding. I have modified Fat Boy for F-power with a ...
- Modification Super Baby Bertha By Kevin Johnson
Took a Fat Boy kit and added Big Bertha like fins to make a Super Baby Bertha. Modifications: NARHAMS held a Fat Boy theme sport launch this month, and I was looking for something different to do with my last Fat Boy kit. I had just finished repairing my Super Big Bertha when inspiration ...
- Modification Two-Stage Fat Boy By Kevin Johnson
Kit bashed two Fat Boys into one two-stage rocket. Modifications: After building the sustainer per the instructions, I started the booster by building the motor mount/center rings. Using the completed mount as a guide, I marked the aft end of the second BT and cut it down just in front of ...
- Scratch BoatTail Fat Boy By David Fergus
Brief: Modified BoatTail FatBoy with a D engine mount, sturdier construction throughout, and better fly-ability with a boat tail. The basic dimensions of a stock Fat Boy were maintained for both body length and fin shape and size. Modifications: Body Tube: Cut the main body tube 5 1/8 inch ...
- Scratch Fat Boy (7 x 18mm Motor Eater) By Dick Stafford
This Fat Boy flies on seven 18mm motors. Modifications: Here is what I changed: The base of the cone was cut off The stock centering rings were not used Additional 18mm motor tubes were added Parts list: Estes Fat Boy kit 18mm tubing for the 6 additional motor ...
- Scratch Fat-Ass-Tron Sprint By Jim Sekol
Fat-Ass-Tron Sprint The Fat-Ass-Tron Sprint: The F-A-T Sprint is a combination of the Estes Fat Boy, and the Astron Sprint. It was originally created to address one of the Fat Boy's inherent design flaws, that being ...
Related Products
Sponsored Ads


![Vintage Estes Viper #0820 Model Rocket [4*G-17.25]](https://i.ebayimg.com/thumbs/images/g/Q7EAAOSwN1Nl1kDF/s-l225.jpg "Vintage Estes Viper #0820 Model Rocket [4*G-17.25]")


 |
 |