| Construction Rating: | starstarstarstarstar |
| Flight Rating: | starstarstarstarstar |
| Overall Rating: | starstarstarstarstar |
| Manufacturer: | Clone |
 Brief:
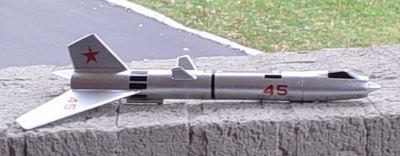
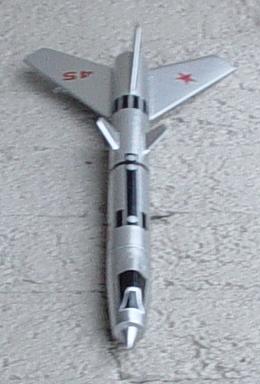
My first Estes catalog was a dog-eared, second-hand copy of the 1977 edition. This was my first hint that model rocketry did not begin and end with the legendary Estes Scout, and like many others, I spent a good deal of time thereafter paging through it, plotting, planning, memorizing and most of all, wishing. While the usual suspects (i.e. Orbital Transport, Mars Lander, Interceptor and the big scale birds,) always caught my eye, deep down I knew that I stood a much better chance of actually owning and flying the smaller kits. The Estes Wolverine, with it's unique ram-jet style nose cone and cool pseudo-Russian graphics, was always high on my list of "gotta-haves". Unfortunately it wasn't readily available in my area, and with mail order but a far off dream, I never managed to build one, (or even see one for that matter.) Many years later (after a hideously unsuccessful attempt to turn my own using a drill and a chunk of balsa,) a chance inquiry to BMS about the availability of this special nose cone would change all of that.
 Construction:
The parts that are needed are:
- BT-50 (7.75")
- BNC-50BC (from BMS)
- 13mm engine mount kit
- 3/32"basswood fin stock
- cockpit pattern
- 12" parachute
- 18" sewing elastic shock cord
- 1 snap swivel
- 1 screw eye
- launch lug
- decal sheet
- 2 - 3/4" wood screws
One thing that I hadn't been prepared for when I started this project was the Wolverine's small size. (Despite the fact that it is a "mini-brute".) This would not have been a big deal on it's own, but it would make a difference when it came time to finish the rocket. Construction was easy and considering the excellent instructions, probably would have been so even for a beginner. There should be nothing about this project that would trip up even a marginally experienced builder, and in the end you are rewarded with a great looking, compact rocket that is about as far as you can get from a standard 3FNC rocket (and can be flown on a small field as a bonus.)
As I mentioned earlier, BMS now makes the cone for this classic. The BMS version of the BNC-50BC is a two-piece cone and gluing on the tip is probably the most challenging part of this project. (Not really, but the truly anal modeler really sweats the small stuff and I was somewhat panicked about the possibility of gluing the tip off center. I didn't.) The balsa cleans up nicely, and despite the fact that I've never seen an original, I can't imagine that one would be able to tell the difference between the two.
Finishing:
Because of it's relatively small size and single color paint scheme, I expected that finishing the Wolverine would be about as straightforward a project as one could ask for. Not so in my case.
Since I had used basswood for the fins, finishing looked like it was going to be a breeze. Following a coat of thinned Elmer's Fill n Finish (and the sanding thereof,) and a couple of coats of primer (ditto sanding,) I sprayed on the initial coat of Krylon Metallic Silver. The metallic paints coat evenly and quite well, but when dry they tend to accentuate any inconsistencies in the rocket's surface, (at least in my experience.) The body and fins looked fine, but the area immediately surrounding the fins looked particularly sloppy, bad enough that even a full set of decals weren't going to distract even casual onlookers from the sub-standard sanding job. At this point I decided to take a mulligan and do a combination re-sand of the areas around the fins and a color sand of the first coat. This made for a marked improvement. A set of inkjet decals completed the "catalog perfect" look.
Construction Rating: 5 out of 5
 Flight:
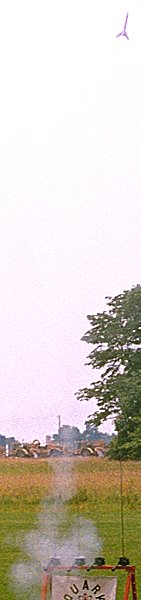
This was one area where I was surprised to find that improvement was needed, although I suspect that the fault lies with the builder, not the design. I first launched the Wolverine at a QUARK section launch in the spring of 2002. For the first flight I deliberately chose an engine that was on the conservative side, a 1/2A3-2T, hoping to get a better idea of the rocket's flight characteristics. Unfortunately the most notable flight characteristic turned out to be a habit of wobbling as it left the pad. Ejection occurred at apogee and overall it was a good flight, but the wiggle had me worried. "More power," I mistakenly thought, and plugged in the "mighty" A10-3T for the second flight. This made the wiggle disappear entirely, but the wobbling, end over end flight pattern that replaced it wasn't the fix I had been hoping for. This made me rethink the problem and I figured that substituting basswood for balsa had probably messed up the rocket's surprisingly delicate balance. Several of my fellow QUARKer's also came up with this theory, so I felt like I was moving in the right direction. The third flight came after I had added some nose weight in the form of two good sized screws into the bottom of the nose cone next to the screw eye. The resulting flight was perfect, arrow straight with a textbook recovery, not much in the area of altitude, but being a mini-brute, the Wolverine wasn't meant to be a high flier anyway. (But an UPSCALE might be! Where'd I put my crayons?)
Flight Rating: 5 out of 5
Summary:
Despite the trouble I had with this project, I gave the Wolverine five points across the board because the problems I encountered were of my own making, not inherent in the design.
PROs: Overall unique design, seldom seen at launches, BMS makes the cone.
CONs: JimZ's decal scan needs work and the cockpit pattern isn't included with the plans.
Overall Rating: 5 out of 5
Related Products
Sponsored Ads


 |
 |