| Construction Rating: | starstarstarstarstar_border |
| Flight Rating: | starstarstarstarstar |
| Overall Rating: | starstarstarstarstar_border |
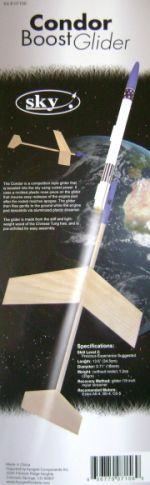
| Manufacturer: | Sky  |
Brief:
Sky brand model rockets are made in China and imported into the USA by Apogee Components. They manufacture a number
of conventional rockets with plastic fin cans. As far as I can tell, this is the only boost glider made by Sky. The
Apogee web site describes the Condor as “a competition style glider”, in reality a standard pop-pod and plane
setup. I bought my Condor from the newly opened Suburban Rocketry, based in Sydney, Australia.
Tim Van Milligan, the owner of Apogee Components, is a pretty keen boost/rocket glider builder and flier; his book Model Rocket Design and Construction has the majority of a large chapter dedicated to gliders. With this in mind, I had certain expectations of the Condor. I guessed someone with a reputation for being a bit of a glider enthusiast may have found themselves a diamond in the rough.
I have had some experience with budget gliders from the good (Edmonds Deltie) to the not so good (Starlight Sparrow). Now and then there is a pleasant surprise, like the Fun Rockets foam version of Holverson's brilliant Silver Hawk, which was a design so good that even making it out of cheap foam couldn't destroy it.
Cheap pod and plane boost gliders using 18mm motors are a bit thin on the ground these days. Quest's Flat Cat and Q EZ, Edmonds Deltie B, and the Estes Eagle are the ones that come to mind. At $9, Sky's Condor is right at the bottom of these in terms of cost; Estes Eagle tops the price list at $18, and Quest's EZ comes in low at $10.50 In Australia, Suburban's keen pricing means that at $13 AUD the Condor is just over half the price of the next cheapest boost glider, Quest's EZ ($24 AUD).
The appeal of an 18mm glider is simple: most fliers will have 18mm motors in their field box already. People may be put off trying a glider if they have to buy 13mm motors they don't usually use or ultra short delays they can only use with that rocket. Although it wasn't specifically recommended, I wanted to see if the Condor would fly on an A8-3, a motor which seems to breed in my field box.
Construction:
Sky's offering is in the familiar plastic bag with full color face card heat sealed with a hang tag. In its bag the
Condor wouldn't look out of place on any hobby store's shelves.
Immediately obvious when you turn the bag over are the pre-printed body tube for the pop-pod and the blue plastic components for the pod and glider. All good so far.
The instructions are on a double sided sheet a bit bigger than an A4 sheet (236x37cm). A quick skim read of the instructions shows they are easy to read and laid out logically. There are a couple of minor spelling mistakes (e.g., stabalizer,) and the occasional extra space in the text, but overall, the instructions look good.
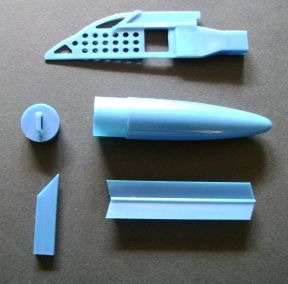 Plastic moldings are of extremely high quality with almost no flashing. I tried the nose
cone with industry standard BT-20 tubes and it is a good fit.
Plastic moldings are of extremely high quality with almost no flashing. I tried the nose
cone with industry standard BT-20 tubes and it is a good fit.
A small sheet of peel and stick self-adhesive decals with a matte surface is included. These are not included in the 'Parts' list and no instruction regarding their intended placement is given in the instructions. I decided not to use mine.
What at first looks like hard balsa is actually Tung wood. Tung is grown primarily for oil from its seeds and traditionally used in lamps, but these days they are mostly found in paints and varnishes. The wood is light and hard, like a medium competition grade balsa.
The instructions list building materials needed for completion. The only thing I would add is CA Gel in addition to the CA liquid (Superglue) listed.
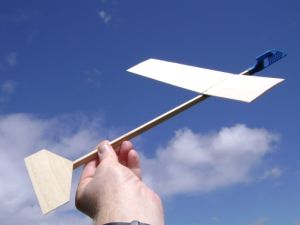
 The glider is built first. This goes together quickly, in fact incredibly quickly.
Wings have a pre-cut airfoil, if a little rough. I gave the wings an extremely light sand just to remove the roughest edges, and this was the longest part of building the glider. The wings are glued to the plastic wing mount with CA liquid.
The wing mount deserves special mention here as it not only gives the correct dihedral without you having to chamfer the root edge of the wing, it is also constructed with the front higher than the rear, so it automatically gives the correct angle of attack when you attach it to the boom. Very, very clever.
The glider boom is roughly finished but dead straight. It received a light sand as well.
 Attaching the wing mount has two small areas of concern. First is the distance from the
front of the boom that the wing is attached. The instructions say 38mm (1½ inches), but that looks awfully close
to the nose. It looks much farther back in the instructions. I checked the picture on the face card, and the large
image of the glider shows the leading edge of the wings a good third of the boom length back from the nose. However,
there is a small image of the glider on the face card which shows the wing in the correct position. It looks like some
of the photographs have been taken with the wing set farther back so that it looks "better". Secondly, the
wing mount is attached to the boom with CA liquid and will tend to grab when you mount it. Unless the wing mount is
pressed smoothly home, it may grab on one side first, resulting in a greater angle on one wing relative to the
horizontal stabilizer. If I were building the glider again I would use CA gel for this step to get a longer working
time.
Attaching the wing mount has two small areas of concern. First is the distance from the
front of the boom that the wing is attached. The instructions say 38mm (1½ inches), but that looks awfully close
to the nose. It looks much farther back in the instructions. I checked the picture on the face card, and the large
image of the glider shows the leading edge of the wings a good third of the boom length back from the nose. However,
there is a small image of the glider on the face card which shows the wing in the correct position. It looks like some
of the photographs have been taken with the wing set farther back so that it looks "better". Secondly, the
wing mount is attached to the boom with CA liquid and will tend to grab when you mount it. Unless the wing mount is
pressed smoothly home, it may grab on one side first, resulting in a greater angle on one wing relative to the
horizontal stabilizer. If I were building the glider again I would use CA gel for this step to get a longer working
time.
The glider nose piece is both the catch for the pop-pod and a series of holes to secure trimming clay.
The whole glider is built in under ten minutes.
Oddly, there is no indication in the instructions of where the Center of Gravity (CG) is located on the completed glider nor are any instructions given on trimming and testing the glider before a first launch. Although after building the kit, I found some brief trimming advice is given on the Apogee website.
No modeling clay for trimming the glider is included with the kit, gross trimming is supposedly accomplished by moving the wing mount fore and aft prior to gluing it into place. The fact that this is not covered in the instructions is an enormous oversight.
Conventional glider wisdom has the glider CG one quarter to one half of the wing chord from the wing leading edge. My glider bare balanced about 200mm from the tip of the nose piece. This was behind the root trailing edge of the wing. A quick throw around the back yard indicated that the trim was pretty much spot on where it was.
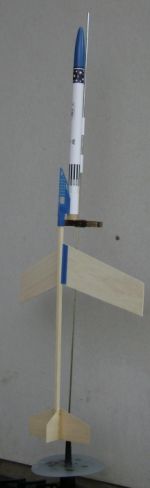
 The pop-pod is a fairly conventional rocket without fins.
The body tube is white, pre-printed with blue decorations and some Chinese script. Interestingly, the body tube is not wound spirally as a conventional tube but just like rolling up a sheet of paper (convolutely wound). No spirals to fill and pre-printed tubes are a snap. It will be interesting to see how this type of tube stands up to the rigors of flight.
No thrust ring is provided, and one does not appear on the 'Parts' list. The motor hook is not very wide and has poor memory so it tends to stay bent when flexed to install a motor. With that in mind I was loathe to trust a tiny tang of the motor hook to prevent the motor thrusting upwards through the pod. I fitted a standard thrust ring I had sitting in the parts box.
Two launch lugs are provided, and like the body tube they are made from, are convolutely wound paper too.
The glider pod hook is contoured to fit the wall of the body tube. CA gel is of use here as it fills the small void between the contoured back of the hook and the wall of the body tube.
The shock cord attachment is the standard Estes tri-fold mount except that there is no pattern in the instructions for the paper mount. No measurements either, just a picture of how to fold it up and glue it into the body tube. The shock cord itself is the usual three strand wide elastic, relatively short, which is in keeping with glider standards. Long shock cords tend to tangle with gliders as they separate from the pod.
Pop-pod recovery is via a 50 x 5 cm mylar streamer.
Construction Rating: 4 out of 5
Flight and Recovery:
The instructions for flight preparation are quite detailed.
The motor choices given seem a little odd to me: A6-4, B6-4, C6-5. I would expect motor selection to be the short delay A8-3, B6-2, C6-3 motors. I would be interested to see flight results on some of these other motors.
Use the longest rod you have! The combined length of the glider and pop-pod is about the same as a standard Estes two piece rod. Use a clothes peg under the pop-pod to keep the glider tail off your pad's blast shield.
Our local park is a good size for shakedown flights, two standard football fields placed end to end.
 A quick test glide in light wind at the park showed the Condor needed just a little tail
weight (about a match head of clay) to smooth out the glide.
A quick test glide in light wind at the park showed the Condor needed just a little tail
weight (about a match head of clay) to smooth out the glide.
First flight was on an A8-3. I held the motor hook in place with a small piece of masking tape. This seemed to do the job of ensuring the motor wasn't spat out on ejection.
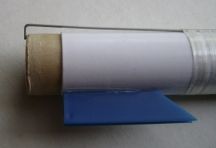
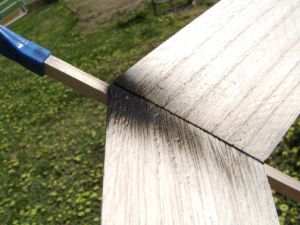
Boost was to about 70 meters (~230 feet) with clean separation and a shallow glide with a left turn. Forty seconds into the flight, the Condor met a tree at a height of about three meters. The pod landed about ten meters away from the launch pad.
There was some charring of the wing root, the picture shows the glider after a single flight.
 The glider is quite sensitive to additional weight. After the first flight I test threw the
glider again and ended up removing the tail weight I had added for the first flight. A quick test glide every few
flights will ensure your glider is trimmed optimally for the current conditions.
The glider is quite sensitive to additional weight. After the first flight I test threw the
glider again and ended up removing the tail weight I had added for the first flight. A quick test glide every few
flights will ensure your glider is trimmed optimally for the current conditions.
Given the size of the field I was testing at, we kept first flights to the A8-3. Total time on each flight (including boost) was in the 35-50 second range. A nice small field glider on this motor. On a C6 the Condor will probably thermal away.
Flight Rating: 5 out of 5
Summary:
This is a great glider, and a pleasant surprise at the price. Skill level is listed as 2. If the instructions
included trimming the glider it would be more like a 1.5 This kit is certainly suitable as a first glider if you have
access to the trimming instructions.
The Good:
- Intelligent wing mount
- High quality plastics
- Contoured pod hook
- Glider nose piece
- Precut airfoil on wings
- Straight timber
- Price
The Bad
- Poor quality motor hook
- No thrust ring
The Ugly
- No trimming instructions included
- No pattern for shock cord mount
I would advise you to just make a few small changes when you build your Condor:
- Read the trimming instructions on the Apogee website
- Fit a thrust ring
- Junk the motor hook and friction fit motors
- Use CA gel to attach the wing mount and pod hook
Overall Rating: 4 out of 5
 |
 |
Flights
|
|
Sponsored Ads


|
|
D.L.S.M. (January 24, 2008)