| Construction Rating: | starstarstarstarstar |
| Flight Rating: | starstarstarstarstar |
| Overall Rating: | starstarstarstarstar |
| Diameter: | 1.34 inches |
| Length: | 14.30 inches |
| Manufacturer: | Semroc  |
| Skill Level: | 2 |
Brief:
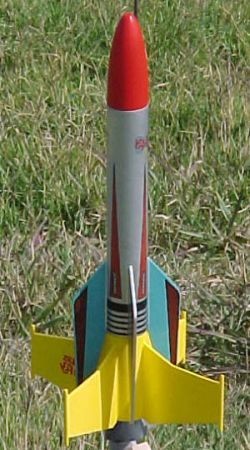
The Semroc Texas Firefly is a beautiful 175% upscale of the Semroc Firefly and is a Retro-Repro clone of the original
Centuri Firefly 2-stage rocket. Combining elegance with a beautiful simplicity of line, the Texas Firefly flies
wonderfully on standard 18mm black powder motors with a unique gap-staging design to enable reliable upper stage motor
ignition.
Construction:
Included in the kit is:
- 1 balsa nose cone
- 2 body tubes for booster and sustainer
- 1 tubing coupler
- 2 motor tubes for booster and sustainer
- 2 thrust rings
- 2 motor hooks
- 2 sets of centering rings
- 8 laser-cut balsa fins
- 1 length of wood doweling
- 1 1/8 launch lug
- 1 screw eye
- 2 washer weights
- 1 1/8 elastic shock cord
- 1 length of Kevlar® string
- 1 plastic parachute with tape discs and shroud lines
- 1 cardstock shroud for booster motor nozzle
- 1 full set of waterslide decals
The Texas Firefly, despite being rated a skill level 2 build, is nonetheless quite easy to construct. The components are of exceptional quality and Semroc continues to provide a beautifully detailed color booklet with easy to follow instructions. Excepting the occasional use of 12-minute epoxy, Great Planes Pro yellow wood glue was used throughout this build
The sustainer assembly is constructed like any other basic 4FNC rocket with the sustainer motor mount constructed by notching a motor hook on to the sustainer motor tube, gluing in a thrust ring then slipping the two sustainer centering rings over the motor tube and gluing them into place. I then glued the Kevlar® string into place around the center of the motor tube and slipped the free length through a notch in the front centering ring. After applying generous glue fillets to both the front and rear centering rings, the completed motor mount was then glued into the sustainer tube with generous glue fillets later applied to the rear centering ring/sustainer tube junction.
I then proceeded to slightly roughen up the booster and sustainer tubes with 240 grit sandpaper to enable better glue and paint adhesion after which I tackled the fin marking steps. Fin marking is provided by a fin guide in the instructions booklet consisting of a circle with hash marks by which the end of the body tube is placed on the circle and the hash marks used as a guide for fin position markings. After freeing the sustainer fins from their balsa sheeting, I gave them a light sanding with 360 grit sandpaper at which point I deviated from the instructions to laminate the long spindly sustainer fins with computer paper and slightly watered-down white glue. After being placed under three stacked telephone books for a week to prevent fin warp during the drying process, the laminated fins were attached to the sustainer tube using the double-glue method. In the interests of fin durability, I used 12-minute epoxy to form small fin fillets. Upon completion of the sustainer, the launch lug was then glued into place.
The construction of the booster assembly is no different to that of the sustainer although the booster centering rings are vented to allow for proper gap-staging and a tubing coupler is glued into the top of the booster so it can slide into the bottom of the sustainer assembly. The wood doweling was then cut into four lengths of two inches and each section then glued to the tip of each booster fin with generous glue fillets then added. Again, 12-minute epoxy was used to form small fillets for the booster fins.
The cardstock motor nozzle shroud was formed and several coatings of thin CA used to stiffen it. Rather than following instructions and attaching the nozzle shroud to the booster to be painted later, I used Tamiya Gunmetal Gloss spray lacquer to paint the nozzle shroud separately and set it aside to be attached later.
The screw eye for the nose cone was then screwed into place on top of the two washer weights and secured using a small blob of 12-minute epoxy.
Finishing:
I filled in the balsa nose cone and booster fins with five coats of NHP Micro-Fill balsa sealer which nicely sealed
all the balsa smooth and then gave the booster/sustainer assemblies and nose cone two coats of Tamiya Fine White spray
primer with light sanding in between using 400 grit sandpaper. I then followed this up with two coats of Tamiya Silver
Leaf Gloss spray lacquer for the sustainer assembly and two of the sustainer fins, Coral Blue Gloss for the other two
sustainer fins, Italian Red Gloss for the nose cone and Yellow Gloss for the booster assembly.
 After having allowed the paint to cure for a full week, the comprehensive waterslide decals
were then carefully applied. The decals were easy to apply and give the completed rocket a most classy and elegant
look.
After having allowed the paint to cure for a full week, the comprehensive waterslide decals
were then carefully applied. The decals were easy to apply and give the completed rocket a most classy and elegant
look.
Upon completion of painting, the nozzle shroud was then glued to the bottom end of the booster assembly.
Construction Rating: 5 out of 5
Flight:
The first flight was with a B6-0/A8-5 motor combination with three sheets of recovery wadding during relatively mild
weather conditions. Upon booster motor ignition, the Texas Firefly zoomed into the afternoon sky, all the while
tracking perfectly straight and stable. The gap-staging design functioned perfectly with the sustainer motor eventually
igniting and sending the sustainer assembly off on a very slight angle to a total altitude of around 700-750ft.
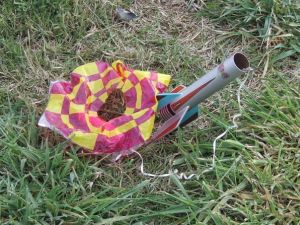
Recovery was perfect with the supplied Semroc 12" plastic parachute (with a spillhole cut into it) and the
sustainer assembly came back down without damage close to the launch area. The booster assembly was also recovered
close by without damage.
 The second flight was a textbook repeat of the first although a deep gouge on the nose cone
shoulder was evident upon retrieval which I suspect was due to an atomic ejection charge causing the shock cord to snap
the nose cone back into the top of the sustainer assembly. This was later easily fixed by filling the gouge with NHP
Micro-Fill, smoothing it out then lightly sealing the shoulder with thin CA followed by a light sanding.
The second flight was a textbook repeat of the first although a deep gouge on the nose cone
shoulder was evident upon retrieval which I suspect was due to an atomic ejection charge causing the shock cord to snap
the nose cone back into the top of the sustainer assembly. This was later easily fixed by filling the gouge with NHP
Micro-Fill, smoothing it out then lightly sealing the shoulder with thin CA followed by a light sanding.
Recovery:
The Kevlar®/elastic
recovery system has proved to be very reliable and the Semroc 12" plastic parachute is of excellent quality and
has also proved to be very durable. Prior to painting the sustainer assembly, thin CA was soaked into the top of the
sustainer tube to lessen any chance of the Kevlar®
causing any zippers during recovery.
Flight Rating: 5 out of 5
Summary:
The Texas Firefly is an excellent choice for a first 2-stage rocket. The gap-staging design ensures flawless upper
stage motor ignition and Semroc's excellent components quality allows for a most satisfying build. The finished product
with its beautiful waterslide decals is a most elegant pretty rocket that looks absolutely gorgeous whether moving or
standing still. A Semroc masterpiece!
Overall Rating: 5 out of 5
Other Reviews
- Semroc Texas Firefly By Geof Givens (April 29, 2007)
Brief: The Texas Firefly is a gap staged 18mm kit from Semroc. This kit exemplifies everything I love about Semroc: high quality, wide selection, low price, outstanding customer service. The rocket stands 14.3in and 1.34in diameter (ST-13 is slightly larger than BT-55 tubing). The total weight is 2.1oz. Construction: The assembly is so utterly straightforward that it hardly ...
- Semroc Texas Firefly By Lee Berry
Picture courtesy of Semroc Astronautics Brief: The Texas Firefly from Semroc is a 2-stage great small flying rocket. It comes with a 12" parachute. Construction: Kit has balsa nose cone and laser cut balsa fins. The instruction were easy to follow. The only thing I did not like was the way they had you to mark the fins on the ...
 |
 |
Flights
Sponsored Ads


|
|