InFlight Rockets Blue Bird Zero Clone Kit
InFlight Rockets - Blue Bird Zero {Kit}
Contributed by Stu Young
| Construction Rating: | starstarstarstarstar |
| Flight Rating: | starstarstarstarstar |
| Overall Rating: | starstarstarstarstar |
| Manufacturer: | InFlight Rockets  |
 Brief:
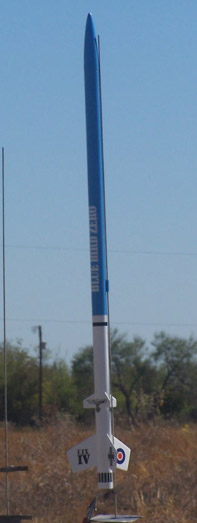
This is a single stage, three fin rocket with a parachute recovery
Construction:
The kit comes in a sturdy transparent bag, with a header card printed in three colors (which, conveniently, means
that the picture of the rocket on the card is in full color). The body of the rocket is comprised of two body tubes of
glassine-coated kraft paper. There is no payload section. There are three laser-cut balsa fins, with three tiny
"auxiliary" fins above and parallel to the primaries. The fins are already removed at the factory from the
balsa sheeting and included in their own individual baggie. They, as well as the nose cone, are of a very fine-grain
balsa. There were no dents in the nose cone. The nose cone, screw eye and shock cords are individually bagged, as is
the motor mount assembly. The centering rings for the motor mount are made of an unknown, rigid substance (perhaps
lightweight plastic or some sort of dense foam with a flat black coating) but were as sturdy as balsa and definitely
more sturdy than paper. An 18 mm cardboard ring, intended to be used as a motor block and a typical engine hook, are
included. The shock cord is comprised of Kevlar®
cord, attached to the motor mount, which is long enough to actually extend a few inches further than the length of the
rocket. Attached to that is an elastic shock cord. The nose cone is balsa, attached to the shock cord with a screw eye.
The parachute is a Hartle Engineering 20-inch Thermal Rider chute. The decals are water-slide type. The large
"Blue Bird Zero" decal comes in its own bag with some sort of protective, waxy sheet covering the lettering.
The smaller decals are also bagged.
The Blue Bird Zero is firmly a Skill Level 2 kit, in that one has to assemble the parachute (a Hartle Engineering Thermal Rider parachute kit) and align the auxiliary fins with the primaries. There are no "gotchas" in the assembly. The instructions are in logical order. The motor mount assembly is first in the instructions. The motor block is glued flush with the top of the motor mount tube. The above-mentioned motor mount centering rings worked well with Elmer's Glue-All® (used throughout the build) which makes me think that they are made of high-density foam or some derivative of paper. The engine hook is not attached to the motor mount by the typical plastic ring; instead one cuts out a printed strip of paper from the last page of the instructions and glues that around the engine hook. On the last page of the instructions, there is the standard printed tube marking guide which one has to cut out and tape around the tube. There is also a printed tri-fold shock cord attachment, if one chooses to attach the shock cord by this method although such is not described in the instructions. I used the time-tested door-frame method to lengthen the pencil marks I made on either side of the tube marking guide; I had to go back and lengthen the pencil lines further, though, because I had forgotten about the auxiliary fins! Fortunately, I caught this before I had glued the primary fins onto the body tube. The instructions show how to cut the included launch lug in half as well as where to glue the resulting two lugs onto the rocket. There is a view-from-above, smaller-than-scale drawing in the instructions showing how to attach the fins at 120 degree angles from each other. I lengthened the lines representing the fins in the drawing to full scale. Before pressing the fins on, I let the glue dry for a few minutes first; then placed the body tube on top of the drawing I had modified and used line-of-sight to press the fins on at the correct angles. After screwing the screw eye in and out of the nose cone, I dropped some glue into the resulting hole, and screwed the screw eye back in. The Hartle™ chute material is already cut out to a hexagon shape; one merely has to apply the adhesive reinforcing rings to both sides of the corners of the chute, and cut the included thread into 3 equal-length pieces. A few knots later, the assembly is done!
Finishing:
I rounded the leading edges of the fins. I used 3 coats of Sig™
sanding sealer on the primary fins (and the nose cone), sanding with 400 grit sandpaper between coats, before gluing
the fins on the body tube. After completing assembly, I sprayed the entire rocket with three coats of Kilz primer,
again sanding between coats with 400 grit. This completely covered the balsa grain and the spirals in the body tube
(which were shallow to begin with). The balsa grain of the auxiliary fins barely showed upon close inspection; but
since these are covered by decals, that was satisfactory to me (besides, sanding such tiny fins would have driven me
crazy!). In retrospect, I think I'll try another coat or two of Kilz™
on my future balsa rocket components, skip the sanding sealer and see if I can cover the grain that way.
Being a cheapskate, I checked the compatability of the paint I already had, rather than going out first to buy all Krylon™ products. I had Design Master Larkspur Blue® (which my daughter had chosen for one of her rockets) and Quick Color white® (99 cents from Home Depot™) on my shelf, so I sprayed them over Kilz™ on a spare piece of body tube. After drying, I coated these paints with Krylon gloss clear®, which, again, I had on my shelf. I also tested the Krylon clear on a corner of decal sheeting which I cut off from the decal sheet included with the kit. There were no devastating reactions between these paints. I sprayed the Quick Color white® on the bottom half of the rocket, then masked it off with newspaper and Frog green tape to spray the top half with Larkspur Blue. After removing the newspaper, I found that some of the printing had come off on the white paint; so I sprayed one more coat of white over it.
The decals were the best with which I've ever worked! They were thin enough to glide over curved surfaces, but thick enough not to break. They practically slid themselves into place! A few nudges with my finger, and they were done!
One historical note: I've always been somewhat bothered by the combination of English text ("Blue Bird Zero") and WWII German markings. (I'm strange that way!). I briefly considered making my own decal with a German translation of "Blue Bird Zero;" instead I decided that this rocket was from an "alternate timeline" in which the Germans and British were allies during WWII. Accordingly, I added Sir Oswald Mosley's lightning-bolt logo to the center of the wreath carried by the German eagle. (Google the word "Mosley" if you're interested; he would have been the obvious choice for Prime Minister during a German/British alliance. But I digress...).
I didn't have a chance to clear-coat the rocket until I got to the field. Fortunately, the Krylon clear dries fast.
Construction Rating: 5 out of 5
 Flight:
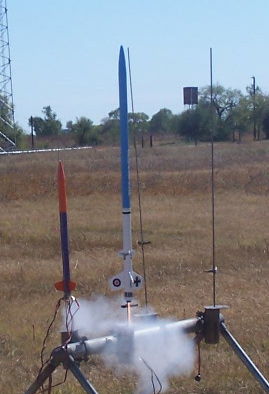
I launched the Blue Bird Zero three times on November 8. I only used recommended motors. The maiden flight occurred
on a B4-2, followed by flights on a B6-4 and a C6-5. The chutes deployed at or slightly after apogee on all three
flights. I've read reviews of scratch-built, upsized versions of this rocket and the flight characteristics of my
rocket seem similar. It doesn't catapult off the pad (at least with the motors I used) but accelerates smoothly, with
minimal weather-cocking. It's such a pretty rocket, I don't intend to push it to the limit; so a C6-5 is as powerful as
I'll use. It probably went 800 or 900 ft. on that motor as close as I can estimate.
Recovery:
The Thermal Rider chute feels slightly slick, doesn't stick to itself, and rolls/packs easily. (They're so good, I
ordered a 5-pack of these chute kits, of assorted sizes, for use in my other rockets!).The parachute is the perfect
size for this rocket in terms of descent rate and wind-drift. One primary fin was loosened after the third flight, but
I attribute this to the very thin fillets of Glue-All which I used. I added another fillet when I got home, and it's
fixed.
Flight Rating: 5 out of 5
Summary:
It's taken me 30-plus years; but I think I've finally learned how to build a rocket according to the instructions and
achieve a paint-job which satisfies me! Accordingly, it's appropriate that I honed my skills on this kit, which dates
from the mid-1970s when I first got into this hobby. To me, my Blue Bird Zero is a display piece. It's not a
high-performance bird; but that's O.K., because I don't want to lose it. It's pretty; it's made of high quality
materials; and it's reliable. I've thoroughly enjoyed building and flying this simple, but satisfying, rocket. If this
kit is representative of other Inflight products, I'll definitely be shopping with this company again!
Overall Rating: 5 out of 5
Other Reviews
- InFlight Rockets Blue Bird Zero Clone Kit By Marlin Meyer (April 25, 2010)
Brief: Single stage, low powered rocket, recovery via 18 inch parachute. Construction: Parts list: 1 BNC-55AO balsa nose cone 2 BT-55 body tubes - 18" 1 BT-20 Engine Holder Tube 2 CR-2055 centering rings 1 3/16" screw eye 1 engine hook 1 1/4" x 24' shock cord (elastic) 1 18" plastic parachute kit 1 3/16" launch lug 1 ...
 |
 |
Flights
Sponsored Ads
 Blue Bird Zero™ KMX-06")

 Model Rocket Kit")


|
|