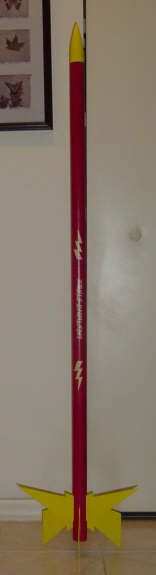
RocketHead Rockets Lightning Strike
RocketHead Rockets - Lightning Strike
Contributed by Donald Besaw Jr
| Construction Rating: | starstarstarstar_borderstar_border |
| Flight Rating: | starstarstarstar_borderstar_border |
| Overall Rating: | starstarstarstarstar_border |
| Manufacturer: | RocketHead Rockets |
Brief:
The Lightning Strike is a 5 foot tall clustered 3x18mm rocket with lightning
bolts for fins. According to the manufacturer, 1,000 foot flights are possible
with three C6-5 motors.
Construction:
The kit came packaged in a plastic bag with a very professional looking header
card and included the following:
- 3 BT-60 body tubes
- 3 upper fins
- 3 lower fins
- 2 tube couplers
- 1 balsa nose cone
- 3 motor mount tubes
- 3 thrust rings
- 1 18" red mylar parachute
- 1 shock cord mount
- 1 bulkhead
- 2 1/4" launch lugs
- 2 nose cone screws
- 1 screw eye
- 1 instruction booklet
- 1 fin marking guide
- 1 sheet of waterslide decals
I would rate this at least a high skill level 2 project due to some of the construction techniques utilized in the construction of this kit.
The instructions were very easy to understand and included a lot of text and color photos. There were a few typos though but it was not a problem. No templates were included in the instructions but a fin marking guide is included with the kit.
To build this kit you need: White, CA or epoxy glue, hobby knife, masking tape, scissors, pencil, ruler.
I started by assembling the motor mount assembly. The thrust rings are inserted into the tubes by using a spent motor casing. The three motor mount tubes are then glued together. One great tip included in the instructions is sanding all the glassine off the tubes before gluing. Trust me, this works very well. I then applied glue fillets to complete the motor mount assembly.
After the glue dried, I glued the motor mount assembly into one of the BT-60 tubes. You may notice that there are no centering rings used. Instead, you must shove gluey wads of paper towel to seal off the gaps between the tubes. This proved to be a very messy and time consuming technique. I would have preferred centering rings.
I took the body tube with the motor mounts in it, sanded the glassine off it, cut out the fin marking lines and marked the tube for the fins and launch lugs. I then attached the fins one at a time. Even then I found the fins difficult at best to attach due to their size. After all fins were secure, I added several fillets for strength. I then took another BT-60 tube, sanded it and drew a line on it and made a mark for the second launch lug.
I differed from the instructions a bit here by securing the Kevlar® shock cord mount in a paper anchor instead of just gluing it to the internal wall of the coupler like the instructions mentioned. I then glued the shock cord mount into the coupler. To get the couplers to fit properly in the body tubes, I had to remove the top layer of paper and sand them smooth. I then glued the coupler into the marked body tube. When the glue dried, I aligned the lines and glued the tube into place.
I assembled the bulkhead assembly at this point. I glued the bulkhead into the remaining coupler and applied fillets on both sides for strength. I then screwed the eye bolt into place.
A nice touch with this kit is that it includes two thick HPR type 1/4 inch launch lugs. I glued them on one at a time and added several fillets to each one for added strength.
I then tied the elastic shock cord into place and tied a loop in it for the parachute. The parachute was attached to the shock cord as instructed.
The nose cone can now be attached in one of two ways. First, it can be made removable by screwing it into place with the included screws. Second, it can be permanently glued into place. I decided to glue it on but I decided to wait until after it was painted to attach it as I didn't particularly care for the appearance of the screws.
PROs: High quality parts, quick build.
CONs: I didn't like having to use wads of gluey paper towel to seal off the gaps in the motor mount assembly. The fins were somewhat difficult to attach.
Finishing:
After everything was sanded smooth, I sprayed the entire rocket with coats of
white Ace brand primer and sanded between coats. I followed the paint scheme on
the header card. I then sprayed the fins and nose cone with gloss enamel.
After the yellow paint was completely dry, I masked off the fins and sprayed the body with gloss red enamel. Wow!!! I could not believe how much paint this would require. The can was about 3/4 full when I started and was just about empty when I finished.
After the red paint was completely dry, I applied the water slide decals without incident, let them dry overnight and applied clear spray enamel to protect them.
PROs: Easy to finish, stock paint scheme was easy to duplicate.
CONs: Required a LOT of paint but I'm not sure this could be considered a CON due to the rocket's size.
Construction Rating: 3 out of 5
Flight:
The recommended motors for this rocket are three Estes C6-5 motors. I had
received an email from Tom of RocketHead recommending against the use of B6-4s
as it would result in a low and potentially heart stopping flight. The three
motors are friction fit into place and wadding is required to protect the
parachute.
For the first flight, I loaded the rocket up with three C6-5s installed with ignitors and then packed some dog barf type wadding to protect the chute.
I loaded the rocket onto the pad with a 1/4" rod. I also used a Thrustline 3 motor clip whip to insure simultaneous motor ignition.
At launch, all three motors lit with no problems and the rocket took off with some minor wobbling at first since it was a bit windy, but then it straightened out nicely and continued up to about 700 feet or so, arched over and deployed the chute without incident.
PROs: Flies great
CONs: None that I can think of here.
Recovery:
The 18" parachute appeared to be the right size and brought the rocket
down safely. After landing, it was unfortunately dragged through the grass by
the wind. As a result, I noticed an area where the fin peeled away from the
body tube but was easily fixed with some CA. I then touched up the paint and it
looks almost new again.
Due to the size of the fins, this rocket will almost likely suffer fin damage at some point. Since the fins are 1/16" ply, it will most likely to be the type of damage mentioned.
PROs: Correct size parachute, recovered nicely.
CONs: Fin damage will most likely be an issue with this rocket.
Flight Rating: 3 out of 5
Summary:
I really liked this kit and think it will made a great addition to anyone's
fleet for $24.95 direct from RocketHead Rockets. The only thing I didn't
particularly care for was the motor mount assembly and the fins may or may not
prove to be an issue. Maybe large epoxy fillets might prevent this.
Main PROs: Nice finished appearance and flight performance, high quality parts used throughout, reasonable price.
Main CONs: Minor motor mount assembly and fin issues. Nothing major though.
Overall Rating: 4 out of 5
 |
 |
Flights


|
|