| Construction Rating: | starstarstarstarstar |
| Flight Rating: | starstarstarstarstar |
| Overall Rating: | starstarstarstarstar |
| Diameter: | 1.63 inches |
| Length: | 48.00 inches |
| Manufacturer: | LOC/Precision  |
| Skill Level: | 3 |
| Style: | Sport |
 Brief:
The LOC/Precision Weasel is a simple, near minimum diameter 3FNC MPR that can fly as little as an E or absolutely tear a hole in the time-space continuum on a high thrust H.
Construction:
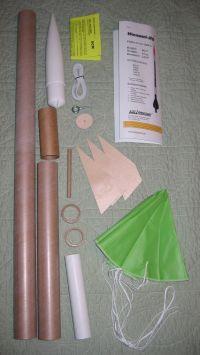
The Weasel is a basic kit with a minimal number of parts. The kit includes:
- 1 1.63"d ogive plastic nose cone
- 1 38mm x 11.5" payload tube
- 1 38mm x 27" body tube (premarked for fins and launch lug)
- 1 coupler
- 1 birch plywood bulkhead
- 1 screw eye
- 3 birch plywood fins, 1/8" thick
- 2 paper centering rings
- 1 29mm x 6" motor mount tube
- 1 14" nylon parachute
- 6ft elastic shock cord
- 1 shock cord mount
- 1 launch lug, 1/4"ID
The build went very quickly and offered no surprises. I started by briefly reading the instructions, which I found to be a little on the thin side content wise, however, anyone who has built even a few LPRs shouldn't have any problems with the Weasel. The directions recommend using epoxy for the build, but I am confident that my usage and application of yellow wood glue (aliphatic resin) for the wood and paper components will also be more than adequate if not as durable in building this kit. The motor mount was simply 2 paper rings and a tube. To attach the fins, I rough sanded the body tube with 150 grit sandpaper (almost to the point of sanding the premarked lines off) and then used the "double glue" method for tacking the fins to the airframe. 2 applications of yellow glue fillets followed. The fins offered little if any flex after the fillets were applied.
I should mention that I did use a small amounts of polyurethane glue and epoxy in the build. The polyurethane glue is my preferred method of securing the screw eye into the coupler bulkhead as it foams slightly to create a satisfyingly sticky bond between metal and wood. The 12-minute epoxy with a little milled fiber for added strength and thickness was used to attach the nylon string shock cord mount inside the main airframe tube.
Lastly, I'm not big on launch lugs so I drilled and attached a pair of rail buttons right into each of the paper centering rings with CA and saved the paper lug for another project. And while drilling the holes for the rail buttons, I also put 1/16" vent holes in both the payload and booster tubes.
Even allowing for everything to dry or cure, the Weasel went together in only a couple of hours.
Finishing:
I don't think I am alone in wishing that LOC/Precision should include decals with their kits. They just make their rockets look so doggone good on their website that it's simply wrong they don't include any decals or information on how to make yours look like the picture.
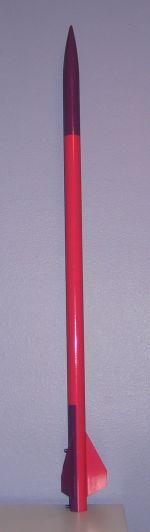
Decals aside, I kept the finishing work simple like the rest of the rocket. The fins were sealed with Elmer's Fill 'n' Finish and then sanded smooth. The tubing has slightly noticeable spirals but I didn't feel that they were enough of an issue to warrant filling them. The rocket was then primed with Krylon white primer, sanded with 400 grit sandpaper, and then primed and sanded again. Finally I had myself an excellent opportunity to apply a color I'd been wanting to use for some time: Krylon Gloss Watermelon. It's not too soft a pink to be considered feminine (not that there's anything wrong with that) but it is such an eye catching color! I added Krylon gloss purple as an accent color--another great color that should be great for helping locate the rocket in the field! I painted a couple of fins and halfway around the body tube so I can easily track any rotation during flight. For a final touch, I added some automotive pinstriping.
Construction Rating: 5 out of 5
Flight:
Prepping the Weasel for flight is reasonably easy. There isn't much room for any kind of external motor retention so masking tape is the obvious solution to holding the motor in place. A handful of dog barf cellulose wadding goes in the other end of the booster tube followed by the shock cord and chute before closing it up and putting it on the pad. An AeroTech G104T-M was used for the Weasel's first flight. While the total impulse is rather low, I liked this motor because of it's high average impulse! I used that motor with the intention that the rocket would zip off the pad but not go ridiculously high. Well, if nearly 2000ft is someone's idea of not ridiculously high!
The Weasel flew just as I expected it to. The high thrust, fast burning motor sent the Weasel up on a long, mostly silent glide to apogee where it ejected right on cue. Excellent!
Recovery:
The 14" chute is tiny but made of non-porous rip stop nylon with some stout shroud lines (almost certainly strong enough to serve dual duty as a drogue chute for larger rockets!) If the chute didn't come with the kit, I'd probably (and still might in the future) switch it out for a plastic streamer. The chute is small compared to the rocket's size and that might alarm some builders new to MPR. However, it should not only be more than adequate to safely get the rocket down, the rocket's aft end with the motor mount and the fins are placed far enough forward that the rocket would sustain extremely minimal damage if any at all on all but the hardest surfaces. (In fact, you can pretty much guarantee that it's the motor casing that will accept the brunt of landing impact regardless of launch site.)
I attached the chute with a quicklink so that I can attach it as needed to the shock cord. And speaking of the shock cord, it is 6 feet of standard 1/4" elastic--basically an upscaled version of what you'd find in a typical LPR kit. I didn't have any problems with the quality of the elastic but I thought it to be a little on the short side, preferring an extra 2 or 3 feet. I used it anyway and it proved to be an acceptable length. The nylon string that is epoxied just inside the forward end of the booster appears to be pretty rugged and makes the elastic easy to replace if necessary in the future.
The chute came out perfectly and the rocket descended quickly. Being a relatively light rocket, I didn't want it drifting anyway. The chute and shock cord are more than acceptable for this rocket.
Flight Rating: 5 out of 5
Summary:
The LOC/Precision Weasel is a great introductory MPR kit for someone making the transition from LPR. It uses many similar build techniques found in LPR and is a simple design that shouldn't overwhelm the builder. The small diameter of the kit means that you're most likely going to have to resort to masking tape friction fit motor retention but that is a technique worth learning. About the only other thing someone might need for this kit is a 29-24mm motor adapter to fly it on 24mm E and F motors.
Overall Rating: 5 out of 5
Other Reviews
- LOC/Precision Weasel-29 By Steve Graham
Single stage, 14" parachute recovery at apogee using motor ejection. Two airframe BT's (27", 13"), 1.6" LOC nose cone, 3-plywood fins, 2- paper centering rings, LOC-type 29mm motor mount tube (8"long), 1 coupler, bulkhead, and eye screw. You also receive a length of 1/4" elastic for a shock cord. No decals. Instructions are straight forward. I always expect good things from Barry. The ...
 |
 |
Flights
|
|
S.G. (August 12, 2002)
P.C. (June 2, 2005)


|
|
R.T.P. (August 10, 2002)