Scratch Upscale Astron Streak Original Design / Scratch Built
Scratch - Upscale Astron Streak {Scratch}
Contributed by Bruce Shepherd
 Brief:
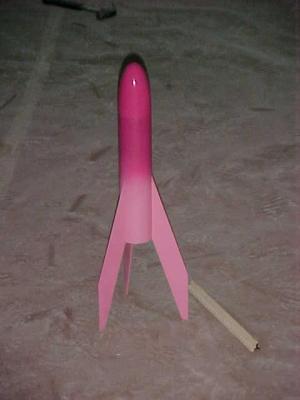
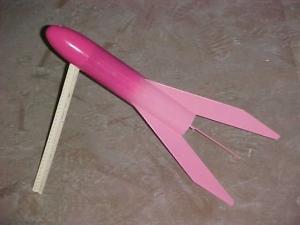
A single stage upscale of the Astron Streak using a Fat Boy nosecone,
parachute, and engine mount components, as well as a spare BT-80 tube and balsa
fin stock.
Construction:
We used a BT-80 body tube I had from an assortment of body tubes I got on eBay
a while ago, cut to 10-1/2 inch length. The motor mount was stock from a Fat
Boy kit, which had a crushed tube. The nosecone was from the same Fat Boy kit.
We used the standard Estes three fold shock cord mount (glued, attached and
coated with more glue), but replaced the shock cord with elastic that was about
twice as long.
Construction started with the building of the motor mount, which was simple and straight forward. I considered using something larger than an 18mm motor mount, however, since this was to be my daughter's rocket, we stayed with the standard mount.
My daughter assembled all the motor mount components and glue was applied to the mount assembly and allowed to dry before installing it in the rocket body. We then attached the shock cord, using the standard Estes 3-fold technique, but we used lots of Tacky Glue in the folds, attaching the mount to the body tube, and coating it after attachment.
I scaled the fins up from my original fin template I had (from 1972!), transferred them to the balsa, and cut them out. We sanded and shot the fins with primer, sanded again, and tacked them to the body with Tacky Glue. This allowed my daughter to line up and attach the fins without the time pressure of a CA. We then filleted heavily, using Tacky Glue again. My daughter enjoyed the sanding (to a point) but was so excited to be building "her rocket"(!) that we had to run outside and paint the moment that Dad pronounced the fillets to be dried.
 Finishing:
This was to be a PINK rocket, so she chose Plasticote dark and light pink spray
paints (the little cans from WalMart). We painted a light coat of light pink
followed by a light coat of dark pink.
The parachute was attached and packed and we were ready to fly!
Flight:
We finally got a chance to fly recently, using a bulk pack of motors (I got
from Michael's with a half-off coupon). We flew A8-3's and B6-4's for nice,
easy-to-track flights. The rocket was easy to prep, using several sheets of
wadding including wrapping the parachute in a sheet to prevent scorching.
My daughter took part in all the prep as well as pushing the button for each flight. Flights were not too fast off the pad, straight, and easy to track.
Recovery:
The parachute came out with no problems each time and then the chase was on!
Summary:
PROs: Building and painting was easy, quick and fun for a 6 year old and
wonderful for her Dad! *grin* Also brought back memories of my little Streak I
has as a kid- this would be an easy kit for Estes to put out there along with
their Fat Boy.
CONs: None I can think of
Other:
Tip: Guide your child, but let her (him) build. The most exciting part of the
build was attaching the fins - it started to look like a rocket!


 |
 |