Squirrel Works Interstellar Probe
Squirrel Works - Interstellar Probe {Kit}
Contributed by James Gartrell
| Construction Rating: | starstarstarstarstar |
| Flight Rating: | starstarstarstarstar |
| Overall Rating: | starstarstarstarstar |
| Diameter: | 0.98 inches |
| Length: | 24.25 inches |
| Manufacturer: | Squirrel Works  |
Brief:
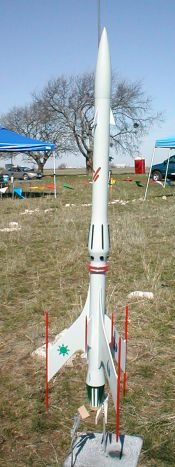
An exotic single stage rocket, the [Nick Adams'] Interstellar Probe is reminiscent of the
original Estes Mars Snooper, looks fantastic, and flies great! I got my kit
from Don as a beta test kit. The rocket stands a little over 24" tall,
flies on 18mm motors, and recovers by parachute. The kit is probably fairly
rated a Skill Level 3, but Don's instructions are very detailed with plenty of
step by step illustrations that make building the kit very straightforward.
Construction:
This kit has a ton of parts: a BT-50 body tube, an extra long 18mm engine mount
that also serves to hold the rear tail cone, balsa nose cone, screw eye,
1/8" x 36" elastic shock cord, 15" Mylar parachute, 1/8"
launch lug, 4 laser-cut fin/parts sheets, shroud templates, lots of centering
rings, 3 hardwood dowels and toothpicks, and some really nice multicolor
decals. A "small parts" bag is also provided that is very useful for
keeping all the little pieces in one place. The shock cord was long enough that
I didn't have to substitute it, although I did add an 8" length of
Kevlar®
at the shock cord attachment point.
This is probably the best set of instructions I've ever seen. Don really went out of his way to make construction of this kit a snap. The instruction steps are numbered with tons of helpful illustrations. Although construction begins with the motor mount (install engine block and an engine hook for positive motor retention), it isn't installed until later in the build. While this initially seems weird, it makes perfect sense as you progress through the build. It is one of those changes that shows how much thought Don put into making this build as easy as possible. He even provides a laser cut part that's used to assist with installation of the launch lug! Next, using the marking guide included in the instructions, about umpteen lines are drawn along and around the main tube to mark placement of the fins, shrouds, exterior rings, etc. The body tube didn't require any finishing to fill in the seam lines, and they were hardly noticeable after primer and paint. Probably the hardest part about this kit is the installation of the three shrouds. I don't typically have a lot of problems with them, but for many, even one shroud is a challenge. This is another area though, where Don has taken extra effort to beef up the instructions to make installation of the exterior rings and shrouds go smoothly. Making sure the shrouds slide easily on the body tube, minimizing the amount of glue used, and getting the shrouds in place quickly is a must. After the exterior rings and shrouds are installed, the fins, dowels and toothpicks are glued on. The laser-cut fins were perfectly matched, as well as all of the small parts that attach on the upper shroud. This is one of those kits that will cause you to appreciate laser cut parts! After removing the fins from the fin sheets and rounding the leading and trailing edges, the three main, aft, and forward fins were glued on and the dowels and toothpicks added. The instructions actually indicated installing the dowels and toothpicks onto the fins before gluing them onto the tubes, but I decided it would be easier to put the fins on first then add the dowels and toothpicks. That way, I wouldn't have to worry about the fins falling over due to the extra weight. At this point, I deviated again from the instructions and finished the rocket, except for decals, to keep from having to mask everything off. Afterwards, I picked back up with the instructions and installed the twelve small balsa vanes onto the tail cone. This goes pretty quickly the way Don instructs to place them. The motor mount was also installed during this step, and then the twelve small balsa pieces were added onto the upper shrouds. Whew! This isn't one of those kits that you build in a couple of hours. Nope, this is one of those kits that you savor over an entire weekend. A tri-fold shock cord attachment was provided in the instructions to connect nose cone and body tube. As is usual on any rocket I build, I installed a length of Kevlar® in the shock cord attachment with a loop at the end to attach the elastic shock cord. To minimize abrasion from the Kevlar® against the body tube, I soaked in CA around the top 1/2" of the body tube and tied the Kevlar® so the knot in the loop meets the lip of the body tube. Finally, the launch lug, screw eye and shock cord were attached, and the separately packaged parachute was assembled.
Finishing:
I used Elmer's Fill 'n' Finish for all the balsa pieces, but any balsa filler
will work fine. All of the balsa was finished before attaching it to the
rocket, and the rear vanes and small parts were painted before attaching them.
There's way too much on this rocket to try and do either of those afterwards.
Just be careful so you don't have glue all over the place. I also used FnF to
fill in the seams around the shrouds before painting. Even cutting the decals
very close to the edges of the design, they laid down easily and were easy to
work with. Even my wife thought it was a great looking rocket, and she doesn't
even like rockets!
Construction Rating: 5 out of 5
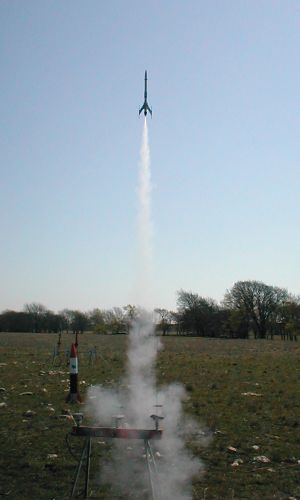
Flight:
Preparation for flight requires standard wadding. I only doubled the parachute,
rather than tri-fold, for a looser fit in the BT-50 tube. My only flight so far
was on a B6-4 but it went a lot higher than I thought it would. Wind was about
5 mph. It jumped off the pad and flew perfectly straight with ejection right at
the top. With a finished weight of only about 2 ounces, this rocket should
achieve some serious altitude on a C motor and will likely get pretty good
altitude even using an A.
Recovery:
I had already resigned myself to expect at least one of the dowels to break
upon landing, but the 15" Mylar chute brought the rocket down perfectly.
Even though the chute was a tight fit, I'm glad I didn't drop down to a
12" chute.
Flight Rating: 5 out of 5
Summary:
The Interstellar Probe looks fantastic and provides the builder with some
definite satisfaction upon completion. Nick Adams deserves a big thank you for
making such an excellent design available to us all! It definitely turns heads
as you approach the launch pad. Kudos to Don for the excellent instructions
too, and to Terri for another face card with awesome graphics!
Overall Rating: 5 out of 5
 |
 |
Flights
Sponsored Ads


|
|