| Construction Rating: | starstarstarstarstar_border |
| Flight Rating: | starstarstarstarstar_border |
| Overall Rating: | starstarstarstarstar_border |
| Diameter: | 6.00 inches |
| Manufacturer: | Tango Papa  |
 Brief:
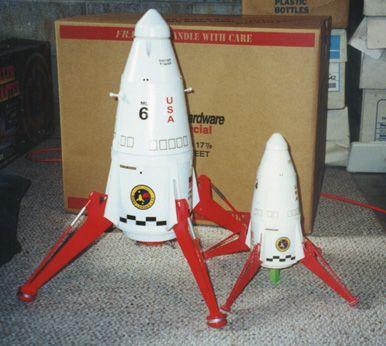
Tango Papa's 1.6x Mars Lander is a nice upscale of the vintage Estes Kit that fetches ungodly amounts of money in an auction. If you have the same fond memories of the Estes kit from your childhood that I do, then you need to look at this kit. The kit comes standard with a 29mm motor mount, and parachutes are optional. I believe the standard parachutes come from Top Flight, but I'm not certain. Shock cord is a length of standard elastic.
A complete set of decals, upscaled from the original Estes decals, comes on a sheet with the kit. As one can expect from Tango Papa, the decal appearance is impressive.
A nice final touch is the inclusion of dual-purpose motor retention hardware. Not only do the bolts hold the motor in place, but they also hold the rear of the rocket on, which means it can easily be removed.
Construction:
The kit includes a lot more parts than the standard high-power kits, which is understandable, considering the complexity of the end result. The parachute tube is a heavy, rough cardboard tube; normally, I wouldn't like this, but since this tube is completely covered by the shrouds, structurable integrity is the only thing that matters. The descent stage tube, which is where the legs come through, is a good quality phenolic. The motor tube is good quality cardboard tube.
Also included are a plywood centering rings for the large tube, as well as three wooden rings to mount the motor tube into the parachute tube, and to also provide a mounting point for the leg supports. All are high-quality parts.
Many of the smaller pieces are laser-cut from appropriate materials, including basswood and balsa. The main leg braces are made from aluminum rod, which is appropriate since this is what takes the primary force.
The legs are attached to the body with heavy vinyl tubing for the hinges, just like the Estes kit. The kit also includes rubber bands for use as springs, once again like Estes. The bands supplied could not support the assembled weight of my lander, so I replaced them with small springs from the local hardware store.
The shrouds themselves are printed on poster-board with lines instead of being embossed like in the original kit. Fabric paint is supplied to allow the builder to draw raised lines to give the shrouds detail. More on this later.
The shrouds themselves require rings to hold their shape and provide attachment points. These rings are foam-core board, which is plenty sufficient for this purpose.
To complete the kit, you will have to provide appropriate weight, which the kit provides placement instructions for. I found that flexible fishing weights (basically braided nylon tubes with shot in them) worked well for the weight to be placed in the top shroud.
This kit is not for the impatient. I estimate that I spent 10 hours or so just building the legs and getting them sanded properly. During this time, the kit progress really seemed to creep along. Once the legs were done, things picked up a bit, although I still estimate I spent about 30 hours in construction time.
The instructions are fairly detailed and quite lengthy, although a bit confusing in some cases. It is critical that you read and understand the steps before performing them, or it may come back to bite you later on. Tom Prestia is very good about answering emails with questions regarding the instructions.
There are also some photographs included to help with certain aspects. These definitely are valuable.
As started earlier, the shrouds are made from poster-board with lines printed on them where the Estes shrouds were embossed. The fabric paint supplied works nicely for creating raised details, although it takes a steady handy for best results. Because I can't draw a straight line with a ruler, my details aren't as nice as what others are able to do, although I am happy with the result.
In forming the shrouds, I suggest using rubber cement to glue the ends of the shroud together. I used white glue, and have a minor point where mine are joined. With rubber cement, the joint stays flexible while the support rings are installed, so the end result is better. Since the rings themselves are what actually hold the shrouds in place, using rubber cement will not present a structural issue down the road.
Patience and a small bit of fiddling are required to get some of the final details to fit properly. This task isn't overly difficult, but is also something that you cannot rush, or it will show in the end result.
Finishing:
Finishing is quite easy, since the legs are removable. On the original Estes kit, it is necessary to paint the legs prior to assembly, then mask them off when the main portion of the rocket is assembled. The Tango Papa kit has removable legs, so painting is a lot easier.
Since the kit includes a lot of decals, and all the decals come on a single sheet, it takes time to cut and place everything appropriately. Also, the decal film is a bit thin, so if you are not careful, they will curl under themselves. Patience, once again, is necessary for the best final result.
I covered my completed rocket with Future floor finish to provide some protection for the decals.
Construction Rating: 4 out of 5
Flight:
While Tom Prestia recommends G motors for this lander, I wasn't comfortable with such a small motor in a rocket this heavy. Instead, I used an H128-S for all my flights.
My lander has flown four times, with three beautiful launches. Up was quite impressive on those three, with the fourth having problems which I can only blame on myself.
There's a simple little law in physics which states that an object at rest wants to stay at rest. This applies well to our rockets, and in provides itself on the second flight of my lander. The first time I flew the lander, I used a standoff which kept the base fairly high off the pad. On the second flight, for some reason, I didn't use a standoff. This meant that the rear of the rocket was pretty much right on the blast deflector plate. That was fine, except for the legs. Because the legs are hinged, when the motor first fires, the legs try to stay in place when the rocket body begins moving. This results in the feet "tucking under" the rocket a bit. Due to the size of our club's blast deflectors, once foot was able to catch on the deflector when this happened. That put a pull on one side of the rocket, causing the rod to flex in that direction. Eventually, the leg pulled free form the lander body, freeing the rocket. Now, physics comes into play twice -- first is the asymmetrical drag on the rocket. Second is the launch rod now snapping back to the other side, causing the rocket to be flung off the rod on an arc. The rocket spun in the air, then slammed into the ground when the motor cut out.
Moral of this story? ALWAYS use a stand-off with the Mars Lander, unless the deflector can in no way hook the feet when the legs tuck under on launch.
On my fourth and latest launch, I ran into a different issue, which is also not the manufacturer's fault. The parachute tangled on deployment, keeping the canopy from fully inflating. This caused the rocket to come in a bit fast, and sustain some (repairable) damage on landing.
Recovery:
There are two decent quality parachutes included with the kit. On my first two launches, I used the included parachutes for the main body of the rocket, and recovered the nose cone on a separate 15" parachute, at the recommendation of the manufacturer.
Due to space limitations, packing that much parachute into the rocket is tricky, so I have since switched to a single larger parachute I had custom-built for this rocket.
Including one larger parachute with the kit would be an improvement, I believe.
I have also replaced the elastic with a long piece of light-weight tubular Kevlar -- I'm just not comfortable with elastic in rockets, and especially not in high-power.
Flight Rating: 4 out of 5
Summary:
Overall, I was very pleased with this kit. Impressed enough that I convinced my wife to buy me the 2x Mars Lander for Christmas the following year. The 1.6x Lander was a Christmas gift, also.
The biggest improvement that Tom made with this kit is making the back end removable, so that the legs can be serviced.
Overall Rating: 4 out of 5
Other:
You could, with minor edits, use the 2x review for the 1.6x kit. The only difference would be the motors and flight info.
Other Reviews
- Tango Papa 1.6x Mars Lander By Mike Caplinger (February 4, 2015)
The Estes Mars Lander, designed by Wayne Kellner, was released in 1969. I remember getting the kit for Christmas in the early 70s and assembling it over the course of a year or more; it was easily the most complex build I had ever attempted. I think mine flew once on a B6-2, and as I recall it got about 50 feet up and barely managed to deploy the chute. Tom Prestia of Tango ...
 |
 |
Flights
|
|
Sponsored Ads


|
|
B.B. (May 23, 2002)