| Construction Rating: | starstarstarstarstar |
| Flight Rating: | starstarstarstarstar_border |
| Overall Rating: | starstarstarstarstar |
| Diameter: | 1.34 inches |
| Length: | 16.60 inches |
| Manufacturer: | Semroc  |
| Skill Level: | 1 |
| Style: | Sport |
Brief:
You TV trivia fans will love this one. You might be sharp enough (or old
enough) to recall "The Man From U.N.C.L.E" series from 1967. I'm not,
but Carl at Semroc is, and he's included a nice biography/history of the rocket
design for this kit. The series featured a car that had a rocket launcher built
into the gull-wing doors. The "real" rockets on the show were powered
by Centuri Mini-Max F engines. This downscale only runs on 18mm but flies very
nicely just the same (but from a rod, not from your car door).
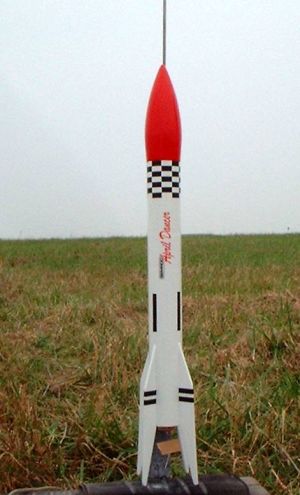
The rocket is named after the lovely Stefanie Powers, who played the Girl from U.N.C.L.E. for the show's one season and like the star, the bright red head on this rocket has a definite eye-appeal.
This model also sports a new Semroc feature--an ejection gas baffle system, which was a very nice feature in such a modestly priced ($13.50 retail) kit.
Construction:
As is customary with most every Semroc kit, this one comes complete with a
waterslide decal that has the production unit number and basic specs. I've got
quite a few "numbered" rockets, although this is the only one that
could potentially sport the number on the rocket in the form of a decal.
The parts list includes:
- Balsa nose cone (definitely custom shape), screw eye, retaining disk
- Clay nose weight
- Baffle system
- White glassine body tube
- Laser cut balsa fins
- 18mm motor mount/centering rings
- Metal motor hook
- Kevlar®/elastic shock cord
- 12" plastic chute
- Water slide decals
Semroc instructions are clear, easy to follow, and generally include not only construction tips but craftsmanship tips as well. They're very good kits to grow into once you've "mastered" an E2X/Quick kit or two.
Construction begins with the nose cone. It's hollowed out for the addition of clay weight. Looking at the puny fins, I'm glad this had this extra weight. The clay packs in then a plywood disk with screw eye is bonded in. Be sure to apply a generous fillet on the joint here, as the disk will want to pop out after a couple of flights and send your beautiful custom nose cone into orbit.
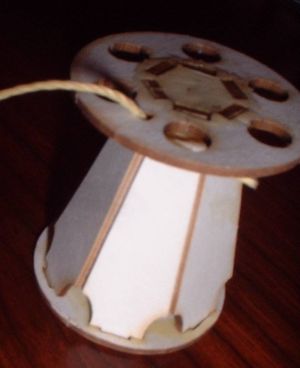 The ejection
baffle assembly is a very neat idea. Baffles are hardly a new innovation but
seem to have disappeared until recently. I've experimented with a few different
designs and found this one of the easiest to build. Being made from fiberboard,
time will tell whether or not it's durable. The assembly consists of a pre-cut
"shroud", which is glued to a lower disk and an upper disk (see
photo). The inside of the shroud is lined with a layer of glue to protect it. I
gave a thought to epoxy but decided to build this one stock and went with
yellow glue. The Kevlar®
shock cord is anchored to this, which is subsequently glued into the body tube.
The instructions call for mounting it 3 inches deep, which leaves only a small
amount of room for the chute, however, you don't want to go much lower or the
gases won't have cooled enough.
The ejection
baffle assembly is a very neat idea. Baffles are hardly a new innovation but
seem to have disappeared until recently. I've experimented with a few different
designs and found this one of the easiest to build. Being made from fiberboard,
time will tell whether or not it's durable. The assembly consists of a pre-cut
"shroud", which is glued to a lower disk and an upper disk (see
photo). The inside of the shroud is lined with a layer of glue to protect it. I
gave a thought to epoxy but decided to build this one stock and went with
yellow glue. The Kevlar®
shock cord is anchored to this, which is subsequently glued into the body tube.
The instructions call for mounting it 3 inches deep, which leaves only a small
amount of room for the chute, however, you don't want to go much lower or the
gases won't have cooled enough.
The motor mount assembly is standard 18mm tube, motor block, and a couple of centering rings. There is a metal hook for retention.
Fins are long and sleek, swept way back from the aft end. (Is that another subtle reference to the legs of the namesake? Probably just coincidence, as this is a scale model after all.) Alignment is done via a template in the instructions. The only thing I can ding the build on is that I prefer using a wraparound guide (or my Estes tube marking guide, which doesn't fit Semroc's Centuri tube sizes).
The launch lug is a long 1/8" tube and is mounted to a small standoff to clear the oversized nose cone.
Overall, this is probably about a 1-2 hour project--or 5 hours if you really get into filling spirals and grains. In my case, I spent the better part of a day on surface prep before beginning construction, as I really wanted this one to have a fantastic appearance. It just looks too cool for a half-[fannied] job. I'd rate it about a skill level 2 on the 1-5 scale.
Finishing:
The finishing techniques on this one were my usual diluted Elmer's Wood Filler,
one coat in the tube spirals, and two coats on the nose and fins. I prefer to
do this before construction rather than later, as I don't have to work around
tight edges/corners, and a sanded tube offers a much better bonding surface for
fins.
The paint scheme is very easy on this rocket with no masking required (assuming you paint the nose cone before attaching it). The lower body got two coats of primer, followed by two coats of gloss white. The nose cone got the same treatment, but finished up with two coats of Testor's Guards Red. It's about 4 times as expensive as the Krylon I normally use but this is just a beautiful red and is occasionally worth it.
The decals were easy to work with, rugged enough to adjust a bit. Pay attention to the stripes though. There are 4 long and 4 short stripes with not much difference between the two lengths. The shorter ones are just the right length to wrap around the fin edges, striping both sides. I was very impressed that the clear portion of the decals doesn't stick out too noticeably on the finished model.
After allowing everything to dry for a couple of days, I sealed it up with Future Floor polish.
Construction Rating: 5 out of 5
Flight:
First flight was on a breezy, overcast day and I decided to go for a lower
altitude B6-4 flight. I was also a bit paranoid about the stability of the very
small fins. It turns out I had nothing to be worried about--this flew very
nicely with a slight weathercock into the 10 mph winds. Ejection was right at
apogee, which was about 300 feet.
Recovery:
The baffle system worked perfectly and the chute came out completely undamaged.
I was tempted to slip a couple pieces of wadding in there, but went completely
"stock" for the first flight and was quite impressed with the
performance of the baffle.
Given the extra nose weight though, I'd consider upping the chute size on this to 15" unless you're flying in very soft grass. Mine spit the motor and still came down a bit fast for those frail looking fins.
Flight Rating: 4 out of 5
Summary:
I honestly can't come up with any cons on this without being overly picky. The
pros would be attractive theme and design, quality materials, and that baffle
system all packed into a great bargain at $13.50. I was very impressed with
this kit and definitely recommend it.
I'm especially looking forward to seeing the baffle system work its way into more of Semroc's kits in the future.
Overall Rating: 5 out of 5
 |
 |
Flights
Sponsored Ads


|
|