| Manufacturer: | Scratch |
|
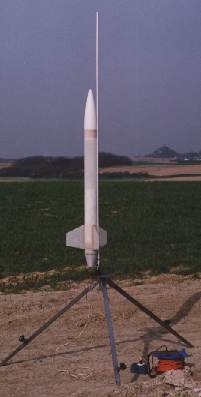
This rocket is mostly classical, but has a rear ejection system. Building it, I wanted to achieve two goals: the possibility to open the chute at a higher speed, and the absence of any baffle or wadding system. |
 |
| Living in Europe, I mostly build my rockets from scratch. I use PVC pipes to mold fiberglass/epoxy tubes. After doing this for small rockets (to 66 mm), I wanted to make one of 100 mm (the PVC pipes are available in diameter 25, 33 ,40 ,50 ,66 ,75 ,90, 100, 160 mm). Since the nose cone is the hardest part of the job, I choosed this time to buy one. The closest size was the LOC PNC 3.9. The external diameter was OK, I just had to reduce the internal diameter in the front part of my fiberglass tube to adapt to the shoulder. All the rest is home made: The fins are made with 4 layers of fiberglass (the same material I used on the walls of my children's rooms) impregnated with epoxy resin. The couplers are slices of the PVC tube used to mold the body tube. The motor mount tube is made from two wraps of 160 g (6 oz) fiberglass, molded around an 29 mm RMS case. The centering rings are made from balsa plywood. The boattail is made from cardboard, reinforced with one coat of light fiberglass (50gr or 1,5 oz). The chute is made from fabric (called "shower curtain" by the dealer). The rail used to launch the rocket is simply an aluminium curtain rail. |
 |
To be simpler, I converted the part list so you can use commercially available parts (the list is exported from
RockSim).
|
|
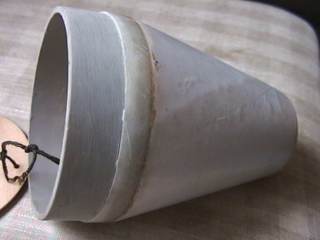
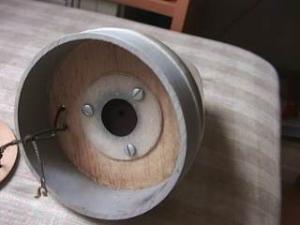
The tail cone: You can make the tail cone yourself: Glue the first centering ring at one end of the motor mount tube, and the other centering ring at the other end. Cut the cone template which has been printed or drawn on cardboard, glue the joint to form the cone and glue the whole on the centering rings. Take a 30mm slice of coupler and glue it on the 100 mm centering ring to make the shoulder of the tail cone. |
 |
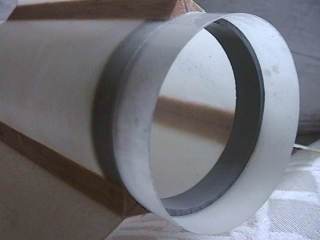 |
Bulkhead: The originality is in the rear ejection system. The pressure eject the tail cone, that pulls a bulkhead,
then the chute out of the body tube. The chute is never in contact with hot gasses and there is no need for a baffle,
Nomex®,
bag or wadding. How to install the bulkhead: Glue a slice of coupler inside the body tube. To know the correct
distance, insert the coupler, then the bulkhead, and finally the tail cone. Push the whole until the cone is just in
the correct position. Remove the cone and the bulkhead, and mark with a pencil the position of the second coupler
inside of the body tube. Remove the coupler, apply glue inside the tube beyond the mark then push the coupler in the
correct position. Note: the bulhead must be removed easily. Sand it if necessary. Fins: To attach the fins, first glue the triangular balsa on the G10 fins, with the blasa protruding by 1 mm. When the glue is cured, wrap the body tube with a sheet of sanding paper and sand the root end of the fins to make them round. When the fins are glued to the body tube, paint the balsa with cyanoacrylate glue. |
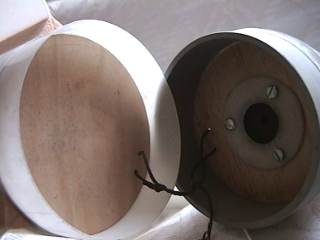 |
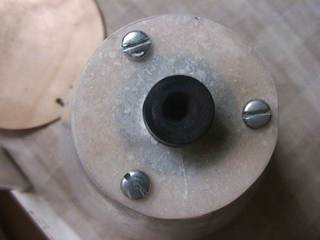
| The thrust ring and the motor retainer are made from the centering rings 24 to 50. Fix them with three screw in the correct position. | ||
 |
 |
|
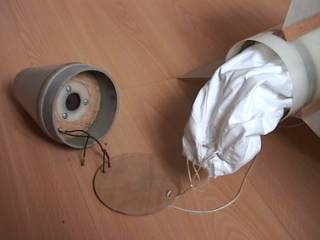 |
You can attach the shock cord to the hook of the ogive, or build another bulkhead in the center of the body tube.The top of the chute must be tied to the removable rear bulkhead. The bulkhead is tied to the tail cone with Kevlar® (or any fire proof means) shock cord. See the illustration for more detail.I used two rail guide on this rocket. One at the center of gravity, the other at the center of pressure | |
|
Finally, when the rocket is finished, mark the center of pressure (1000 mm from the nose tip) and add weight to the
nose cone to have the center of gravity about 150 mm in front of the center of pressure, with the motor mounted (pack
the chute at the rear of the body tube for the test). This rocket has flied on a G35-4 (econojet). It has not been tested with bigger motors. The flight was nearly perfect with a nice ejection near apogee. Next time I will put a longer delay, to open the cross chute at a higher speed. I had a problem with the boattail on the pad: I had to tape it to the body tube until the rocket was ready to launch, because I couldnât snap the alligators clips to the copperhead igniter without making the boattail fall. |
Sponsored Ads


")

")
 |
 |