| Construction Rating: | starstarstarstar_borderstar_border |
| Flight Rating: | starstarstarstarstar_border |
| Overall Rating: | starstarstarstarstar_border |
| Manufacturer: | Model Minutes  |
Brief
Brief:
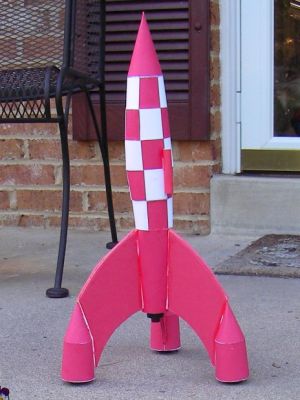
The XFLR-7 is a paper/foamboard kit patterned after the Tintin rocket from the Destination Moon comic. This is a cool design and should be considered a classic. Although the kit is now OOP, existing stock may be around for a while, so I decided to submit a review anyway. I hope that my observations will help in the construction of other paper/foamboard rockets whether they are kits or scratch built. Since there is an excellent review already here on EMRR, I will focus on the details of what I did instead of a top-to-bottom walk through of the entire build.
Construction:
The instructions were detailed and included '3-D' photos (glasses provided), however my aging 'bifocular' eyes couldn't see them clearly. The instructions themselves were pretty good quality in general but were not completely accurate. This kit is at least as challenging as the Estes Skill Level 5 kits that I've built, so it is very important for you to read the entire set of instructions and try to understand how each part will be installed.
This kit includes a lot of parts which must be cut out--paper, foamboard, and even soft foam for the shock absorbers on the pods. I have built numerous paper conversions, Art Applewhite cardboard saucers, etc., however, I had a lot of problems getting this kit together. Precision, patience, and dexterity is required.
Shock absorber (wing tip pods): When mating the pod cones and bodies, set them initially by hand, set the assembly down, then apply pressure downward on the cone. The two pieces will tend to self adjust to one another. I used Aleene's Tacky Glue throughout the build.
Fins: I attempted to round the leading edge but left the trailing edge square. The rounding process didn't go perfectly but a little Elmer's Fill 'n' Finish finished the job. If I were to do it again, I'd bevel the edges as recommended in Art Applewhite's kits . The colored surfaces are printed on plain paper and must be cut out and applied to the foamboard. Even with the strips provided for the edges, I found that they did not 100% cover the fin surfaces. After pondering this problem, I have came to the conclusion that due to rough tracing of the fin template, I probably made the fins ever so slightly larger than planned. I recommend tracing them carefully with a fine point pencil, rather than a big dull one. If the kits were to be continued, I'd suggest that the cutouts be oversized and trimmed in situation after application.
Body tube, base section: This was straightforward and I have no words of wisdom here.
Fuselage: This section consists of five tubular sections and one ring. I had a tough time getting these components to align, and the results are not as uniform as I'd have liked. Make sure you are careful to align the colors to achieve the checkerboard pattern.
Cone: This assembled well but I am concerned with the weight of the provided clay given the shock cord attachment point is in foamboard rings. This also convinced me to go with the 24mm option despite worries about the C11's relatively energetic ejection charge. If it blows apart, then I can glue it all back together. If it burns up, then we have extinguishers.
Main assembly consists of two pages of instructions. These were easy enough to follow, but I had major fit issues. We'll see how this holds together on recovery given the small chute. By the way, the chute is about 12" diameter and is made of plastic. I held my shroud lines on with squares of Gorilla tape.
I had installed the inside tube without attaching the motor hook prior to changing my mind to the 24mm option. Luckily, standard 24mm tube fit nicely in that custom wrapped tube. I used the 18mm motor tube wrap as a guide to position the hook on a piece of Apogee 24mm tube and slipped it right in.
Finishing:
Finishing should consist of a layer of clear coat but give all the white edges that I had peeking out, I touched it up with some red markers. The result looks nice from a distance. I noticed the instructions talked of painting--an indication that this was an edit of an older version.
Construction Rating: 3
Flight:
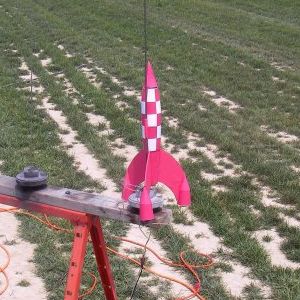
The motor hook seems to work quite well, snapping right over the C11-3 motor. I used an ample amount of dog barf and folded the chute as suggested. The boost was nice and ejection was near apogee.
Recovery:
The chute didn't fully open and the rocket floated down generally parallel to the ground. The only damage was the nosecone tip was bent. I guess I should have tamped a tiny piece of clay into the far tip of the nose. I won't ding the flight rating on this since it falls into the construction difficulty area. I know I only have one flight, but I have to give this one a 4.5. A swivel would have fixed the one small recovery issue.
Flight Rating: 4
Summary:
This was a fun kit to build and although there are some issues with the fit of the components, the overall look is great (based on the opinions of the crowd at the launch, not just me). I have to bump the overall rating a bit to reflect the overall look.
Overall Rating: 4
Components
Other Reviews
- Model Minutes XFLR-7 By Chan Stevens
Model Minutes specializes in paper rockets and this is one wild looking futuristic design. It clearly draws a lot of looks at the pad and no one will believe it is made of paper. The parts list is pretty simple for this kit, just pre-printed cardstock patterns. Lots of them. There are also a few other items like foamboard for fins, some clay for nose weight, a motor hook, and a parachute ...
Sponsored Ads
 H-IIA Rocket 3D Paper Model 3D Rocket Puzzle Kit")
")


 |
 |