LOC/Precision Lil' Nuke
LOC/Precision - Lil' Nuke {Kit} (PK-4) [1988-]
Contributed by Bill Eichelberger
| Construction Rating: | starstarstarstarstar_border |
| Flight Rating: | starstarstarstarstar |
| Overall Rating: | starstarstarstarstar_border |
| Published: | 2012-10-07 |
| Diameter: | 2.26 inches |
| Length: | 29.50 inches |
| Manufacturer: | LOC/Precision  |
| Style: | Sport |
 Brief
Brief
The Lil' Nuke is a sleek, 3fnc rocket that is one of the more popular entry level rockets for mid-power rocketry. When I got back into the hobby in 2001, my brother-in-law bought me a Lil' Nuke so that I'd have something other than my Estes fleet to fly at NARAM 43. Tony and I had gotten back into the hobby in 1994, but he had spent the next seven years working his way up through the different sizes of rockets, whereas I had done the occasional launch with my son, his friends, and our Estes Bail Out and Manta. I was wildly intimidated by the size of the Lil Nuke, the fact that epoxy had to be used in construction, and that it used an F engine. (I hadn't even flown a D motor until the spring of 2001.) Despite my terror and inexperience, the rocket turned out looking and flying great, which says a lot more for the kit than it does for me.
Components
- Nose cone
- Main body tube
- 3 pre-cut fins
- 2 centering rings
- Motor tube
- Nylon loop for shock cord attachment
- 1/4" sewing elastic shock cord
- Launch lug
Construction
As I mentioned already, I was pretty nervous at the start of the project, so before I even opened the package I did some research on the internet. (Thank you, Al Gore.) I read every review and opinion thread that I could find on the Lil' Nuke, and made notes on anything that sounded useful to me. I first built and installed the motor mount, then used one of the tips I'd read about online and drilled small holes to allow the epoxy to form glue rivets. The body was premarked for the fins, so I took a pin drill and made the holes along the line, then attached the fins one by one, making sure to allow the epoxy to flow into the holes. When they had dried sufficently, I placed masking tape on the fins and body tube to keep the epoxy from flowing outside of an area 1/4" from the fin root. The epoxy was allowed to flow and settle, then the masking tape was removed before it could set up, leaving a nice, straight line of epoxy. (Another internet tip.)
The next step was the installation of the shock cord anchor. The anchor is a nylon loop that is epoxied to the inside of the body tube near the top, but not too near. (I made the mistake of being too close and had to sand away some of the nose cone shoulder to achieve a proper fit. Not a big deal, but it didn't occur to me until too late.) Epoxy is layered over the loop in several applications and the end result feels very sturdy and strong. The shock cord is tied to the loop on one end, then attached to a large snap swivel on the other end. This attaches to the nose cone. All that was left was the launch lug, the line for which was also printed on the body tube.
This bird was flight ready.
Finishing
The kit came with no decals, and at this time I was not yet schooled in the art of decal making, so I opted for some flames to make it stand out. Tube spirals and wood grain were hidden with liberal application of thinned Elmer's Fill & Finish, followed by sanding. By the time I was finished the surface was smoother than I'd anticipated, which really impressed me. Two coats of Valspar primer were followed by additional sanding, then the whole rocket was sprayed with a metallic gold paint. When this was dry I masked off the areas on the fins where I planned to cut out some flames, then drew the flame pattern on the masking tape and cut away the surrounding tape with a new X-Acto blade. The area at the top of the cone was also covered and the flames cut the same way. After burnishing the ends of the tape the whole rocket was sprayed with Valspar gloss black. When the paint had dried and the masks were peeled off, I was surprised at how well it turned out. Not hot rod art, but not bad for a freehand first try with primitive methods and supplies.
Flight
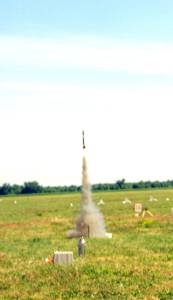
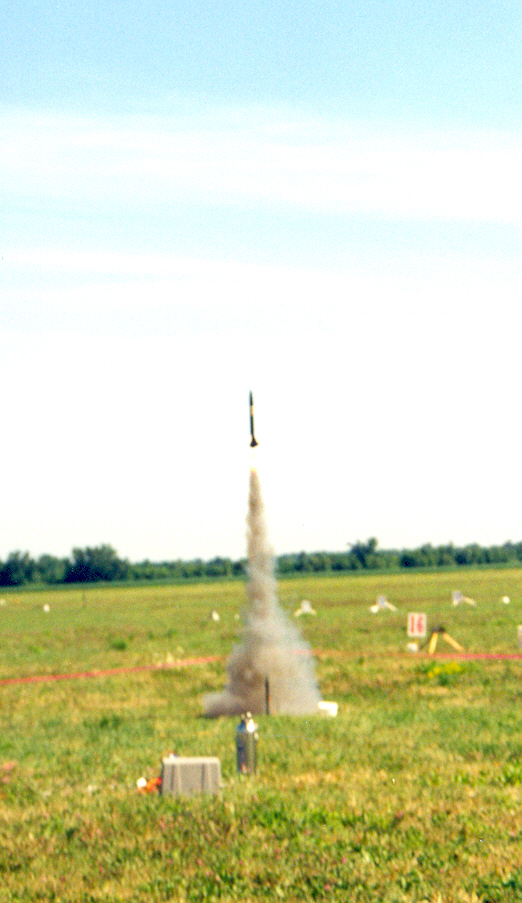
If the build had made me a bundle of nerves, it was a cinch that the first flight would be worse since Tony had talked me into attending NARAM 43 in Geneseo, NY. All the cool guys were there, and I was deathly afraid of making a fool out of myself in front of them. I envisioned the rocket leaving the pad in a rush, then skywriting a message across the sky while the fins fluttered to earth. Didn't happen. Tony and I took our Lil Nukes, both loaded with Aerotech F20-7s, to the pad for a drag race after he instructed me in the fine art of mid-power engine and igniter installation. The time between the on-pad picture I took and the launch seemed like hours, but eventually the rockets were announced and the countdown started. (I'd given my LN the name Mourning Would in hopes that I could trip up an inattentive LCO, but it never happened.) My Lil Nuke leapt off the pad in an impressive cloud of smoke and climed to an equally impressive height. Tony's bird spit the igniter. Mine windcocked considerably to the right when the initial thrust dropped off, so it was well out over the field by the end of the flight. It tipped over at apogee, and I had a bad moment when I thought the ejection charge had failed, but in actuality it had barely started down when it blew, launching the chute and riding the breeze back to the cornfields to the left of the pad. Finding it was no problem, as it landed short of the corn, bouncing impressively and making me wonder if it had held together, but it was intact when I arrived at the landing spot.
The second flight didn't come until the following year after our club moved to the expansive new gigs at the Voice of America Park in West Chester, OH. Loaded again with an F20-7, the Lil Nuke left the pad and immediately began riding the wind. Ejection again occurred with the nose down near the old control building, then the recovery drift began. It ended near the north edge of the field, a drift of 1/4 to 1/2 mile. I was quite impressed. And tired.
Recovery
Summary
Pros: Ease of construction, performance.
Cons: Lack of decals, but that's a piddly gripe.
Other Reviews
- LOC/Precision Lil' Nuke By Tim Burger
A stylish yet standard three fins and a nose cone rocket for 29mm and smaller motors. Heavy body tube and rakish plywood fins make for a tough and fun to fly rocket. The kit was neatly packaged in the standard clear plastic bag, with the motor tube floating around in the airframe tube, and a nylon chute, pre-cut plywood fins, rings, and launch lug inside a zip-lock bag. The fins are ...
- LOC/Precision Lil' Nuke By Paul Gray
The Lil' Nuke is a mid-power rocket part of LOC/Precision's Novice Kit series. It is single staged with a 29mm motor mount. The instructions of this kit were rather explicit. The assembly order was logical, but as far as I can remember, they did not have any illustrations. The kit came with all of the parts including an enormously thick paper body tube with lines pre-drawn to mark the fin ...
 |
 |
Flights

|
|


|
|
Mason Hazzard (October 29, 2012)
H410, anyone??