| Construction Rating: | starstarstarstarstar_border |
| Flight Rating: | starstarstarstarstar_border |
| Overall Rating: | starstarstarstarstar_border |
| Manufacturer: | FlisKits  |
Brief:
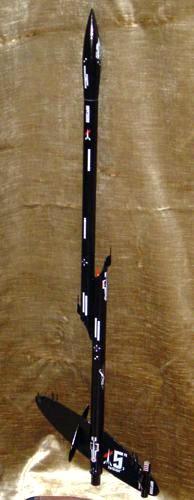
A skill level three build. Very interesting design featuring two offset body
tubes, elliptical primary fins intersected with smaller and similar secondary
fins and many small details, some that can be included or modified at the
builder's option. Recovery is by way of 16" parachute which is deployed
via ducted ejection gasses. The kit as the "Farscape" has been
discontinued due to legal issues but will be reissued as the "Night
Whisper".
Construction:
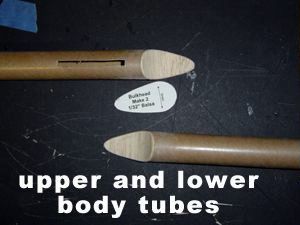
All parts were present and accounted for: 3 balsa fin stock sheets (1/8",
3/32" and 1/32" thick), 1 balsa nose cone, 2 .976" x 18"
body tubes, 1 .69" x 2.75" motor tube, 1 .50" x 3" body
tube, 1 16" parachute, 2 1/8" x 2" launch lugs, 4 centering
rings, 1 engine block, 1 engine hook, 1 medium size screw eye, 96" shroud
line, 1 36" Kevlar®
shock line, 1 sheet of tape discs, 2 round fiber slugs, 1 .062" x 4"
square basswood strip, 3 .040" x 4" square basswood strips, 1
24" elastic shock cord, 1 fin pattern sheet, and 1 instruction sheet. All
parts are packaged great and arrived without damage. The basswood strips are
taped to the instruction book, assuring that they were not snapped in transit.
 The
instructions were very easy to follow considering how complex an assembly this
model is. The steps are in a logical order and the templates are properly
sized. My kit was Farscape #49 (early in the production run) so there was a
handful of minor typos which have since been addressed and corrected by the
manufacturer. The illustrations are clear and accurate. It is very important to
distinguish between the upper body tube and the lower body tube during assembly so
elements end up in the correct orientation. A rectangular slot (included in
tube cutting pattern) is cut in each body tube to channel the exhaust gasses
from the lower body tube where the motor is housed into the upper body tube
which contains the parachute and shock cord which is anchored to the exhaust
The
instructions were very easy to follow considering how complex an assembly this
model is. The steps are in a logical order and the templates are properly
sized. My kit was Farscape #49 (early in the production run) so there was a
handful of minor typos which have since been addressed and corrected by the
manufacturer. The illustrations are clear and accurate. It is very important to
distinguish between the upper body tube and the lower body tube during assembly so
elements end up in the correct orientation. A rectangular slot (included in
tube cutting pattern) is cut in each body tube to channel the exhaust gasses
from the lower body tube where the motor is housed into the upper body tube
which contains the parachute and shock cord which is anchored to the exhaust
 duct plug by a Kevlar®
cord. A really neat technique that was new to me was Fliskits' method of
shaping the curved bulkheads that terminate each body tube. Once fiber exhaust
plugs are glued into place flush at the curved end in each tube, oversized
bulkheads are cut from 1/32" balsa with the grain running across. This
allows it to flex smoothly to follow the curves in each of the body tube ends
containing the exhaust plugs. The bulkheads are glued over the curved cut ends
of the body tubes and at this point they overhang the edges of the body tube.
Per instructions I used masking tape to hold them in their curved positions
while the glue set. Once these were dry, the tape was removed and the bulkhead
edges were sanded smooth flush with the sides of the body tubes. At this point
the upper and lower body tubes are glued together, taking care to align the
previously cut rectangular exhaust ducts on the surface of each tube.
duct plug by a Kevlar®
cord. A really neat technique that was new to me was Fliskits' method of
shaping the curved bulkheads that terminate each body tube. Once fiber exhaust
plugs are glued into place flush at the curved end in each tube, oversized
bulkheads are cut from 1/32" balsa with the grain running across. This
allows it to flex smoothly to follow the curves in each of the body tube ends
containing the exhaust plugs. The bulkheads are glued over the curved cut ends
of the body tubes and at this point they overhang the edges of the body tube.
Per instructions I used masking tape to hold them in their curved positions
while the glue set. Once these were dry, the tape was removed and the bulkhead
edges were sanded smooth flush with the sides of the body tubes. At this point
the upper and lower body tubes are glued together, taking care to align the
previously cut rectangular exhaust ducts on the surface of each tube.
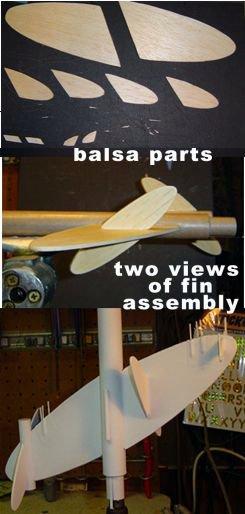 Time and care
must also be taken with the fin assembly as well as all of the balsa and
basswood accent pieces: 2 large fins, 4 secondary fins 2 Hyper-TAC Antenna
supports, and 2 Long Range Sensor supports. After these pieces were cut from
the provided patterns and the edges sanded for smooth curves and uniformity,
they were sealed and sanded prior to attaching them to the body tubes and each
other. The large fin pattern has a gray area, which needs to be marked off on
fin #1 only. This section is removed from the fin to make room for a 3"
length of .50" body tube. The larger section of fin #1 is then glued to
the lower body tube positioned so that it is slanting rearward. The 3"
section of small body tube is then marked with the provided wrap in four
90-degree increments. It is also marked 1/4" from the end and glued to the
large section of fin #1 so that it is extending rearward beyond the fin. The
remaining tip section of fin #1 is then glued to the tube opposite the main
section of fin #1 positioning it so that the curve of both sections of the fin
interrupted by the tube form a continuous curve. Fin #2 is glued onto the
airframe opposite fin #1. A set of secondary fins is attached parallel to the
body tube and perpendicular to fin#2. The secondary fins are shaped so they
give the illusion of a single continuous elliptical fin running through fin #2.
The two remaining secondary fins are then glued to the 3" tube, which is
now incorporated into fin #1. They are also attached parallel to the body tube
and perpendicular to the wing so that they appear to be another single
elliptical fin running through the sensor tube. This array of fins is kind of
tricky to align as looking at it from different angles makes it seem to be
misaligned when in fact it is not. The small pieces of basswood are cut to
shape to be used as antennae and sensors. The pattern sheet contains these
templates also. The antennae are glued to the balsa support pieces cut earlier
and then glued and sandwiched between cardstock wraps (skins) from the template
sheet for support. These assemblies are the Hyper-TAC Antennas and Long Range
Sensors. There are two of each. The two Long Range Sensor pieces are attached
to the top and bottom of fin #2, perpendicular to fin #2 on the indentation
made from the fin template. The Hyper-TAC Antennas are attached centered to the
upper and lower body tubes both facing forward in flight. The instructions
indicate that these delicate details can be omitted if desired. I really like
how the Hyper-TAC antennas bring the sweep of body tubes to an elegant point so
I included them. Two launch lugs are attached on the line at 1.5" and
7.5" forward on the lower body tube. To be certain that the two launch
lugs were aligned, I ran a 1/8" dowel through both lugs, which also
reassured me that they were straight in relation to the entire model. At this
point, the detailing is left to the builder who is furnished with two different
thicknesses of basswood strips. These strips are intended to be antennae or
guns. Small holes can be bored in the primary fins to insert these strips or
they can be attached on the surface of the fins. I chose to mount two on one
surface of each fin and one to the opposite surface of each fin. Then I
reinforced them with strips of gauze medical tape, which I then smoothed and
sealed over with several coats of white glue. These are delicate and will
hopefully survive some flights. Another suggestion from Jim Flis is to use
150lb monofilament as from a weed whacker in place of the basswood strips,
which is more flexible than the basswood.
Time and care
must also be taken with the fin assembly as well as all of the balsa and
basswood accent pieces: 2 large fins, 4 secondary fins 2 Hyper-TAC Antenna
supports, and 2 Long Range Sensor supports. After these pieces were cut from
the provided patterns and the edges sanded for smooth curves and uniformity,
they were sealed and sanded prior to attaching them to the body tubes and each
other. The large fin pattern has a gray area, which needs to be marked off on
fin #1 only. This section is removed from the fin to make room for a 3"
length of .50" body tube. The larger section of fin #1 is then glued to
the lower body tube positioned so that it is slanting rearward. The 3"
section of small body tube is then marked with the provided wrap in four
90-degree increments. It is also marked 1/4" from the end and glued to the
large section of fin #1 so that it is extending rearward beyond the fin. The
remaining tip section of fin #1 is then glued to the tube opposite the main
section of fin #1 positioning it so that the curve of both sections of the fin
interrupted by the tube form a continuous curve. Fin #2 is glued onto the
airframe opposite fin #1. A set of secondary fins is attached parallel to the
body tube and perpendicular to fin#2. The secondary fins are shaped so they
give the illusion of a single continuous elliptical fin running through fin #2.
The two remaining secondary fins are then glued to the 3" tube, which is
now incorporated into fin #1. They are also attached parallel to the body tube
and perpendicular to the wing so that they appear to be another single
elliptical fin running through the sensor tube. This array of fins is kind of
tricky to align as looking at it from different angles makes it seem to be
misaligned when in fact it is not. The small pieces of basswood are cut to
shape to be used as antennae and sensors. The pattern sheet contains these
templates also. The antennae are glued to the balsa support pieces cut earlier
and then glued and sandwiched between cardstock wraps (skins) from the template
sheet for support. These assemblies are the Hyper-TAC Antennas and Long Range
Sensors. There are two of each. The two Long Range Sensor pieces are attached
to the top and bottom of fin #2, perpendicular to fin #2 on the indentation
made from the fin template. The Hyper-TAC Antennas are attached centered to the
upper and lower body tubes both facing forward in flight. The instructions
indicate that these delicate details can be omitted if desired. I really like
how the Hyper-TAC antennas bring the sweep of body tubes to an elegant point so
I included them. Two launch lugs are attached on the line at 1.5" and
7.5" forward on the lower body tube. To be certain that the two launch
lugs were aligned, I ran a 1/8" dowel through both lugs, which also
reassured me that they were straight in relation to the entire model. At this
point, the detailing is left to the builder who is furnished with two different
thicknesses of basswood strips. These strips are intended to be antennae or
guns. Small holes can be bored in the primary fins to insert these strips or
they can be attached on the surface of the fins. I chose to mount two on one
surface of each fin and one to the opposite surface of each fin. Then I
reinforced them with strips of gauze medical tape, which I then smoothed and
sealed over with several coats of white glue. These are delicate and will
hopefully survive some flights. Another suggestion from Jim Flis is to use
150lb monofilament as from a weed whacker in place of the basswood strips,
which is more flexible than the basswood.
Finishing:
Because the Farscape contains fins attached to fins and various small delicate
details, I decided to sand and finish my balsa parts before assembly. The nose
cone was very porous and may require 3 or more passes with your favorite balsa
filler and sandpaper. Two coats of white primer and three coats of gloss black
with attention given to the insides of the bulkheads and the Hyper-TAC and
Antenna supports had our Farscape covered and she was ready for the waterslide
decals. The decals look a lot more intimidating then they are with rows of
white windows taking up a lot of the space, contoured ones that fit onto the
curved bulkheads, serial numbers, cooling fins and other markings. The builder
is given a guide to the decal locations but encouraged to apply the decals as
he sees fit. I applied my decals pretty much by the numbers. They were quite
strong when moistened which allowed for a nice amount of time to fine tune
their locations. Once the decals were dry, I applied two coats of clear coat
gloss for a nice finish. When completed, the Farscape looks dark and dangerous.
Construction Rating: 4 out of 5

Flight:
The recommended motors for the Farscape are B6-4 and C6-5. A motor hook holds
the motor in the engine tube. The first two flights on B6-4 engines took off a
little slow but ascended very straight only arcing slightly as the engine
thrust slowed. There was no noticeable rotation. The altitude was about 200
feet and the parachute deployed fine with the nose still pointed a little up.
Flight number three on a C6-5 took off a little quicker and followed a very
gentle arc to about 400 feet. With all of the surface area on the fins it is
very susceptible to wind interference. It's profile was easy to see at maximum
altitude and the 5 second delay resulted in a perfect angle for chute
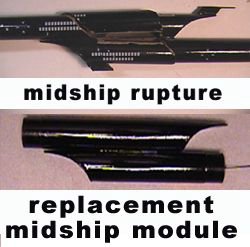
deployment at apogee. The chute deployed fine but on recovering the model it
turned out that the midsection of the body where the two tubes and exhaust
ducts meet had been ruptured possibly due to an overpowered ejection charge, an
adhesive malfunction, or a combination of both. The Farscape requires no
recovery wadding because of the ducted ejection gasses, so between flights you
can pretty much repack your chute and load in your engine.
Recovery:
The shock cord is a 24" elastic tied to the nosecone by a screw eye. The
other end is tied to a 36" length of Kevlar®
thread which is anchored through two holes in the exhaust duct plug in the base
of the upper body tube. The parachute is 16" plastic with a Fliskits logo
in the center. The chute seemed to be the right size for the model because the
Farscape neither drifted too far nor descended too fast. There was no damage to
the chute or vehicle sustained from the parachute recoveries.
Flight Rating: 4 out of 5
Summary:
This was my first skill level 3 model, but I have previously built more than 15
skill level 1 rockets and 3 or 4 skill level 2 birds. I'm not yet to the stage
where I can personally design a model of such complexity. It keeps our hobby
interesting when companies offer such well thought out, great flying model kits
that are courageous departures from the basic 3 fin and a nosecone designs. The
completed Fliskits Farscape is a jaw dropping rocket which always gets the
first "wow" and raises the most intrigue ("You built
that?") when someone sees my fleet for the first time. It is a
challenging, rewarding build that really gets exciting as the body tubes are
joined and the fin assemblies progress. The small parts made from the basswood
strips are very delicate and the Farscape needs to be handled with care during
flight prep. That said, these delicate parts can be omitted or made from more
flexible materials.
Overall Rating: 4 out of 5
Sponsored Ads


 |
 |