| Manufacturer: | Custom Rockets  |
Brief:
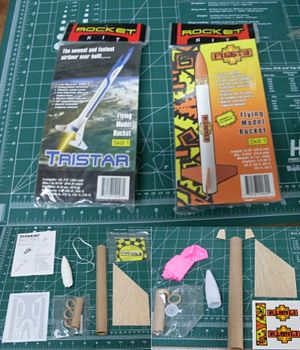
For the Stage Bash section of the 2009 EMRR Challenge, you are required to combine any two purchased single-stage
rocket kits into a rocket that is at least 2-staged using only the parts for the two kits. I decided to attempt a gap
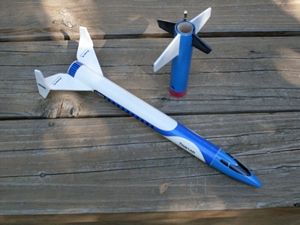
staging design by combining Custom Rockets Tristar and Fiesta. For some reason I though the Fiesta had 4 fins, so when
I received the rocket in the mail and found it was a 3FNC, I modified my original design.
Modifications:
To construct this kitbash, I first built the Tristar following the instructions with the exception of the motor
mount. You do not install the motor retention clip and you need to make sure that the lower centering ring is moved
forward enough so that the tube coupler will fit into place (about a half inch). I added a piece of Kevlar®
cord to use as an anchor for the shock cord. There is a small set of die cut fins that the instructions say can be
discarded but save them for the booster.
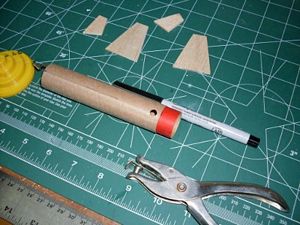
For the booster, you need to make the following changes: Build the motor mount as instructed. You need to cut the BT-50 body tube so that you have a 4-1/2" long body tube. Mark the tube for 4 fins instead of 3 as instructed. Once you have glued the engine mount into the booster body tube and the tube coupler in place, punch two vent holes near the top of the tube. I lined the holes up with a set of fins lines but should have made them in between a set of lines instead. Glue two of the three Fiesta fins opposite from each other on the booster. The two smaller fins saved from the Tristar kit are used for the other two fins. All fins are positioned so that the trailing edge is flush with the bottom of the rocket.
Construction:
I will not list the individual components in each kit but let you know as individual kits these rockets have good
quality parts in each bag. I did have to add a tube coupler to my design since most single-stage rockets do not contain
one. The nose cone that came in the Tristar kit had a bad seam so I opted to use the Fiesta nose cone which did not
have a seam at all.
Finishing:
I choose to finish the rocket like the Tristar picture and painted the booster blue with white and black fins. The
blue I had did not match the blue on the decals so if I was to do it again, I will use yellow instead of blue. I used
only the Tristar decals since the Fiesta decals did not fit into the color scheme of the rocket.

Flight:
For the first flight I loaded the booster with a C6-0 and the sustainer with a B6-4. The rocket lifted off the pad
rather quickly. At some point the rocket got very wobbly and began to do sporadic loops. It was pointing slightly down
and toward the flight line when the sustainer ignited at about 100' in the air. It screamed over the head of the crowd
and plowed into the ground 100 yards behind us just as the ejection charge went off. Needless to say the rocket
suffered great damage.
Recovery:
Each of the kits has a different recovery method. The Tristar uses a parachute and the Fiesta uses a streamer. The
advantage here is that you have both choices on hand depending on the weather conditions. Since the design would appear
to be unstable, I guess it doesn't matter which you chose.
Summary:
Each individual rock seems like they would be fun to build and fly. As a staged kitbash, there is definitely a
stability issue. The first couple inches of the body tube are crumpled and scorched pretty bad. I might eventually cut
and repair the tube and try it again. I will be sure to perform a proper swing test before I launch it.
Sponsored Ads


 |
 |