| Construction Rating: | starstarstarstarstar_border |
| Flight Rating: | starstarstarstarstar |
| Overall Rating: | starstarstarstarstar_border |
| Manufacturer: | Schoolyard Rockets |
 Brief:
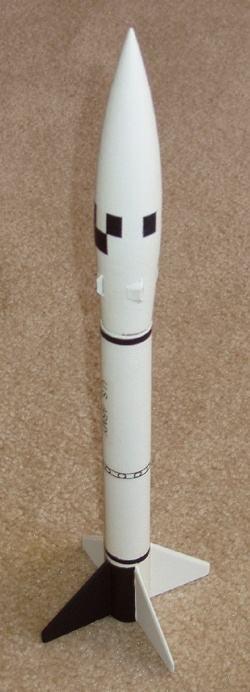
The Honest John was a short range ballistic missile that was used for many years in a peace keeping role armed with a nuclear warhead. It’s distinctive bulbous nose cone and delta fins make this a very distinctive rocket. School Yard Rocketry is a new rocket company that I found through a web search. They have two rockets at this time, the Honest John and the Patriot Missile, and they are hoping to be adding more soon.
Construction:
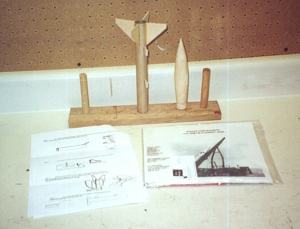
The Honest John arrived in the mail from School Yard Rocketry in a sturdy cardboard box. Inside the kit was packaged in a Zip-Lock bag with a picture of the real rocket on a mobile launcher, a nice touch. All of the parts were there and in good shape. The parts consist of a body tube, nose cone, engine mount tube, thrust ring, centering rings, launch lug, screw eye, shock cord, a balsa sheet with the fin patterns printed on it, a cardstock sheet for the spin motors, engine nozzle and shock cord mount, a sheet of water slide decals, and a 12" nylon parachute. All of the components are good quality. One interesting item is the body tube. The body tube is what they call a “Tuff Tube Airframe.” This Tuff Tube is substantially thicker than your standard Estes tube, and the outside is a little rougher as well. It turned out to be easy to work with and finished nicely, but more on that later.
The instructions are printed on both sides of two 8.5"x 11" sheets of paper. They are in a logical order, and include diagrams for each step. There is one template for marking the location of the fins. The instructions are easy to follow, if you have built a rocket kit before. In one of the diagrams the fin outline is different than the ones that are used. This could be confusing for the first time builder, however, if you have already built a kit or two, this should not be an issue.
The kit goes together well. I did not find any places where the instructions were difficult to follow or anything that needed more explanation. The only thing that was difficult to build are the spin motor housings. These are printed on heavy card stock and are to be cut out, folded and glued together and then installed on the nose cone. The kit has twice as many as you need for the rocket. This allows you to try and try again until they look right. This is a nice feature. A couple of drops of thin CA cement will make then easy to sand and finish. Also on the cardstock sheet is an engine nozzle. This engine nozzle fits in between the motor mount and the body tube. It is virtually undetectable on the finished model, so I wonder why it is included in the kit.
 The Honest John is finished like most rockets. The balsa fins and nose cone will need to be sanded and sealed, but the body tube will also need to be sanded and sealed. Step 11 of the instructions tells you to “sand off any ‘fuzzies’ between coats” of primer. I used Krylon gray sandable primer. The body tube smoothed out very nicely after two coats of primer. The Spin motors are optional in this kit. I used some wood filler putty around the motors to blend them into the nose cone. I was pleased with the results. Included in the kit is a sheet of waterslide decals. These decals are very thin and difficult to work with. I had difficulty keeping them from cracking when I applied them to the model. One tip with these decals is to cut further away from the color to allow you to work with more of the clear carrier. This makes the decals a little easier to work with. Once I completed with the decals I gave the model two coats of Testors Dullcote. I have had trouble using clear Krylon on decals before, and have never had any trouble with the Testors paint. The finished model matches the cover photograph of the Honest John in the kit. As the operational rockets were painted an Olive Drab, this must have been a high visibility test rocket paint scheme.
Construction Rating: 4 out of 5
 Flight:
To prepare the Honest John for flight, one needs to install a motor, and install the parachute. The motor relies on a friction fit, as there is no retention hook. The elastic shock cord is held in place by a Estes type triple fold paper shock cord mount. The Shock cord is then tied off to the nose cone on a screw eye installed in the base of the nose cone. The parachute is a high quality orange nylon parachute, one of the reasons I bought the kit. Pack a couple of sheets in the body tube and then insert the Parachute. School Yard Rocketry recommends using B4-4, B6-4 and C6-4 motors.
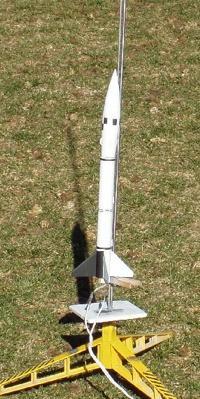
I launched the rocket on an A8-3 Motor. There was a 5 to 10 Mph wind that day. The rocket flew great, with the ejection charge firing just after apogee. The Parachute seems to be just about the right size as the rocket came back at a reasonable rate, and landed without damage on the football field that I launched on.
Flight Rating: 5 out of 5
I give this kit an overall rating of 4.5. The flight was about as perfect as you can expect. And I like it when manufactures include high quality components like nylon parachutes with their models. For the price this is a great deal. The on-line ordering was easy and painless and the kit arrived in the mail quickly. The body tube is extremely robust, and should last a long time. I particularly enjoyed the balsa wood components. There could be some improvement in the quality of the decals, and the instructions could be a little clearer as well. Overall this kit was fun to build and was great to fly.
Overall Rating: 4 out of 5
Other Reviews
- Schoolyard Rockets Honest John By Bob Ellis
( Contributed - by Bob Ellis - 01/14/03) Brief: I won this kit in the DesconX contest and decided to try something that I hadn't done since '67, building a kit per the instructions, exactly per the instructions, no changes or improvements at all. I normally wouldn't consider a rash act like this, but while trial fitting the parts, I was very surprised to find that all the parts fit on ...
Sponsored Ads


")

")
 |
 |