Welcome
Welcome to RocketReviews.com (formerly EMRR).
RocketReviews.com is the home of almost 5000 reviews of rocketry kits and products. Written by visitors to RocketReviews.com like you, the reviews cover everything from low-power model rocket kits to high-power rocket motors.
The site's Flight Log allows you to record and share your rockets and their flights. The Builds feature helps you document your rocketry projects.
At RocketReviews.com, you'll also find a large collection of rocketry resources such as a list of rocketry clubs, and large libraries of OpenRocket design files and Rocksim design files. A number of rocketry tools and calculators are available to help you design, build, and fly your rockets.
As you explore RocketReviews.com, you'll also find a number of fun things such as a huge library of rocketry videos and a collection of photo albums.
 |
 |
Featured Review
Micro Classics Assortment Pack
Manufacturer: Micro Classics Style: MicroMaxx

Construction Rating: 

Flight Rating:
Overall Rating:
Contributed by Chan Stevens
Brief:
After having thrown out most of my RTF flying micro bricks, I started looking for interesting Micromaxx rockets that
are fun to build, attractive designs, and reliable fliers. I couldn't resist the Micro Classics assortment pack, which
includes 3 different downscales of Estes classic designs, all for the bargain price of $12.
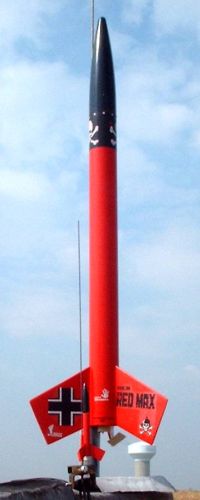
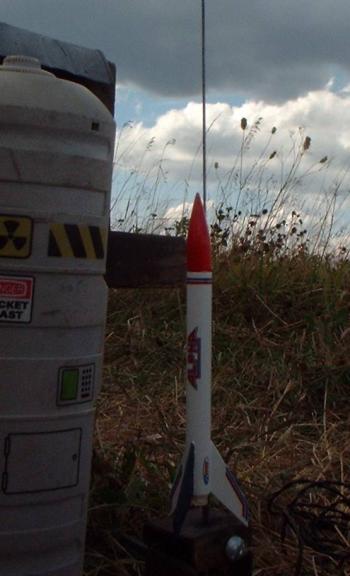
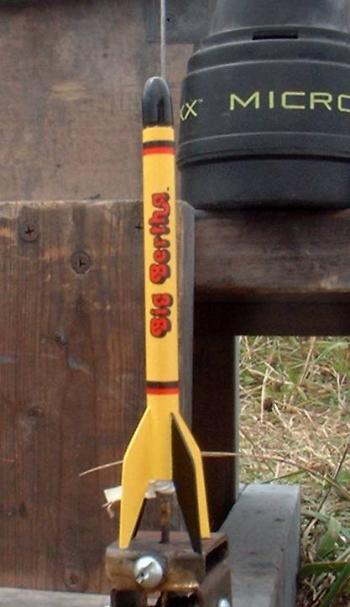
The assortment pack includes a 1/3 scale Alpha, a 1/5 scale Der Red Max, and a 1/5 scale Big Bertha. Scales are approximate as can be seen positioned next to their full-scale counterparts.
Construction:
The components come bunched together in a single bag so you'll need to be careful to sort them out and use the right
parts as you go. Some of the parts, such as the main body tubes were labeled in pencil so this helps. Each rocket is
built from 8mm plastic tubing for the body, styrene sheet for fins, and wood nose cones. The good news on the cones is
they're hardwood. The bad news is they're dowels not cones so you'll need to spend some time with a power drill or
lathe to sand them down on your own.
Recovery is all Kevlar® cord and mylar streamer. Each kit also includes a cardboard coupler tube used as a motor block.
The instructions are rough. There's a single page with hand-drawn exploded parts view for the 3 kits. There's a second sheet that includes construction steps for the 3 rockets, each in sequence. There are virtually no illustrations though these are fairly simple designs and if you're an experienced builder you probably don't need much guidance.
Rather than lay out construction for each one, I'll describe the basic procedure used across all three. First, clean up the rough cuts on the body tubes. Next, cut out the fins from the styrene stock using templates provided. The templates were also hand-drawn, and on the Red Max incorrectly labeled as calling for 4 fins, not 3. The instructions suggest airfoiling the fins, which I found amusing. The best I could do in such small scale was just round the leading and trailing edges a bit.
 Turning of the nose cones was a pain for me as I don't have much experience rolling my own, so
to speak. I used a power drill and sanding block with 100 grit sandpaper, but found each cone took me about half an
hour. There are outlines for the cone shape provided on the parts list sheet and I came fairly close to those, but
close scrutiny will show that I really left some room for improvement. If you don't have a lot of patience and
experience or really want to make sure the cones are done right, you might consider springing $5-10 and having Balsa
Machining Service turn the cones for you.
Turning of the nose cones was a pain for me as I don't have much experience rolling my own, so
to speak. I used a power drill and sanding block with 100 grit sandpaper, but found each cone took me about half an
hour. There are outlines for the cone shape provided on the parts list sheet and I came fairly close to those, but
close scrutiny will show that I really left some room for improvement. If you don't have a lot of patience and
experience or really want to make sure the cones are done right, you might consider springing $5-10 and having Balsa
Machining Service turn the cones for you.
Tubes are marked using hand-drawn wraparound marking guides. I attached my fins using liquid plastic cement (much better than the squeeze tube stuff) though thin CA would probably work well also. The kits include two sizes of launch lugs so you can select the one appropriate for whichever size rod you have (various Quest starter kits offer different sized rods).
The Kevlar® shock cord is anchored on the aft around the coupler that's used as a motor block, and on the forward end glued into a you-drill-it hole in the nose cone shoulder. None of these required any nose weight.
Finishing:
With all-plastic construction other than the cone, I didn't have any seams, grains or spirals to fill. I applied a
thin coat of white primer as a base then followed the original standard paint scheme for each. On the Alpha, I followed
the 1225 version with a white base, red nose and one blue fin. For the Red Max, it's red base and black upper/nose
section. For the Bertha, I went with yellow base and black nose plus a couple black fins.
The kit did not include decals. Instead it is suggested that you use markers for detailing. While that might look OK, I decided to run a set of these on my own color laser printer. That worked out great for the Alpha and Bertha, but the color laser can't handle the white of the Red Max decals. Phred at Excelsior and I swapped emails and scans on and off for about a year, when he came up with a very nice set. Unfortunately, he set it up to print a sheet of about 40 sets for $10, and as much as I like the Red Max, I really couldn't justify buying an extra 39 sets of decals.
Construction Rating: 3 out of 5
 Flight:
Not a lot of motor choices for these--there's only one "current" MicroMaxx motor and it has a delay that
generously rounds up to a one second delay. Each of these flew great--straight and incredibly fast although they would
have benefited from a longer delay.
Recovery:
Recovery on each is mostly tumble with a tiny mylar streamer included just for effect. You'll want to fly these over
short grass as they go so fast you might not be able to spot them flying and could easily lose them in tall grass.
Flight Rating: 5 out of 5
Summary:
These are a very nice value and good reproductions in miniature of some of my favorites from the classics.
Cons would include fairly rough instructions and the lack of decals. Sure you can hand paint or marker instead of the decals, but if you're going to do something like the Red Max, you've got to have nice skull and crossbones.
I've got to say the 3-pack for $12 with such cool mini rockets is a great deal and a welcome addition (albeit small) to the fleet.
Overall Rating: 4 out of 5
Browse our database of about 4,300 reviews of rocketry kits and other products.
Sponsored Ads


 Model Rocket Accessory")


|
|