American Alliance Rocketry F2 Avenger
American Alliance Rocketry - F2 Avenger {Kit}
Contributed by John Lee
| Construction Rating: | starstarstarstar_borderstar_border |
| Flight Rating: | starstarstarstar_borderstar_border |
| Overall Rating: | starstarstarstar_borderstar_border |
| Manufacturer: | American Alliance Rocketry  |
| Style: | Futuristic/Exotic |
Brief:
This is a longneck, futuristic fighter that flies on 24mm motors.
Construction:
While looking over the AA site, I decided that there were several rockets I liked the looks of and the Avenger was one of them. I ordered it along with a few others and soon had a box of rockets begging for my attention. There was also a note saying that a part for the Avenger was out of stock and that it would be shipped separately as soon as it came in. I promptly forgot all about at that point and did not remember it until my wife confronted me with one of the "I thought you weren't going to order any more for a while" conversations. I was at a loss because I really was trying to be good. After I opened it, I remembered what it was for.
The first thing I noticed was that the main body tube was severely damaged. It had been doubled over at some point and was severely dented. I contacted AA Rocketry and without any fuss, was sent a replacement. I had a harder time explaining this one to the wife.
When the replacement arrived, it was in a priority mail tube. On opening it, the tube was stuffed with Styrofoam peanuts and the body tube was exerting pressure on the forward closure. When I examined the tube, it had a dent that looks like it originated from compression. Classic Euler buckling. It was nowhere near as bad as the first time but enough to be suspect when intended as an airframe.
I contacted AA again and again, they were very reasonable. We jointly decided that I would be sent a tube coupler and cut out the bad section. The resulting joint should be stronger than the original. A few days later, a boxed arrived with the coupler. Then everything sat around unopened for a few months until, finally, I was ready to begin the build.
Upon looking at the instructions, the first item to work on is the BT so I decided I had better start splicing. I used a razor knife to cut the tube in two and then test fit the coupler. It would not fit. A bit of judicious sanding fixed that and I glued it into place with yellow glue.
I tested the other piece and, as expected, found that it was too tight as well. I sanded some more and then, stupidly, spread the glue without checking. The tube did slide on but froze up before I could get it all the way down. It left about an 1/8" gap. I figured that I would incorporate this flaw somehow in the final paint scheme.
The next step was to mark the BT for the fins. This kit has a printed end alignment guide where you set the rocket on a circle and transfer marks. I prefer the wraparound type but realize that others prefer this type so it's just a matter of taste. I made the marks and used a door to lengthen them. Then I went to transfer the marks to the side body tubes and ran into a problem. I only had a single BT and I needed 2. I had not done an inventory before starting.
Checking the parts list, I found that I was indeed supposed to have 2. I checked the instructions again just in case I was supposed to cut the one I had but, no, I need two. There, everything came to a screeching halt as I tried to contact AA Rocketry once more.
AA Rocketry sent out the replacement and, while I was at it, I ordered an extra decal sheet. The reasons will be apparent later.
The long awaited tubes for the side pods were marked and then I was instructed to use the template in the directions to cut out 4 parts. Two of these were for fins and two more were to assemble a tool to aid in the making of the motor mount.
I taped the pattern to the provided sheet of balsa and used a straightedge to cut the pieces out. I found that my template was just a touch narrower than the balsa but that was not a problem. I cut as if the lines for the fins extended all the way to the edges and then compared the resultant pieces. Sure enough, one was just a hair wider than the other. The razor fixed that.
The two jigs that were cut out were supposed to be put together without glue to use as a tool to place the thrust ring. I tried to get the two pieces together but the slots were too narrow. I fixed that with a razor and they went together. When I used it to test fit the ring though, the X passed right through it.
I pressed on and marked the motor tube where indicated and then used a spacer tube from another kit to glue in the thrust ring. A slit was then made for the engine hook and I placed it and secured it with some tape. The centering rings were then placed with glue, filleted, allowed to dry, and then filleted on the other side. The instructions were adequate at this point, but I feel they could have been made clearer with a diagram or slightly different prose.
The side pods were up next. The instructions indicated that the 4 plastic nosecones were to be placed with either plastic cement or epoxy. I had some 20 minute epoxy handy so I used that.
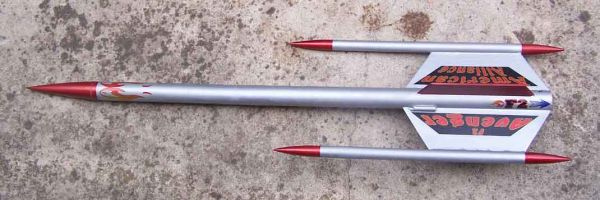
 I need to point out that the kit has two pairs of fins. One, the larger set made from plywood, came already cut. The ones cut from balsa in a previous step are not exactly small either but they are smaller than the plywood ones. The instructions talk about the "main" fins. I was not sure which set this reference indicated. I thought it was probably the plywood ones but was unsure. Then I thought it would probably be the fins attached to the side pods and later the instruction make clear that this is indeed the case, but that still left unresolved the question of whether it was the balsa or the plywood fins that were to be used with the side pods. I finally thought to check the illustration on the first page and it turns out that my intuition was correct. The main fins are the plywood ones.
After both main fins had set up for a while, I installed the secondary fins. These were the balsa ones. I decided to use yellow glue for these since they would not be under as much stress, not having the side pods. I used a double glue joint and carefully checked for alignment.
After letting the secondary fins dry for a while, I attached the side pods. I again used 5 minute epoxy for this step and, when they were in place, I could finally see the "cool" factor coming into play.
The kit comes with a 1/4" launch lug that has already been bevel cut. I placed it according to the instructions at the top of one of the main fins using yellow glue.
I used sandpaper to bevel the leading and trailing edges of both sets of fins after making sure that each pair was identically sized. The plywood fins were already identical but the balsa ones needed a touch of extra sanding to bring them into conformity.
I used 5 minute epoxy to glue the main (plywood) fins to the BT. I did so in order that the adhesive would set up quickly while I was still checking for straightness. After I was fairly sure things were set up right on the first fin, I let it dry for a while more before tackling the second one. It was then put on in the same manner. Both were applied with their aft ends flush with the end of the BT.
The "kit" recovery system involves an Estes style tri-fold mount. I detest these things and avoid them wherever possible. I decided to do so in this case as well and tied a Kevlar harness just abaft of the forward centering ring on the motor mount. I then cut a small notch in the outer edge of the ring to pass the Kevlar and filleted the Kevlar in with yellow glue.
When the harness was dry, I fed the Kevlar through the BT and applied a ring of yellow in the aft end. Then, keeping tension on the Kevlar, I inserted the motor mount and seated it flush with the aft end.
Finishing:
To me, the terms "balsa fillercoat" and "sanding sealer" were pretty much interchangeable. All I really knew about the difference is that my local hobby shop always had sanding sealer and that the rack marked "balsa fillercoat" was always empty. This time around, I ordered over the internet and got the fillercoat. When it came in, the difference was readily apparent. It has much more "gunk" suspended in it. Presumably, this makes it fill the grain more effectively.
I gave the fins, both plywood and balsa, 4 coats and sanded them down smooth. I was quite pleased with the results and the difference compared to using sanding sealer. I still had the ring from my botched use of the tube coupler to worry about though. I filled that with Elmer's Wood Filler and then sanded it down smooth.
Priming was done with Kilz. While using some Rit dye on another rocket (Edmonds Tinee), I had apparently splattered the stuff and gotten drops of it all over the Avenger. I was worried about it bleeding through but the Kilz got 95% of it in one coat and 100% after the second.
 The Kilz was sanded down in preparation for painting. At this point I learned that, while I liked the design of this rocket, those pods on the fins make sanding a real pain. They are fairly delicate and seem to get in the way of every possible motion I wanted to make with my hands. Eventually though, I had a white rocket. Since I was planning on using a metallic paint, I gave the primed rocket a coat of gloss white as well to serve as an undercoat.
I wanted to use a metallic aluminum for the main finish. I was not looking for anything too shiny, just silvery metallic. I sprayed on 2 coats.
I found myself somewhat at a loss at this point. While rummaging around on the desktop and waiting for the aluminum paint to dry, I found a small slab of modeling clay. The clay came from this kit and is presumably to move the CG forward. It's puzzling to me because the clay in mentioned in the parts inventory but nowhere in the instructions. Also, this kind of clay is usually stuffed into the nose cone but this plastic nose cone does not lend itself to such application.
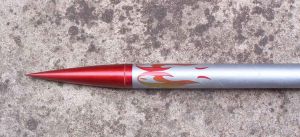
After the aluminum paint had dried, I masked off most of the rocket except for the main nosecone, the nosecones on the side pods, and the secondary fins. On these areas I wanted to try a metallic red paint. My previous experience with colored metallics was a bad one but I was hoping that I had learned something since then. The rocket had been primed and it had 2 layers of metallic aluminum underneath. According to the instructions on the can, it was meant to be applied to the bare metal of car engines. I hoped the aluminum paint would suffice.
It looked pretty good when I was spraying it. The color was bright. Time would tell if it stayed that way as it dried. Fortunately, it did. It was a little darker than the lid but still bright enough to satisfy me.
This kit comes with a single set of decals that make the rocket look pretty good on one side but very plain on the other. When I ordered the replacement for the damaged tube, I ordered an additional set of decals and am glad I did.
The decals were some of the highest quality I have ever worked with. They went on without any problem and greatly enhanced the look of the kit.
Construction Rating: 3 out of 5
Flight and Recovery:
The Avenger had its maiden flight at an Amateur Rocketeers of Texas Freedom launch. The initial motor selection was a C11-3. Some dog barf was stuffed into the tube followed by the chute and the motor was put in place. This rocket had garnered some interest so all were watching as the button was pushed.


The take off was fine, but the rocket began to wobble back and forth, wagging its tail not too long after it cleared the rod. It continued that way until it reached apogee and arced over. It ejected when horizontal and came down gently under its chute. I went to get it and was all ready to try a D when I turned it over. The ejection charge had not only deployed the chute, it had ejected the engine hook as well. This rocket would not fly again this day.
The rocket is repairable and I will repair it and fly it again. I am provisionally giving it a 3 for flight but think it can do better if I can rid it of its gremlins.

Flight Rating: 3 out of 5
Summary:
I had trouble with this one from the outset, but it seems to be more of a convergence of bad luck than a bad kit.
Overall Rating: 3 out of 5
 |
 |
Flights
|
|
J.A.L. (November 20, 2008)
Sponsored Ads


")


")
|
|
E.T. (November 8, 2008)