Art Applewhite Rockets Double Helix (18mm)
Art Applewhite Rockets - Double Helix (18mm) {Kit}
Contributed by John Lee
| Construction Rating: | starstarstarstarstar_border |
| Flight Rating: | starstarstarstarstar |
| Overall Rating: | starstarstarstarstar |
| Manufacturer: | Art Applewhite Rockets  |

Brief:
Art Applewhite has recently been promoting a series of monocopters and, in the case of the Double Helix series,
bicopters. The 18mm version of the Double Helix is not as simple as its 13mm sibling but neither is it very difficult.
Mostly though, they are fun to watch and fly.
Construction:
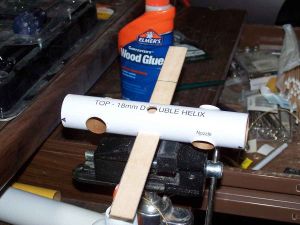
The kit comes with instructions, a piece of basswood that must be cut to dimension, 2 motor tubes, a 1/4" launch
lug and a pre-marked body tube. All materials were in good condition and of good quality.
The body tube, such as it is, is marked by the simple expedient of being wrapped by a sheet with all of the relevant locations indicated by polygons of the appropriate size.
The first step in construction is to cut out the polygons on the body tube. This is done with an #11 X-Acto knife and the blade needs to be a new one. The method recommended in the instructions and, which worked quite well, is to push the blade in perpendicular along one line of a polygon, slowly push it in until the blade completely covers one line segment, remove the blade, and repeat as needed until all sides are cut out.
The second step is to cut the basswood. A single strip is provided and from that both wings and the balance beam. When done, there was a 4" x 3/4" strip left over that I am sure will come in handy one of these days.


After the wings are cut out, they can only be forced into the BT with some effort and flexing of the tube out of round. The instructions say to sand down either side for a distance of about an inch. This was done by marking the limit on the basswood, laying a sheet of sandpaper out on the edge of the work area, and working the fin back and forth.
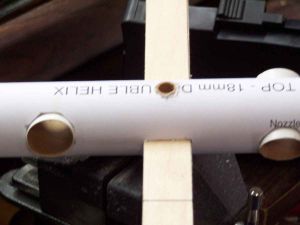
The balance beam is supposed to have a 3/8" hole drilled in its center to accommodate the launch lug. I decided to go ahead and install the beam so that I could use the holes in the BT to make sure the hole in the beam would align. I had to do a little trimming to get it to fit but then it slid into place. I used a ruler to make sure that each side extended the same distance.


After the glue had dried, I got out the 3/8" drill bit and made the penetration through the balance beam. I then slipped in the lug and glued that as well.
Finishing:
I can be a real dunce sometimes. Most of the Helices I have seen have been flown "nekkid" but I like a
little paint and the instruction indicate that is just fine as long as too much is not used. With that in mind, I put
the now dried "Black Death" in the booth and had at it with, what else, but black. About the time I snapped a
photo, I realized something was wrong but could not quite put my finger on it. I went back to my work desk to get
something done on another project and, voilá, there were the wings for the Double Helix starring at me: I
had forgotten to install them.
When the paint had dried enough for me to mess with the Helix and I had time, about 2 days, I took out the wings and test fit them. They fit fine but putting them in place was much more difficult than it should have been because of the paint, especially black paint.
The BT is marked with black triangles to serve as alignment marks. You insert the wing and make sure that the edges lined up with the points. At least that is the way it is supposed to happen. With me, the black paint had obliterated all traces of 3 of the 4 marks. The fourth line was barely visible.
I did remember that the wings are to be aligned at the same angle as the motor tubes. That meant that I was able to get the wings right, I hope, but that I worked much harder at it than I needed to have done. Bad me.
The wings were glued in place and filleted. Everything was eyeballed into place. I hope its good enough and the flight will tell.
With the wings in place, I set up the Helix and applied a second coat of paint to the body and the first coat to the wings. I am going to leave it at that so as to not add too much weight.
Construction Rating: 4 out of 5

Flight and Recovery:
I only got one shot at flying this one the first time out. I chose to use a pair of C6-0s, prepped the rocket by
forming a thrust ring of masking tape around each motor, and loaded it up on the monocopter pad.
At ignition, it started to spin just like its supposed to and took off in a slow motion flight accompanied by a buzzing sound. The C6s were a good choice because of the duration of the burn.
When they had burned out, the Double Helix slowed down its revolutions, came to a stop and then started spinning in the opposite direction as it auto-rotated down. This was by far the best performance I have gotten out of any of the Helices.
Flight Rating: 5 out of 5
Summary:
Cool rocket. Probably the best of the Applewhite Helices.
Overall Rating: 5 out of 5
Other Reviews
- Art Applewhite Rockets Double Helix (18mm) By Dick Stafford (June 14, 2008)
Brief: The Double Helix is another new twist on the monocopter (pun intended)--it has two wings and flies on two motors. In fact, it's more or less two 18mm Helix Monocopters stuck end-to-end. Technically, it's not a monocopter but a bi-copter. Construction: The parts list: 3/32" Basswood sheet 29mm tube Two BT-20 motor mounts ¼" launch lug ...
 |
 |
Flights
Sponsored Ads


|
|