Scratch FireRay Modification
Scratch - FireRay {Modification} [?-?]
Contributed by David Porterfield
| Manufacturer: | Scratch |
 Brief:
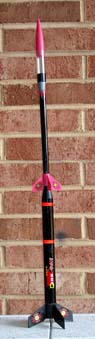
I wanted to make the Fireflash shorter and less fragile. As this in itself would have resulted in a rather nondescript rocket, I used parts from the X-Ray to add a payload section. This resulted in a rocket I called the FireRay.
Modifications:
Like the two rockets it's derived from, this was a very easy rocket to build. First I assembled the engine mount and inserted it into the fin unit according to the instructions provided with the Fireflash. However, I attached the fin unit to the black BT-50 body tube instead of to the gray one (the gray one can go in your parts bin, along with the two black BT-5s).
Since the plastic coupler included with the Fireflash isn't used, there's only a tiny launch lug on the fin unit, so a regular launch lug must be added. I painted the launch lug gloss black so it would blend in with the rest of the rocket, then aligned it on the body tube by sighting through the launch lug on the fin unit. I used the shock cord provided with the Fireflash (actually long enough, since this rocket ends up being considerably shorter than the Fireflash) and attached it to the inside of the black BT-50 body tube with a traditional tri-fold paper mount. The other end of the shock cord was attached to the plastic tube adapter as described in the Fireflash instructions. This completed the lower half of the rocket.
The upper half of the rocket uses most of the parts from the X-Ray plus two clay weights from the Fireflash (put the other two with the rest of the extra parts). I packed the two clay weights into the nose cone for balance, and covered the clay with a small piece of aluminum foil. Then I assembled the payload section according to the X-Ray instructions, using paper tape where needed to get a snug fit. I slid the fuchsia fin unit onto the black BT-5 tube provided with the X-Ray (it's slightly shorter than the BT-5s that come with the Fireflash), then attached the payload/nosecone assembly with CA. The entire upper section is then attached to the adapter at the top of the lower section. You can glue it, but I decided to just friction-fit it very tightly with paper tape to make it easier to change the shock cord if needed. Then tie the parachute to the shock cord an inch or two down from the upper section.
The final result is a payload carrier that uses standard engines and stands about two feet tall -- no shortie, but not so long as to suffer from the crumpling problems that plague the Fireflash.
Construction:
The FireRay uses the engine mount, fin unit, plastic tube adapter, parachute, shock cord, and one of the BT-50 body tubes from the Fireflash, as well as two of the four clay weights from that kit. It also uses the BT-5 body tube, fin unit, payload section and nose cone from the X-Ray kit. The only extra parts needed are a launch lug and (optionally) gloss black paint and a small piece of aluminum foil.
As noted earlier, this is a very easy rocket to build -- you can easily put it together in less than an hour. The materials provided in the two kits (all were fully complete) allow you to retain the black-and-fuchsia color scheme of the X-Ray. I cut up the decals from both kits to make a decal that says "Fire-Ray" (although I placed it a little low on the body tube and ended up adding a couple of strips of red automotive striping tape above it so it would look more "balanced" -- this wouldn't be necessary if I'd put the decals in the middle to begin with). I also cut out the two "X"s from the X-Ray decals and put them on the lower fins. The only "con" I can think of regarding construction and finishing is that you do need to supply a launch lug, which looks much better if you paint it black. I put the small piece of aluminum foil over the clay in the nose cone purely for aesthetic reasons, so whether you do that or not is entirely up to you.
Flight:
Unfortunately I was only able to fly this rocket twice, but it performed beautifully both times. Since it's parachute recovery, it does require wadding (I use the treated paper insulation available from home improvement outlets). It has positive motor retention using the engine hook from the Fireflash.
The first flight of the FireRay was on an A8-3, which took it up close to 200 feet. It looked like it deployed slightly before apogee.
Its second flight was on a B4-4, which deployed slightly after apogee (a B6-4 might work better) at around 400 feet. I never had the chance to try it on a B6-4 or a C, because an upper air current caused it to drift into the woods, where it was not recoverable, but I imagine a C6-5 would have taken it up close to 800 feet.
It flew straight and true both times it was launched. The shock cord, as noted earlier, was attached with a conventional tri-fold paper mount. No damage or wear was evident upon recovery, except for a little soot on the shock cord. The twelve-inch parachute supplied with the Fireflash works great.
Summary:
The main pros of this rocket are that it's considerably shorter than the Fireflash and doesn't get all bent up after you launch it. It also has a payload compartment to give it a purpose. The main con is that it's fairly expensive for a rocket -- you have to buy two kits, which comes close to $20. However, there are enough parts left over to build at least one other rocket. Also, you have to supply your own extra launch lug, and paint it if you want the rocket to look good. But I think these are minor considerations in view of the rocket you get out of it.
Other:
The only extra part you need to build a second rocket from the parts available is the bottom of a nosecone to fit a BT-5 body tube (so you can tie on a shock cord), and optionally a longer shock cord to replace the tiny scrap of elastic that comes with the X-Ray. Using the red nosecone (plus the nose cone bottom), small white fin unit and one of the BT-5 body tubes from the Fireflash, along with the engine hook, retainer ring and streamer from the X-Ray, you can put together a little Gnome-like rocket that flies on mini-engines. (Mine went out of sight on an A3-4T.) Being able to get two rockets out of the kit-bash makes it a little more economical. The colors don't really match, but it works. Since I don't have RockSim, I had to test the rocket using the old swing-on-a-string method. It might not need so much clay in the nosecone, but I figured better safe than sorry.
#Related Reviews
Related Products
Sponsored Ads


 |
 |