| Manufacturer: | Clone |
| Style: | Clone, Futuristic/Exotic |
B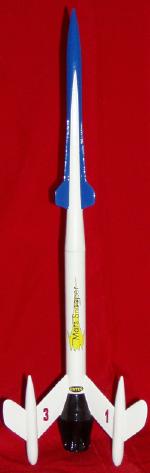 rief:
rief:
This is a single stage futuristic classic from Estes that I cloned from plans off Jim Z's web site. Is powered by a single 18mm motor and recovers on a single 18" parachute.
Construction:
- 1 Sheet of 3/32 balsa 6"x8.5" to cut fins from.
- 1 BT20 Upper Body Tube 6.5"
- 1 BT20 Motor Tube 3.75"
- 1 BT50 Lower Body Tube 7.75"
- 3 PNC5W Upper pod nose cones
- 3 PNC5V Lower pod nose cones
- (Pod Nose cones sold in Estes Parts Kit# 303160)
- 1 PNC20N Nose Cone
- 1 TA2050 Balsa Adapter Estes P/N 8073
- 1 JT50C Tube Coupler
- 2 2050 Centering Rings
- 2 2060 Centering Rings
- 3 BT5 Pod Tubes 1 9/16"
- 1 EB20 Engine Block
- 1 Standard 18mm engine hook
- 1 LL2C 1/8" Launch Lug 3" Long
- 1 18" Parachute
- 1 small Screw in eye bolt
- 1 3/4" Fender Washer
- Decals Custom Ordered from Tango Papa's
- 1 sheet of heavy paper stock(at least 24lb)
- 20" of 1/8" Kevlar string tied to 18" of Nylon/elastic Shock cord
- Modelers clay
Instructions for construction are fairly straight forward. I did have the the Collectors Edition K-20 Mars Snooper in the box unassembled to go to when I questioned the Instructions. All measurements I posted here where taken from that Collectors Edition kit.
When assembling the paper shrouds, test fit everything before gluing. Since the paper stock will deform if a heavy wet glue is used, I used an Elmers glue stick to hold them together. After all paper shrouds are fitted correctly and assembled in place, I coated them several times with a medium CA glue to stiffen and bond them permanently.
One Gotcha, is the Launch Lugs placement in the tube. Check the alignment by sliding the rocket on a Launch lug before final gluing in place. Care must also be taken to prevent paint from adhering to the tapered top of the Launch Lug. This will cause it to bind on the Launch rod.
I also chose to install a motor hook for motor retention, (was not used in the original model). This was a standard installation, and will flex within the confinements of the bottom shroud.
"Gotcha #2", The top PNC20 Nose cone used was plastic so I was not able to add the eyebolt and weight per the instructions. I chose to not glue it in place until construction was finished. Then I loaded a new motor, and added Modelers Clay to the inside of the Cone until I achieved a CG balance point of 15-7/16" per the instructions. I then glued the cone in place and painted the rocket.
Finishing:
Finishing was completed per the original design using white base coat, and then taping for painting the blue nose cone accent, and black tail cone accent. The CA helps the paint to coat the paper shrouds better.
The taping and painting is not easy, and requires slightly more than beginner modeler skills to achieve a good paint job.
Decals should be preordered from Tango Papa's. They arrive on a 8x11 sheet with plenty of duplicates to allow for errors.
All paint was of a gloss coat. A clear coat was applied after the decals where applied. Test your clear coat on Papa Tango's decals before applying. Some clear coats will cause bad wrinkling.
Flight: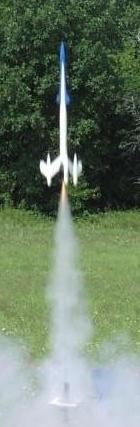 Since most motors recommended are no longer in production, I chose to make the first flight on an Estes A8-3 motor. Chute protection was achieved with the standard Estes wadding.
Boost on the A8-3 was straight, but the flight barely achieved 75 feet. Chute deployment was perfect at apogee.
I then chose to load it up with An Estes B6-4. This was a straight boost to a perfect flight of an estimated 300 feet. Deployment was again achieved at apogee, and recovered unharmed.
To date I have had a total of four perfect flights, mostly on the B6-4. Some slight damage occured when the upper body struck the lower fins during chute deployment, but easily repaired.
Recovery:
The Shock cord was assembled similar to Quest Models. 20" of Kevlar string tied to 18" of cotton lined 1/8" elastic cord. Attachment to the rocket's body and nose cone were according to the instructions. Recovery was perfectly gentle with no recovery damage. Chute protection was achieved with the standard Estes wadding and no chute burning occured.
Summary:
This Mars Snooper clone is one of my all time favorites of the Estes heritage. The slightly challenging construction and painting is well worth the great reward of the finished product. No CONS apply in my opinion.
Related Products
 |
 |
Flights
Sponsored Ads


|
|