Estes Patrol Cruiser Excalibur
Estes - Patrol Cruiser Excalibur {Kit} (1399) [1980-1981]
Contributed by Larry Zeilmann
| Construction Rating: | starstarstarstarstar_border |
| Flight Rating: | starstarstarstarstar_border |
| Overall Rating: | starstarstarstarstar_border |
| Diameter: | 1.64 inches |
| Length: | 20.13 inches |
| Manufacturer: | Estes  |
| Skill Level: | 3 |
| Style: | Futuristic/Exotic |
 Brief:
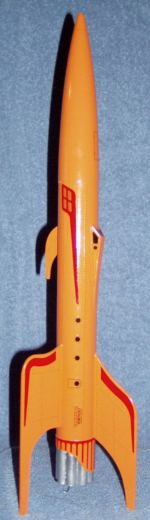
This is a single staged, futuristic style clone of the Estes Out of Production (OOP) kit from the Galactic Pirate series. It flies on a single 18mm motor and recovers on a single 18" plastic Estes chute.
Construction:
Instructions for this kit are available on JimZ's web site at http://www.dars.org/jimz/estes.htm
The parts inventory is listed in the standard Estes part nomenclature, but some of the parts are obsolete and need to be fabricated. Lengths for the out of date nomenclatured parts can be determined by visiting the Ninfinger web page.
Parenthesis items show how I fabricated the item.
- 1 3" BT63CJ Tail Shroud tube (Split a BT60 and filled the gap with Elmers Filler
- 1 11" BT60D Body Tube
- 1 6.5" BT20D Engine Mount Tube
- 1 1.75" BT20AE Spacer Tube (omitted)
- 9 1.75" BT3XW Rocket Tubes (Used 8 1.75" Apogee's 10.5mm tube)
- 2 RA-2060 Die-Cut Rings (CR2060 Centering Rings)
- 1 EH-2 Engine Hook (Standard Hook)
- 1 HR20 Retainer Ring
- 1 PNC60AH Nose Cone
- 1 .125" Thick BFS1339 Balsa Fin sheet (.125" Thick Bass Wood Sheet)
- 1 SP1339A Pattern Sheet (printed on paper)
- 1 18" Plastic Chute
- 1 Standard Shock Cord (One 6" Kevlar string tied to a 20" elastic cord)
- 1 1oz of Modelers Clay
- 1 LL2B Launch Lug
This being my second attempt at building this model, I made some improvements to the construction process for strength, durability, and visual appeal.
 The instructions are simple and well-illustrated. I found them easy to follow after converting the out-of-date nomenclatures and determining required lengths. I tend to always pre-fit everything before gluing. In this case, I glued everything with Elmers white glue.
Gotchas are few but one big gotcha does exist. When printing patterns off JimZ's web site be careful to check that your printer is printing in true size. Some printers will "print to fit" the paper stock you are using. This will throw everything off in the construction process.
After the patterns are printed, construction is straight forward. I made several simple alterations that I thought greatly improved the finished product.
Instructions call for a two-part fin cut and assembled from .125" balsa. On my boilerplate first attempt I experienced many broken fins near the thin bases on recovery. To overcome this, I elected to cut the fins as a single assembly from .125" basswood. I then soaked them in thin and thick CA glue to strengthen and seal the wood grains.
No tube was readily available for the BT63CJ Tail Shroud tube. For this I cut the pattern from a 3" section of BT60. I then split the shroud in the thin area and glued it in place on the body tube. After the glue dried, I filled the slit with Elmers's wood filler and sanded it till it was not noticeable.
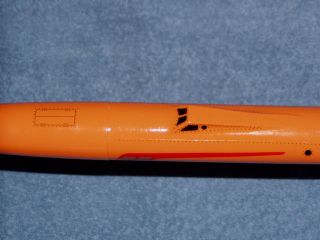
The pattern for the Cockpit Canopy was cut from paper and tacked into place with Elmers. Be careful about wetting the paper too much with Elmers white glue as it will cause the paper to deform. I then soaked the canopy in place with thin CA glue. This permanently cements it in place and greatly improves its strength.
Finally, I was not able to find any BT3 tube for the Rocket tubes. For this I elected to use Apogee's 10.5mm tubing and cut eight sections to a 1.75" length. I discovered that if I discarded the spacer seven of these tubes fit nicely around the engine tube, For the 8th and last tube I positioned it over the engine hook. To facilitate operation of the hook, I cut a lengthwise slit in the 8th tube the same width as the engine hook. When glued in place, it gives the illusion of a complete tube but allows for the engine hook to be displaced inside of the tube. Gotcha warning: remember to paint the motor mount tubes before gluing them into the rocket as the instructions state.
 Finishing:
I built this rocket because I liked the way it looks. Therefore, I decided to finish it in factory colors and decals. Of course, the decals are no longer available. Luckily a decal scan is also available on JimZ's web site. That allowed me to print my own decals on inkjet decal paper. Decal paper is available from most hobby shops or several web vendors.
Painting was accomplished in two phases. This procedure is also recommended in the instructions. The Rocket is painted all over in bright orange, while the motor mount tube area is painted separately in chrome.
Next, the very tedious placement of decals and rivet patterns are cut and placed on the rocket. The only bad illustration on the JimZ web documents is the decal placement illustrations. Unfortunately, they are blacked out and unreadable, however, 95% of the decal placement can be figured out from the instructions and the finish rocket pictured on the web site.
Gotcha: After all decals are in place and dry. Spray a couple of coats of clearcoat over the decals to seal them in place. Do this before you glue the motor mount in place. I have discovered that clearcoat paint sprayed over chrome paint ruins the chrome effect.
After the clearcoat is dry, glue the motor mount in place per the instructions.
Looks great!!
Construction Rating: 4 out of 5
 Flight:
I have yet to fly my second attempt at building this rocket. However, my first boilerplate attempt has flown a few times. I believe that the A8-3 motor is far to weak to lift this rocket. This might be contributed to my heavy construction techniques.
On an A8-3, the test rocket flew true on sluggish performance of the rod to 75 feet. Recovery occurred so close to the ground that the chute barely opened. This resulted in a broken balsa fin from the hard landing. Thus, the fin improvement on the second installment.
The second rocket will fly its maiden flight on a B6-4 soon.
Wadding and motor retention are all standard for the Estes model rockets.
Recovery:
My shock cord construction was of the Quest rocket design. The instructions call for the standard Estes trifold glued inside the body tube. My experience has this method failing after several flights.
Therefore, I ran a 6" piece of Kevlar string through the forward centering ring and tied it around the motor mount. I then tied the end of the Kevlar® string to a 20" length of elastic shock cord. I have also learned that the knot should fall inside the body tube near the top with the Kevlar string fully extended. If Kevlar string is allowed to be exposed to the end edges of the body tube it can cut like a wire and zipper the body tube on normal chute deployments.
As long as you avoid the A8-3 motor, recovery will be gentle on the standard Estes 18" plastic chute. On the A8-3 the chute opens to close to the ground to allow for proper deceleration.
Flight Rating: 4 out of 5
Summary:
This is a great rocket, and with some patience in placing the rivet decals you will end up with a greatly detailed futuristic flier. In fact, it looks so good it is probably guaranteed to be grabbed by the rocket Gods ;>)
Overall Rating: 4 out of 5
 |
 |
Flights
|
|