| Construction Rating: | starstarstarstarstar_border |
| Flight Rating: | starstarstarstarstar_border |
| Overall Rating: | starstarstarstarstar_border |
| Published: | 2011-01-01 |
| Diameter: | 0.98 inches |
| Length: | 27.00 inches |
| Manufacturer: | Estes  |
| Skill Level: | 2 |
| Style: | Multi-Stage, Payload |
 Brief
Brief
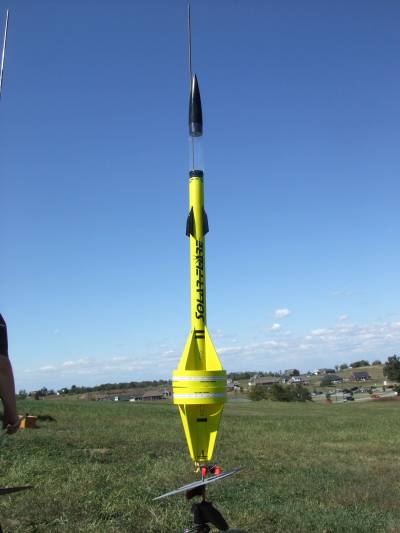
Note--this review is for the standalone rocket kit, not the starter set package referenced in the prior review. The rocket is a nifty 2-stage (18mm==>13mm) ring-fin design with a clear payload tube, with the booster so well integrated into the design this could easily be mistaken for a single-stager on the pad.
Components
My kits came in a retail bag pack, and as a result my ring fins were mashed slightly out of round. Ordinarily this wouldn't be a big deal, but since they mate up to form the joint between stages, this presented fit/finish challenges. Other than that, the parts were very good quality. The kit includes:
- PNC50 plastic nose cone
- Clear payload tube (BT-50 sized, 4" long)
- BT50 body tubes (4.5" and 14")
- TC-50 coupler
- 18mm motor mount, metal hook
- 13mm motor mount
- 90mm diameter rings (1" tall, 2 pcs)
- laser-cut balsa fins, braces
- assorted centering rings, , clay and metal weights
- waterslide decals
- 12" plastic chute (pre-assembled)
Construction
The instructions are well written and illustrated, and really need to be carefully followed to make sure everything fits together as intended. This isn't the type of kit you can eyeball and build without some guidance. I'd rate it about a skill level 2 overall, as there's nothing overly complex about it other than the two-stage aspect.
Construction of the upper stage starts with the 13mm motor mount, fairly straightforward with a tube, pair of centering rings, and motor block, but the aft ring and motor block need to be precisely positioned for the booster to fit properly.
The booster motor mount is an 18mm tube, pair of centering rings, metal hook and motor block, all in a more conventional configuration with the centering rings towards the ends of the tube (aft ring cut out for metal clip operation). The booster tube is a 4.5" length of BT-50 with (4) fins/braces supporting the first of the outer rings. The braces are positioned using a marking template printed on the instruction sheet. The laser-cut fin sheet also includes a balsa alignment fixture piece, which is designed to provide proper spacing between each fin as you tack them on. This is one of those sections to pay careful attention to the instructions, as the booster should look like you're building it upside-down, with fins sweeping forward, and the ring at the forward end of the BT-50 tube. The assembly's completed by adding a metal washer (to promote tumble recovery) and sealing it in with a coupler.
The upper stage assembly is similar to the booster assembly, though using the 14" BT-50 and longer fins, and built right-side up (fins sweeping back, ring at the aft end). There are also four smaller trim fins going towards the forward end of the tube.
The payload assembly is simple, just a coupler/bulkhead piece, clear payload tube, and plastic nose cone (weighted with a chunk of clay). As noted in the previous review, the fit was a bit loose, so I wound up wrapping a couple layers of paper around the bulkhead to provide a better joint.
The rubber shock cord is anchored via paper tri-fold, which for the 13mm motor options is probably adequate.
Finishing
If you're into filling balsa grains, you'll probably want to take care of that (and filling tube spirals) before beginning construction, since so much of them is tucked behind the outer rings. I used Fill N Finish throughout, hit everything (except the payload tube, obviously) with gray primer, then followed with two coats of bright yellow. I masked off the upper tube and hit the forward trim fins with gloss black, along with the nose cone. I then hand painted the bulkhead piece that fits inside the clear payload tube with a gloss black before tacking it in place with thin CA.
The waterslide decals went on fine, though are relatively thin so should be handled carefully.
Flight
For the first flight, I had a fairly calm day with 5-7 mph winds, so went with a full C6-0 booster and A3-4 upper stage, figuring the longer burn and longer delay would be a better choice than Estes' recommended A10-3. The boost was straight and the upper stage lit fine, with clean separation though a little bit of a tipoff at separation, resulting in an angled second stage flight path. As it turned out, this was fine. The sustainer headed upwind, then during descent drifted back to within about 50 feet of where the booster had tumbled.
Recovery
The 12" chute is fine for the sustainer, and the booster tumbled as designed, though a bit fast. It should be fine for taller grass or soft ground, but if flying on hard/dry ground I'd expect an occasional ding to the paint or ring fin.
Summary
I really like the integrated two-stage design on this, and especially like being able to fly two-stage on relatively small fields with 13mm upper stage options. This is one of Estes' better designs in years.
Other Reviews
- Estes Solar Flare By David Scigliano (July 20, 2009)
Brief: This is a flashy two-stage rocket kit. The Solar Flare is a Skill Level 2 rocket kit that features laser cut balsa fins, high quality body tubes, clear payload section and a plastic nose cone for a straightforward assembly. The B or C powered booster stage has a tapered look and makes this rocket look like an intergalactic researcher. In addition to being a two-stage rocket, ...
 |
 |
Flights


|
|