| Construction Rating: | starstarstarstarstar |
| Flight Rating: | starstarstarstarstar |
| Overall Rating: | starstarstarstarstar |
| Manufacturer: | Estes  |
 Brief:
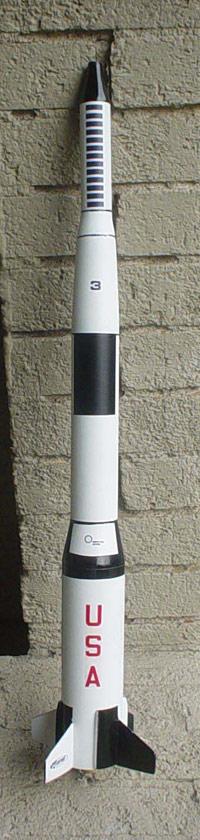
Supposedly created for the sole purpose of ridding the parts bins of excess components from out of production kits, the Estes S.P.E.V. (aka: Spare Parts Elimination Vehicle) undoubtedly possesses one of the more interesting background stories in model rocketry. While it would be excusable if such a rocket failed in the styling department, the S.P.E.V. actually manages to project a sort of regal purposefulness, looking for the most part like a NASA mock up. Though never offered as a catalog kit, the S.P.E.V. could be obtained for free if you ordered a predetermined amount from Estes, but due to it's short, somewhat secretive life-span, it's possible that few BAR's had ever heard about it before JimZ's plan site arrived.
Construction:
- Plans and patterns http://www.dars.org/jimz/k-59.htm
- BNC- 52G nose cone (from BMS)
- TA-5260C balsa adapter (from BMS)
- BT-52S 3.938" body tube (Semroc ST-10)
- BT-70H 7.15" body tube (from Totally Tubular)
- BT-60FG 6.7" body tube (from Totally Tubular)
- TA-6070 balsa adapter (from BMS)
- BT-20J 2.75" engine tube (from Totally Tubular)
- 2070 fiber centering rings (from BMS)
- 2" launch lug
- engine hook
- 3/32"x3"x9" balsa fin stock
- screw eye
- 36" sewing elastic 1/4" width for shock cord
- 18" parachute
- decal
The difficult part of building an SPEV clone lies not in the construction itself, but in locating key parts. All of the balsa parts and rings are stock items at Balsa Machining Service, while the BT-60 and BT-70 tubes are readily available from Totally Tubular. The piece that is difficult to find is the BT-52S. I used a length of ST-10 body tube that I had recently received in a Semroc order, but while it is close to the original, it isn't an exact fit. The TA-5260 balsa adapter fits into the ST-10 tube fairly well, but with quite a bit of play, (while oddly enough the BNC-52G nose cone fit perfectly at the other end.) I countered the tube problem with liberal amounts of wood glue and Elmer's Fill N Finish. It took some time and work, but in the end I came up with a surprisingly smooth finish that disguised the fact that the tube didn't mate to the transition perfectly. Once the upper section of the rocket was completed to my satisfaction, the rest of the project fell into place easily. The fiber centering rings from BMS needed a little sanding to allow them to slip easily into the length of BT-70, but only a very little. Overall the fit and finish of the combination of pieces was great, and it was cool to watch the SPEV grow out of a bunch of seemingly disjointed parts to become a classic piece of model rocketry history.
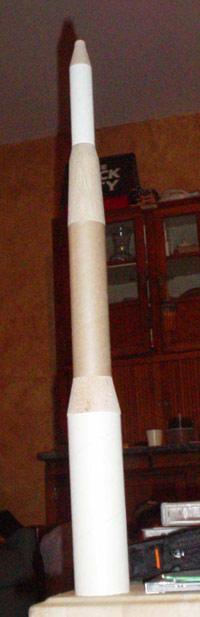 I normally do the primer after all of the filling and sanding are done and the fins are attached, but this occasionally leaves some rough patches or fraying, especially at the top and bottom of the tubes. Because of this unfortunate phenomenon I decided to take a different route this time. I sprayed the entire rocket with a coat of primer THEN began the sealing and sanding process. It made a marked difference. Nowhere on any of the tubes can you detect any trace of fraying even after my heavy handed sanding. This method also paid dividends when it came to attaching the fins as the less slick surface of the sealed and sanded body tubes gave the glue something to bite into when the fins went on. The fins were a story in themselves. Much of the work that I had completed up to this point had been done in one great building session over the course of one weekend. When the weather changed for the worse and messed up my launching plans, I kind of got thrown off course a bit. The SPEV sat untouched for almost a month until the local weather gurus began calling for a beautiful spot of weather for Leap Day weekend. Because of my daughter's basketball game, a Saturday launch was out, but Sunday looked like it would be an even better day if I could get the needed work done. We had a guest in town that weekend, luckily the kind who doesn't consider a Saturday night sitting around watching a network broadcast of Forrest Gump with the family a waste of time. That was how I came to spend a Saturday evening gluing and filleting the fins onto my SPEV clone to ready it for the Sunday launch. I also put together the parachute, a big, checkered 18" chute that I had bought from an Ebay vendor. At a quick glance it looked almost like a vintage Estes chute, which was the effect that I had been hoping for all along.
Finishing: Painting is where you'll earn your stripes on this bird as it takes a lot of patience to get the masking right. The initial coat of Valspar gloss white is no problem, but the Gloss Black areas could very well make you start pulling your hair out. I've tried to come up with a description of all of the masks that you'll need, but I just ended up frustrated. In lieu of a confused and rambling description that I really don't want to write and you really don't want to try to read, let me instead direct you to JimZ's photo section where pics of Mario Anleu's beautifully painted and decaled SPEV resides. These were the pictures that I used in figuring out my masks. Mine's not exactly like Mario's, but it's close enough to capture the Saturn spirit of the original SPEV. Mario's SPEV makes an excellent guide as it's a beautifully done rocket.
Construction Rating: 5 out of 5
Flight: Launch day dawned amazingly clear, warm, and breezy. The fact that it was Leap Day only added to the amazement. It was almost like a day had been imported from late spring to mark the event. I had called some friends the night before, but only found two takers, my friend Rick and his son Richie. We spent several hours that afternoon flying almost everything I had built over the course of the winter. I was saving the SPEV to be the day's final launch, which turned out to be a mistake. (I would have launched it earlier, but I cracked a fin on it while prepping another rocket and repairs were needed.) When we had arrived at the field that afternoon, we found the normally deserted field crowded with people who were working on an emerging baseball field. They paid us little attention, so we set up in an opposite corner of the parking lot and commenced flight operations. After a dozen or so flights over a two hour period we were down to two "first flight" rockets, an Estes Scamp clone and my SPEV. This was the moment that the leader of the construction group chose to tell us that they were leaving and we'd have to leave with them so that they could lock the park up. He was very nice and almost apologetic about it, (we had played in the same local league a few years apart,) but it turned out that he had more bad news. Not only were they building a baseball field. They were building a stadium for the local high school team that had previously used the field as a soccer complex. He said nothing that might make me think that the field would be off limits to us anymore, but the idea of a fenced-in field ringed with light standards did not bode well for future flight operations at the field where Sam had made his first flight on home soil some years earlier. It was like losing an old flying buddy.
We packed up, cleaned up, and left the field, now racing with the fading daylight to get in a launch of both my Scamp and the SPEV. We found old standby B6-4 Field deserted and immediately set up a pad and on the side of the parking area. I angled the rod into the wind to make recovery a more sure thing, and for the second time that day we commenced flight operations. We flew the Scamp and my son's Edmond's CiCi, both with decidedly unpleasant results, then swallowed hard and dragged the still in primer SPEV to the pad. I chose a B6-4 for the flight (hence the field name,) and angled the rod further into the noticeably stronger wind.
At ignition, the SPEV rose from the pad a lot more quickly than I had expected, leaving me with a cloud of smoke instead of a launch shot. While it left relatively quickly, it flew rather slowly and to a respectable height, but was never in danger of out-flying the field. I had brought my digital camera along that day hoping to get an mpeg video of the flight, but the darkening skies and the tall trees at the west end of the field had made that an unworkable proposition. Instead I settled for some in-flight pictures of the inaugural launch, the best of which turned out to be the picture of the SPEV under canopy against the backdrop of the darkening sky. (I guess it's true that art is where you find it.) There would be no more flying that day, and none for quite a while after.
The chance for a second flight didn't come around until a month later. Flying on a large field during a club launch on a breezy day, I felt fairly confident that I wouldn't lose the now all white SPEV, so I upped the power to a C6-5. I had again brought my digital camera along, hoping for that mpeg movie of the launch, and this time I got it. The SPEV arced back over the flight line into the sun. It wasn't an easy chore, but I got the mpeg. The light breeze brought it back within 100' of the main launch area, but a stripped shroud line made the landing harder than normal. Damage was restricted to a broken fillet on a fin, not a fatal injury but one that would ground it for the rest of the day. (Oh, yeah, the mpeg was unwatchable. Apparently it pays to buy a camera with more than 2.0 megapixels.)
Finally painted and decaled and two months plus down the line, flights three and four were both made on the same day. Flight three was another B6-4 flight and seemed oddly underpowered, to the point that it reached a paltry 200 feet and ejected a mere thirty feet from the ground. It also stripped three shroud lines on recovery, so I felt fortunate not to have broken a fin. For the next flight, which would be the last of the day, I chose a C6-3, determined not to have too little power be a factor again. The C6-3 turned out to be the best possible motor for this rocket, allowing a more than respectable amount of altitude, but still not overflying the cozy confines of the local soccer complex.
Flight Rating: 5 out of 5
Summary:
With the S.P.E.V., Estes outdid themselves by creating a rocket that was obviously meant to mimic the Saturn V out of spare parts. With 18mm power, flights are slow and impressive, although if I were to build another, it would probably be 24mm powered.
Pro's:
- The S.P.E.V. is a seldom seen rocket due to the somewhat secretive nature of the original, so yours will almost be guaranteed to be the only one at the pads on a given day.
- The added size makes it a great small field flier in calm winds.
Con's:
- The original was free. The clone isn't.
Overall Rating: 5 out of 5
 |
 |
Flights
Sponsored Ads
 Rocket Decals")


|
|