| Construction Rating: | starstarstarstarstar_border |
| Flight Rating: | starstarstarstarstar |
| Overall Rating: | starstarstarstarstar |
| Published: | 2010-05-26 |
| Diameter: | 1.64 inches |
| Length: | 35.50 inches |
| Manufacturer: | FlisKits  |
| Skill Level: | 3 |
| Style: | Scale |

(Contributed - by Duane Boldt - 05/26/10)
Brief:
Dr. Robert H. Goddard built the first successful liquid fueled rocket, "Nell", making
history on March 16th, 1926.
This review is of FlisKit's sport scale model of Dr. Robert H. Goddard's highest flying rocket, known as "L-13." The L-13 achieved its historic altitude of 2700 meters on March 26th, 1937. The FlisKit's reproduction is a fairly easy and enjoyable build and actually performs very well. It flies on 18mm motors and launches off a standard 1/8" launch rod.
Modifications:
Minor modifications were done but not to the design. A longer Kevlar cord was used and
the fins were skinned with paper.
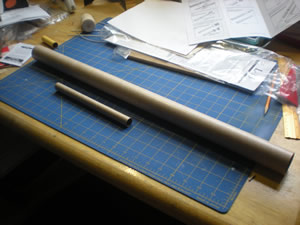
Construction:
- 1 - BT-20 motor tube
- 1 - BT-20 motor block
- 2 - CRF-20-60 centering rings
- 1 - Kevlar® cord
- CPL-60 tube coupler (1)
- BT-60 body tubes (2)
- L13 cardstock boat tail shroud (1)
- 3/32" balsa stock sheet
- 1/16" balsa stock
- 1/8" angle styrene stock
- 1/8" launch lug (1)
- Custom BT-60 L-13 balsa nose cone (1)
- Screw eye (1)
- Elastic shock cord (1)
- 16" parachute (1)
- Instruction sheet
The instructions are very easy to follow, especially for experienced modelers. The steps are straight forward and the illustrations help to follow along. The construction is completed in a logical order typical of many models.

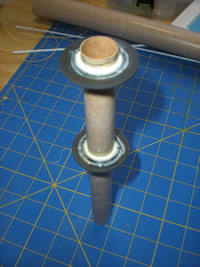
 The first step is to complete the BT-20 motor tube/mount. You glue a motor block inside the motor tube
and two centering rings outside at the prescribed distances. The Kevlar®
cord is then tied between the two centering rings.
The first step is to complete the BT-20 motor tube/mount. You glue a motor block inside the motor tube
and two centering rings outside at the prescribed distances. The Kevlar®
cord is then tied between the two centering rings.
The two BT-60 body tubes are then glued together using the CPL-60 coupler.
The constructed motor mount is then glued into the longer of the body tubes and the Kevlar® cord pulled through the opposite side.
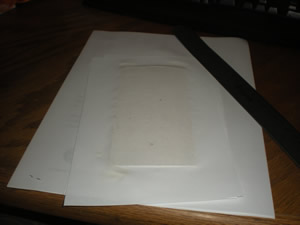
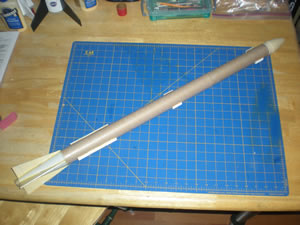
The boat tail shroud is then formed by cutting the pattern out of the preprinted card stock sheet provided. It helps to shape the shroud into its cone shape using a dowel stock prior to gluing it together.


I also coated the inside of the shroud with glue and wiped it till thin. The first try I put too much, as seen in the picture, and had to re-make the shroud. I cutout a replica of the shroud out of 110 lb cardstock and remade the part. My second go-around worked great. If at all, just put a VERY thin coat. Once the shroud is dry, it is then slid onto the motor tube and glued flush with the rear centering ring.
The shroud is then glued and slipped over the motor mount till it is flush with the backside of the BT-60 body tube. This is again allowed to dry.
The body tube is then marked with straight lines for the fins and rails.
It helps greatly to use angled aluminum stock for marking the tubes. Door jams can be used, but the angled metal pieces tend to be more accurate and easier to manipulate. You can buy various sizes of angle stock at your local Ave Hardware, Home Depot, or Lowe's. I found our Ace store had a very good selection.


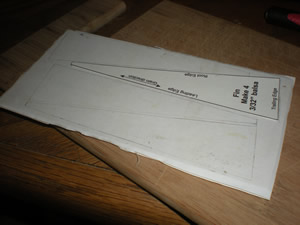
Following the instructions, the four fins are then marked and cut out of the 3/16" balsa stock. I was worried about the fins being attached to the cardstock shroud. I actually ended up wicking this CA into the paper which stiffened it up quite a bit. Again, just be careful not to use too much.
Another change was to "skin" the fins with paper. I just used regular typing paper and wood glue. Then I brushed them with very thin CA. I would really have liked the included fin material to be much sturdier than it was.

I used the pattern to draw the fins and cut them out from the skinned balsa stock.


After the fins are glued on, lined up good with the drawn fin lines, and 3 layers of fillets applied, the next step is to build the rail guides.

"Rail Plates" are cut out of the 1/16" balsa stock and then angle styrene is glued onto these. One long plate and two short plates are glued on each side of the body tube at the designated positions.

I also used sandpaper held against the body tube and ran the rail plates back and forth on it it contour the back of the plates for better gluing and conformity to the tube.


After the rail guide assemblies have been glued on and dried, the launch lug is glued into one of the longer, lower guides.
I prepared the nose cone ahead of time using Elmer's wood filler and sanding. I glued the screw eye is with 30
minute epoxy and coated the bottom of the nose cone. This adds weight, but makes a very strong attachment. Prepared
this way, I've never had one pull out of any rocket, including high powered rockets.


The assembly of the 16" parachute was straight forward. The kit came with a cool looking FlisKits parachute that has patterns that can be cut to various diameters. I also cut out the spill hole.
The kit came with 30" of Kevlar®. I prefer longer recovery rigging, at least 3x the rocket length. I replaced this with a 60" length of my own, though the stock Kevlar® and Elastic shock cord should have been just fine. I used the elastic shock cord that came with the kit.
Finishing:
There are no decals, but masking is required to get the reproduction paint job. A grayscale
shaded
 guide is included in the instruction sheet, but it definitely helps to look at a good colored picture.
FlisKits has some good pictures up on their site of the boiler plate model built by Tony Vincent and donated to the
Clark University Goddard Exhibit. Tony also did some neat details with the vanes that are not included in the
production kit, but could be added by studying his pictures.
guide is included in the instruction sheet, but it definitely helps to look at a good colored picture.
FlisKits has some good pictures up on their site of the boiler plate model built by Tony Vincent and donated to the
Clark University Goddard Exhibit. Tony also did some neat details with the vanes that are not included in the
production kit, but could be added by studying his pictures.
Since this model had a lot of masking to get the paint job right, I decided to try the trick of using Scotch tape, instead of masking tape, to mask off the parts. This tip has been mentioned on several sites including ApogeeRockets.com and here on EMRR.
I've always used better quality masking tape like Frog Tape with pretty good results. In one of the articles the regular satin Scotch tape in the green package and the removable Scotch tape in the blue package were recommended. I didn't have the removable tape so I decided to use a different brand satin tape I had on hand.


Wow! The lines were much sharper and crisper than any masking tape I have ever used, but... it left residue and
also pulled up some of the paint. I wished I had been more patient and waited to buy the

 Scotch brand removable tape.
Another issue was painting over the Krylon aluminum color metallic paint. The other colors did not stick well to it. It would suggest planning the masking and painting of this rocket so that any non-metallic colors are painted on first directly on the primer. Maybe even plan the paint job not to overlap any of the different colors. If you do over lap, have the metallic paints as the top layers where they do have to be painted over. I used Krylon primer and Krylon primer for the whole project.
After my first masking job with the "generic" satin tape left sharp lines, but yifted up paint and left residue, I decided to for a do-over with the "real" removable Scotch tape.
I went out and bought some of the removable Scotch tape in the blue package to do the touch up and re-paint job. It worked great, did not pull up the paint, did not leave any residue behind and left very sharp lines. I am sold and will use this tape for all my detailed masking from now on.


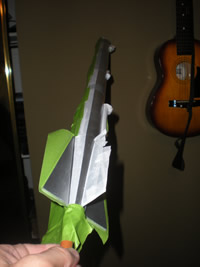
This rocket looks really sharp when it is finished and painted with the recommended patterns. It has
 been a
hit at the launches and a great discussion example for the history of rockets.
been a
hit at the launches and a great discussion example for the history of rockets.
I would have liked to have had a balsa wood boat tail to glue sturdier fins to. I wanted to give the rocket 5's on everything, just because I was just so thrilled that they released these kits and really enjoyed building the L-13. However, I would like the rear boat tail and fins to be more sturdy stock in the kit. The card stock shroud did work ok and has held up, especially after being wicked with CA.
Also, in my rush to complete this kit before a demonstration launch, I didn't fill the spirals on the body tube. Make note: Rockets painted with metallic paint show the spirals 10 times more than other paints... I highly recommend filling the spirals on this kit. It is a really beautiful, historic rocket when finished and the extra time would be well worth it.
Construction Rating: 4 ½ out of 5
Flight:
The recommended motors are B4-2, B6-2, and C6-3. I have only flown it on C6-3 motors. They have
worked great and all three flights so far have been almost perfect. Mine is a little heavier with the added epoxy to
the nose cone and the Quicklink used on the screw eye.
They were nice straight flights and the rocket looks great on the pad.
Recovery:
I have had no damage on recovery using the stock chute that came with the model. As noted
above, I did double the length of the Kevlar®
cord used and I use a Quicklink to attach the shock cord and parachute shroud lines to the screw eye on the nose cone.
Flight Rating: 5 out of 5
Summary:
This is a great all around rocket, fun to build, neat to fly and, best of all, it's a nice
example of a historic rocket that would be great in anyone's fleet.
I for one have extend many thanks for FlisKits making this neat L-13 kit and also the "Nell" kit. My son is getting ready to build that one, so keep a look out for another write-up on that.
Overall Rating: 5 out of 5
 |
 |
Flights
|
|
Sponsored Ads

|
|
T.V. (June 5, 2010)