The Launch Pad Standard AGM-78
The Launch Pad - Standard AGM-78 {Kit} (LP-K032)
Contributed by Carl Tulanko
| Construction Rating: | starstarstarstarstar_border |
| Flight Rating: | starstarstarstarstar_border |
| Overall Rating: | starstarstarstarstar_border |
| Manufacturer: | The Launch Pad  |
| Style: | Scale |
 Brief:
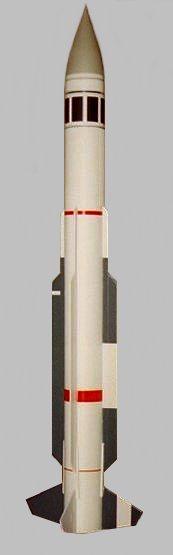
This Launch Pad kit is an accurate 1/5.2 scale version of the U.S. Navy's Standard AGM-78 air or ship launched missile. Additionally, it can be used as the upper stage for the RIM-67A, which is sold separately by The Launch Pad as a Plan Pak kit.
Construction:
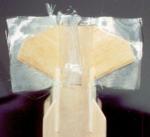
The kit arrived in a plastic bag, similar to some Estes or Quest kits and consisted of two BT80 2.6" body tubes with the coupler stored inside one of the tubes, three sheets of balsa for the fins, a plastic nose cone, paper templates for the fins and nose cone, an 18" mylar parachute and more!
What really impressed me were the laser cut motor mounts, which appear to be much stiffer and stronger than Estes mounts. Another nice touch was the swivel link system for the parachute. About the only items lacking in the kit were a set of decals and fin guides, but I had already been prepared for this from reading comments on other Launch Pad kits. As this is an advanced kit, some prior rocket building and finishing skills are a plus, but it can be assembled by anyone that has a few smaller kits under their belt. Component Rating: 4 of 5
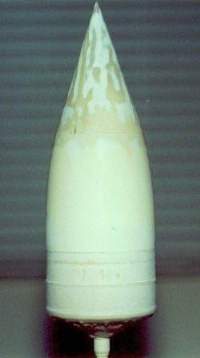 There are four pages of instructions supplied with the model which take your through the building and finishing process. The first step was building the scale nose cone, which requires you to form a conical shaped "hat" from the supplied card stock. Light steaming along with curling the edge of the paper helped shape it prior to gluing, but every review I had read seems to have a some difficulty with this process. I believe the reason for this is that, as you reach the tip of the built up paper cone, there is no longer any paper overlap left to glue together, not to mention it's impossible to get your fingers up there to hold it together. So, I tried a different approach. I used aliphatic resin to glue the paper cone seam and took my time, starting at the bottom and gluing in one inch increments, working my way to the tip. While squeezing the freshly glued section between two fingers, I placed the opposite bottom edge of the cone on the lip of a table and pulled down. This drew the "gap" at the top seam of the cone closed while I let the section between my fingers dry. In no time I had worked my way to the tip. To finish off the tip of the cone, I took a ¼" wood dowel and sharpened it with a pencil sharpener. Then I put some glue on the tip of the paper cone, ran the dowel point inside the cone to the point and pressed the assembly down against wax paper on a table until it dried. This resulted in a perfectly shaped "hat".
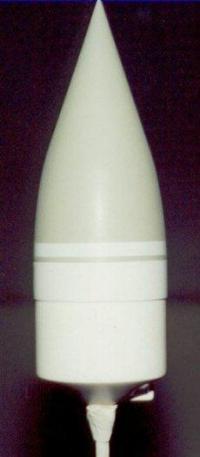 In the next step, I deviated a bit from the instructions and used 5 minute epoxy to glue my "hat" on rather than the recommended CyA glue. I lightly coated the inside of the paper hat with the epoxy, then placed it on the plastic BT80 nose cone and aligned it until straight. The epoxy flowed down the inside of the paper to the plastic nose cone seam, gluing it on, reinforcing the joint and hardening the paper like a rock. I then coated the seam with Evercoat Formula 27 general purpose filler; This stuff, if you have never used it is great; it easily sands off into a powder. Finally, I decided to coat the entire nose cone with epoxy finishing resin.
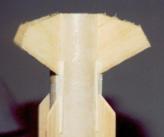
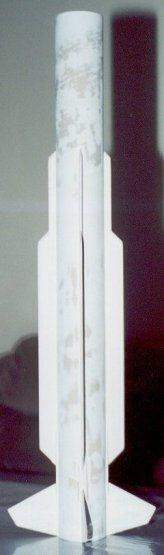
Much of the build process was spent on the nose cone, but, primed and painted, the results were very rewarding. The rest of the assembly was straight forward, with a few minor glitches. I notice the instructions did not tell you to fill and sand the joint where the two body tubes are glued, so make sure you do this prior to mounting the long fins. I used Aliphatic resin for gluing the rest of the model.
Motor mount assembly was straight forward, as was fin assembly but you will have to make your own fin guide. The balsa for the stabilizer (long) fins was of good quality, but one piece was not quite wide enough to cut out two fins. I wound up having two of the four fins about a 1/16" narrower than the template. A fresh piece of balsa from my personal supply fixed the problem, but I would like to see them ship sheets that are wide enough to do the job. I decided to taper the leading edge of each lower fin and the leading and trailing edges of each upper fin for scale appearance.
 Afterwards, I opted to fiberglass the lower fins on for stiffening and additional strength using ¾ ounce fiberglass cloth and 30 minute epoxy. I had read of instances where people saw the surface mounting technique lacking in strength and I didn't want this to become an issue. If you don't fiberglass, make sure you use thin CyA to stiffen the soft balsa fins prior to gluing them on. Location of the launch lug was not specified, which is normal for these kits. I cut mine in half, gluing one piece on right at the top of the lower fin and the other just above balanced CG. Construction Rating: 4 of 5
 Finishing:
White primer was applied prior to the first sanding and I used 150 grit to cut away any excess epoxy resin left from the fiber-glassing. A second round of primer was added and I used 220 grit to start and finished with 400 grit. In the instructions they have you glue paper "panels" over the inside length of each fin prior to assembly, but you risk tearing up the panels with sandpaper during the priming stage. For this reason, I added my scale paper overlays after all sanding was complete and prior to the last coat of primer. Chamfering the edges of each overlay made them lay down smooth. This was also a good time to add scale rivets. The recommended method of using pinheads just didn't cut it for me, especially when there are 144 rivets on the finished rocket! You can buy stick-on rivets from a R/C helicopter dealer on the net, but they only sell them in large quantities and are a bit pricey. I opted to use a very simple and cheap method derived from experiences in R/C aircraft. I filled a syringe that had the needle ground flat on the tip with a white canopy glue found at many hobby shops called RC-56 and "dropped" a small ball of glue at each location for a rivet. The glue ball flattened somewhat when it hit the surface and made a perfect rivet. If a mistake was made, I just wiped it off with my finger and tried again. With this method, scale rivets were finished in less than an hour, including drying time, and the cost was minimal. Note that Elmers White glue could also be used, but I like RC-56 because it is waterproof when dry and it's consistency doesn't require any dilution.
The paint scheme in the instructions shows a very basic color scheme for a single standard model, but if you want it to look like the missile on the LP website, you're pretty much on your own. Mine was painted in the same colors as the website model, which is actually the paint scheme for the upper stage of the RIM-67 rocket. I used Rustoleum flat white for the body and Testors military federal standard paints for the light gray nose cone and dark gray fins. I just wish there were more pictures available that showed labels and letters.
All in all, the instructions are pretty good for painting a single stage rocket. One of the last steps performed is the installation of the shock cord and parachute. The recommended method of attaching the shock cord is to use a supplied Estes type tri-folded paper glued to the side of the body tube. This is not satisfactory for a model of this size. One of my best friends and long time rocket modeler, Ken, recommended I take 2 sets of 70 lb test Kevlarline and loop, tie and CyA them around the motor mount. I followed his advice, then drilled a small hole through the mount plate right up against the motor tube. The Kevlarline was threaded through the hole and extended six inches out the top of the body tube, where I tied it to the shock cord. This is a much stronger and safer way of mounting the cord and will help prevent those nasty "zippers" that can occur when too much stress is put on wall mounted lines during ejection. Finish: 3 ½ of 5
Construction Rating: 4 out of 5
Flight:
Flight: The motor recommended for first flight was a D12-3, which is what I used to make this bird airborne. I wound up using a large sized Pratt Heatshield instead of wadding! The rocket lifted off the pad each time easily, which surprised me for a model of such size. Flight was straight and true; it took to the skies like it was on rails! Listed and supported motors include the D12-3, E15-4 and RMS F24-4. For the next group of flights I want to try the RMS E18-4W, the RMS F24-4W will be a definite must, but only on a calm day. I'll repost a quick update after the holidays on the success of the larger engines.
Recovery:
Recovery: The parachute deployed right at apogee. The gold mylar chute supplied in the kit was very easy to spot and the rocket landed safely with all parts intact. I had wondered about the 18" parachute being enough, since the instructions tell you to build two of them. I believe this may have been a misprint from a previous generation, but on lower level flights, a larger parachute is something I may use. I was please that I decided to beef up the fins during the build process and do recommend it to those wanting to build a sturdier model. For reference, my rocket weighed in at 8.3 ounces without motor, which seems about right for a mid powered model of this size.
Flight Rating: 4 out of 5
Summary:
The AGM-78 is nothing less than AWESOME! The rocket just plain looks good, and is a very close scale representation of the real deal. Construction is easier than it looks and the end result was worth any extra effort. A few things could be improved, such as the supplied balsa stock (or lack of enough), parachute mount and specifications for CG. I would also like to see additional documentation showing more scale lettering information and placement. These minor flaws aside, this is one fine model. Just keep in mind that this is definitely a builder's kit, which worked out well as I really enjoy the building process. I now have a fleet addition that would make any modeler proud. If you like the Launch Pad kits, then you have to get one of these; it's a great buy for the buck! Now, about the only thing I'm still missing is the two stage RIM-67 version, which I intend to remedy real soon, but that's another story.
Overall Rating: 4 out of 5
Other Reviews
- The Launch Pad Standard AGM-78 By Greg Burke
This kit is relatively straight forward. The instructions are pretty easy to understand, and are also correct. The manufacturer gives some hints on detailing and that's the hardest part. They suggest using the heads of pins for the rivets in the fins. This took up the bulk of my building time as it took over 150 pin heads to accomplish this. The only problems that I had with the kit is the ...
 |
 |
Flights
|
|
Sponsored Ads


|
|
C.R. (January 1, 2001)