Qualified Competition Rockets Straight Up
Qualified Competition Rockets - Straight Up
Contributed by Clive Davis
| Construction Rating: | starstarstarstarstar |
| Flight Rating: | starstarstarstarstar |
| Overall Rating: | starstarstarstarstar |
| Manufacturer: | Qualified Competition Rockets  |
Brief:
This is Qualified Competition Rocket's 13 mm minimum diameter
streamer/parachute duration model for NAR competition. The kit I purchased came
supplied with a streamer. I attended an
ASTRE building session in
February 2003 where I learned about streamer duration models.

Construction:
Kit arrived in a plastic bag, Estes-style, with 12" BT-5 cardboard tube,
thrust ring, balsa nose cone, sheet of balsa for fins, shock cord material,
plastic/paper launch lug, mylar streamer, and tiny brass swivel. Package
includes photocopied instructions for construction of rocket with instructions
for streamer construction and preparation technique. Streamer is 4" by
40". What is interesting about the balsa nose cone is that it has a hole
in the bottom already prepared for a fabric-type string loop. The kit is
designed to reduce any amount of unnecessary weight, so no screw eye is used.
The body tube has been marked by pen for place of the fins. The fins have been marked on the balsa sheet with pen and need to be cut out. There is plenty of extra balsa in the event that one may wish to cut extra fins. Since I was at a building session, I followed the directions of veteran NAR competitors. A few of the suggestions in the building session involved using only CA glue, gluing the fins a 1/4 of an inch above the base of the rocket to allow for motor retention by tape, and by not adding the thrust ring/motor mount as a means of reducing the overall weight.

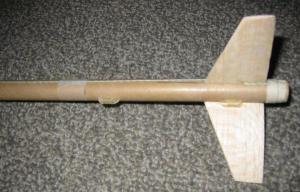
After cutting, shaping and sanding the 3 fins, I CA'd them on the body after sanding the tube a bit. The nose cone is prepared by gluing a string loop into the bottom. The shock cord is actually attached through one of the fins. I had to create a small hole with my Xacto knife, fed the shock cord (which looks like a heavy duty dental floss) through, glue either side of the shock cord onto the fin with CA glue, and extend the shock cord the length of the tube on the outside. The idea with this type of design is to keep the inside of the body free for a large streamer. I believe the techniques I have described would be fairly normal practice for anyone involved in streamer duration techniques. The other suggestion given by the veterans was to cut the launch lug in two, and place them a few inches apart towards the bottom of the rocket. I cut angles into my launch lug for less drag. I assume many competitors may skip the launch lug entirely and use towers for launching. I don't have this type of equipment, so I used the standard method.
The mylar parachute is prepared by knotting and taping the shock cord at one end, taping the streamer over the shock cord, and then adding accordion folds to the other side of the streamer.
Finishing:
Since this rocket is a practical rocket for NAR competition, painting and
decals are strongly discouraged. The only thing I really needed to do was put
my NAR number on the rocket. All in all, it is a handsome little rocket.
The construction as indicated by the instructions would be easy for anyone who can handle a level 2 or level 3 kit.
Construction Rating: 5 out of 5
Flight:
Prepping is a little time consuming since folding a 40" streamer takes
some time. After placing the streamer and shock cord into the rocket, I could
then feed the recovery wadding from the bottom of the rocket since I was not
using a motor mount. I like the idea of being able to put wadding in on either
side of the rocket. This was a new experience for me.

Since I did not use a motor hook, I friction fit the motor with tape, then fit the motor and taped around the base of the rocket onto the extending motor. I flew the rocket twice so far and both times had successful motor retention with complete recovery activated.
I flew the rocket twice on a 1/4A3-3T. Both flights had a quick, straight and stable ascent. On the first flight, the shock cord got a little tangled up, so the streamer did not fully deploy. However, the accordion folds were effective, bringing the bird back safely and slowly The second flight was perfect. It was calm and cool this morning as I launched, and I timed the rocket flight at 21 seconds for a 1/4A motor. Not bad for my first try, considering my best time for a streamer model (prior to this QCR rocket) on a 1/2A motor has been 25 seconds (granted, I never competed before).
Recovery:
Flight recovery is fine if you take time to fold, fold, fold, stuff and pack
the rocket correctly.
Flight Rating: 5 out of 5
Summary:
The pros for this rocket are the price at $5.00, and the fact that it is a
simple 3 fin - nose cone rocket that can achieve admirable times for
competition. Anyone with good building history can adjust the rocket to his or
her specifications. The kit comes with all necessary equipment to build, fly
and have fun.
The cons for this rocket would be the turn around time to get the rocket in the air again. It takes time to prep the streamer, the motor and the rocket. I don't consider this a negative thing, but if you are looking for an easy kit just for a streamer, I would recommend something like the Estes Wizard. If you are looking to achieve great times on little motors and you are interested in competition rockets, I recommend the QCR Straight Up. It lives up to its name.
Overall Rating: 5 out of 5
 |
 |
Flights
|
|
Sponsored Ads


")

")


")
|
|
M.M. (April 3, 2006)