Scratch (S)HOT DOG! Original Design / Scratch Built
Scratch - (S)HOT DOG! {Scratch}
Contributed by Hans "Chris" Michielssen
 Brief:
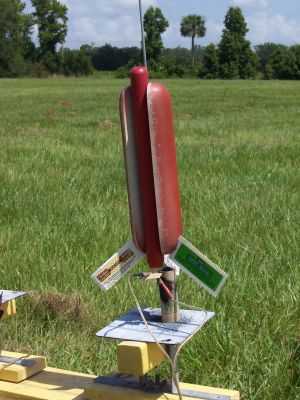
A single-stage flying HOT DOG!
Construction:
The initial drawings were done in late May 2008. I decided to use the "Centuri" ST style tubing with thicker body tube walls. A parts list was made, then an order was placed (online) to Semroc on June 13, 2008. I received the parts by mail on June 16, 2008. Very fast delivery and great customer service, as usual.
Parts list:
- 2 "Bun" Nose Cones, BNC2025
- 1 "Hot Dog" Nose Cone, BC-837 from Squire kit
- "Hot Dog" Body Tube, ST890, 8 Series
- "Bun" Body Tube, ST2060, 20 Series
- 3 fins of 1/16" balsa covered with condiment package wrappers
- 8 Series motor mount from a Semroc Squire kit
- LARGE Screw Eye (for extra nose weight)
- 12" Red and Yellow Parachute
- 12" Kevlar attached to 18" of 3/16" elastic shock cord
- 1 1/2" standard launch lug
Initially I was going to use a 7 series nose cone and body tube. After seeing it "in the bun" it looked too thin. I switched to wider 8 series parts from a extra Semroc Squire kit I had. I also used the Squire's engine mount, nose cone and Kevlar. All other parts were standard: 1/8" launch lug, a big screw eye, 3/16" x 18" elastic shock cord, and 12" parachute.
As I work away from home, I didn't have much time to build the model for the EMRR contest. This would be a rush job! I was returning on July 5 and would have one week to get the model built, photographed, flown, documented and entered! I was also trying to get my Golden Scout built and flown for a July 10 Orlando area launch.
To get the "Bun" end contour, I cut off 1 1/8" off both of the Semroc BNC-2025 nose cones. I rounded the cut ends with 100 grit sandpaper on a block. To get the "Hot Dog" contour I cut off the tip of the Semroc BC-837 nose cone and rounded the end with 100 grit sandpaper on a block.
An actual hot dog is 6" long. It seems a little short, I wanted this rocket to fly stable. The "Dog's" body tube length is 9". The "Dog's" overall length with nose cone and motor mount (extension) in place was now 10 1/4".
After filling the nose cone, I used the back of a razor blade to press in wrinkle lines like those on a hot dog end. The wrinkles radiate out from the center of the nose cone tip.
I am trying to capture the look of foot-long hotdog with it's ends sticking out of the bun. I cut the "bun" tube length at 5 ½". With the two split nose cones in place, the overall "bun" length is 8 5/8".
It'd be easier to fill the tube spirals and balsa grain before cutting the bun tube in half and splitting the bun nose cones.


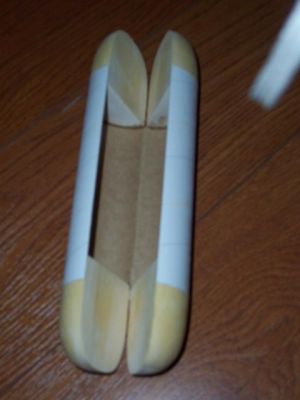 I marked the Bun body tube down its entire length and extended the line up the two end nose cones. I extended the pencil lines over the top of the cones, completely around under the shoulder. To make a clean split, I used a straight edge razor blade to cut 1/4" into the cone. This should insure a clean outside edge. I switched over to a #11 X-Acto after the razor blade to deepen the cut. I broke apart the cones. I was happy with the results. The edges were clean and the inside "flat" areas of the cones would only require some Fill 'n' Finish to smooth them out.
I sanded square the (rounded) nose cone shoulder ends. I left ½" of the shoulder. I'll make two flat inside wall pieces, glued inside and flush with the body tube walls and nose cone ends.
After filling the seams, I only cut through one side of the bun body tube. The opposite side was scored with a straight edge and (dull) butter knife only creasing the line. This let the tube open like an real hot dog bun.
The engine mount was taken from Semroc Squire kit. Kevlar cord was tied to the engine hook. A 3/16" X 18" elastic shock cord is tied to the Kevlar. I picked a 12" red and yellow Semroc chute to match the Mustard and Ketchup condiment motif.
With both bun nose cones in place there is a rectangular open area inside. I cut 1/16" balsa "planks" to fit the void. I cut them a little oversize and sanded them to fit. The final size was 2" wide x 4 7/16" long. It would be difficult to fill and sand the interior balsa so it covered them with paper.
This is where it got interesting. I needed fins that would fit the hot dog theme. I thought of plastic knife, fork and spoons for fins, but another entry had already incorporated sporks into their design. My youngest daughter suggested ketchup, mustard, and relish packets should be used somewhere in the design. Why not the fins? We picked some packets up at a local fast food restaurant. I cut off the back of the packets, emptied, then washed and dried the plastic sleeves. The empty packets were contact cemented onto 1/16" balsa. Simple, fast, and in the theme of the model.
Slots were cut into to bun's tail end and the fins were pressed into place. Super glue fillets followed. The Bun shape didn't allow for 120 degree spacing of the fins. While they aren't symmetrical, they are on straight. I made sure the fins trailed away from the rocket body, once again to improve stability.
I glued a 1 ½" long launch lug to the backside of the hot dog body. The lug was centered out of sight, inside the bun. The hot dog was set in the bun and a line of super glue was run down the seams.
The Kevlar line was pulled through the front of the dog tube and tied on a 3/16" x 18" elastic cord.
I found the biggest, heavy screw eye I had. Any additional nose weight could help this model fly straight. I attached the shock cord and parachute snap swivel to the screw eye.
Finishing:
When buying spray paint at WalMart, I walked through the paint department with real hot dogs and buns in hand. I wanted match the colors as closely as possible. The Bun is actually two different colors. The inside of the bun is much lighter than the outside. I sprayed two coats of grey primer, sanding between coats. The inside of the bun was sprayed with Wal-Mart Almond. I set the bun face down (on the open wedge cut) then sprayed the outside with Wal-Mart Red Primer. No masking, I wanted the colors to blend at the "buns" cut line.
To replicate the lighter color of the bun at the wedge cut (through the body), I sprayed more Almond color on a kitchen sponge. I dabbed some of the Almond paint onto the bun opening. This gave it the same rough color separation like on a real hot dog bun.
Flight:
The Orlando NAR section, R.O.C.K., had a scheduled launch on July 10. In addition to the regular members, there was to be a school group there with many first time fliers. Many of the kids hadn't seen an odd-roc before, and one even asked if I had another hot dog he could have for lunch. I prepped the (S)Hot Dog with a C6-3 with standard Estes wadding. Motor retention was an Estes style metal hook. I usually have great confidence in my rockets as I usually build proven designs, however, I was a little nervous as the RSO called for a heads up.
The first flight was vertical but the model made a 10 foot spiral going up. I wanted better stability and needed more nose weight. Recovery was nominal with no damage. The length of the Kevlar/elastic combination worked well. There was no zippering or nose cone dents. Now, for the nose weight.
Bob, a fellow R.O.C.K. member, offered up a quick link. I attached it to the large screw eye. As well, another R.O.C.K. member had some modeling clay. I rolled two thin "worms" of clay and pressed them into the hot dog/bun seam. I prepped again using another C6-3.
This time it was a slow, straight, vertical boost to a altitude of approximately 225 feet. Deployment was at apogee. There was no damage, burning, or charring on recovery. The model is now retired.

Summary:
This was a great experience. It was fun to construct a different scratch build again. The kids (first timers) at the launch got quite a kick out of the design.
PROs: The reactions of the first time fliers at the local launch. I found a few new techniques: "press mounting" fins in slots cut into the balsa "bun" ends. When the fins were in place, I simply ran super glue fillets. The joints were very strong. Lastly, pressing "wrinkles" into a finished nose cone end using the backside of a single edge razor blade gave the hot dog a certain realism.
CONs: Just tough to fill balsa and body tube seams. I had three different filling sessions. The nose cone and body tube splits were the most difficult part of construction. I had to fill the spirals before cutting and splitting and then fill again after gluing the bun nose cones into the body tubes. This project had a few of those "Waking up in the middle of the night" moments when realizing different construction and material techniques.
Sponsored Ads


 |
 |