| Construction Rating: | starstarstarstar_borderstar_border |
| Flight Rating: | starstarstarstarstar_border |
| Overall Rating: | starstarstarstar_borderstar_border |
| Manufacturer: | Estes  |

Brief:
1:50 Scale model of the Acceleration Engineering LLC's entry in the X-Prize
race. Single stage, parachute recovery. Skill level E2X.
Construction:
The kit includes:
- 1 BT-5 engine mount
- 1 mini engine hook
- 1 rubber (REAL rubber) shock cord.
- 1 12" chute
- clay weight
- plastic parts:
- nose cone assembly (2 halves, nose cone cap)
- body and body base
- 4 Fins
- 4 Nozzles
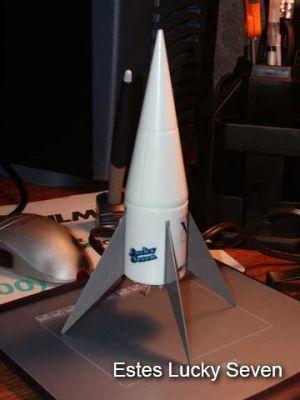
Well I needed a rocket fix while I was waiting for something to render on the computer, so I busted out one of the X-Prize kits. This is not your usual E2X kit. This is basically a plastic artillery shell with an engine hook hanging out of it. It's almost scary. Actually, I think what scares me is that it looks like somebody glued fins to their Old Spice bottle and is planning to launch it!
 Construction is
very fast and pretty straightforward. I think it's the first time I've ever
done an engine mount without slitting the engine tube! In this case the engine
hook just hooks over the forward end of the engine mount, which slides into a
socket in the molded plastic body (and it can go in only one way) The molded
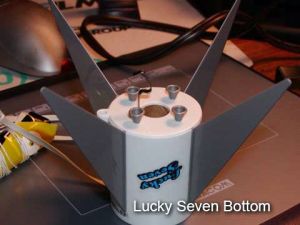
plastic fins slide into slots in the body, then the body base is glued over the
bottom of that, capturing the engine mount and fins in the process. And that's
about the hardest part of construction. You may want to dry fit the base to
make sure the opening is large enough for the tube to just fit through
properly. If I had a mini-engine case handy, I probably would have put it in
there to act as a guide. There are also 4 tiny molded display nozzles that are
attached to the base surrounding the engine.
Because the body of this model is so short, the long pointed nose is mostly hollow, to allow space for the 12 inch chute, and real rubber shock cord. (When was the last time you got THAT in a kit?) To assemble the nose cone, you start by gluing the nose cone cap about halfway up in one half of the nosecone (there is a molded ridge for placement purposes), and allow it to dry. The clay weight is divided in half, with each half of the cone getting it forward of the nosecone cap, then the halves are glued together. Please remember to tie the shock cord to the eye of the nosecone cap before gluing the halves together. While this is clearly mentioned in the instructions, the build is so easy that your humble reviewer neglected to tie the shock cord before gluing. To make room for the chute, you will note that the eyelet is a good 2 inches or so up into the nose after you glue the halves together and I have fingers like Twinkies...
 The other end
of the shock cord is an eyelet molded onto the front bulkhead inside the body.
The chute is tied to the shock cord a couple of inches away from the body, to
guarantee that it is pulled from the nose cone after ejection. With that
completed, the construction is complete. The launch lug is molded into the body
so that is not even a worry. The only thing that is absolutely needed to build
this kit is plastic model cement. (I used liquid cement with no problem,
however, Estes recommends tube type cement.) The kit does recommends a knife,
tape, and sandpaper, but I didn't even need any of these items. I suppose I
could have used tape to hold the nose cone halves together...
Finishing:
The model is molded in shiny styrene in two colors, and requires no painting. I
do recommend washing the parts to remove mold release so the glue can do its
job. I must commend Estes on their fine mold work here. The nose cone halves
went together perfectly and the results are nearly seamless. The decals are the
peel and stick variety and even include a recommended motor label. The
resulting kit is an unusual E2X kit that will be interesting at the launch
site. I'm curious what this thing will fly like.
Acceleration Engineering designed themselves an odd little craft which resulted in an odd little model. I'm half tempted to peel the stickers off and dress it out with model parts just to make it look more interesting. Otherwise it looks like an Old Spice bottle!
Construction Rating: 3 out of 5
Flight:
I used an A10-3T, the only recommended engine, for all flights. Have flown it
several times so far. Prep for recovery consists of folding the chute and
inserting into the recessed base of the nose cone and putting wadding on top of
that, as well as some wadding on the top of the motor. Be sure to attach the
chute to the shock cord where recommended by the instructions--if it is too
close to the nose cone, there won't be enough length for the shroud lines to
pull the chute all the way out.
Flights are surprisingly peppy for a serious hunk of plastic like this with only an A mini-engine. A good 200 feet or so and very straight. It has not suffered damage during any flights so far, just a couple of loosened display nozzles but that was from my daughter playing with the rocket on the way home from the launch.
Recovery:
Very straight forward to fly. It has held up very well on all flights so far.
No damage yet to the old school airplane rubber shock cord that Estes is now
providing with their kits.
Flight Rating: 4 out of 5
Summary:
It is a fast build with clear instructions of an accurate model that is a
bland, pointy, featureless craft.
Overall Rating: 3 out of 5
Other Reviews
- Estes X-Prize Lucky Seven By Chris Gonnerman (September 24, 2007)
This is a semi-scale model of the Acceleration Engineering "Lucky Seven" rocket, one of the contestants for the Ansari X-Prize. This is a largely plastic rocket. The package includes a three-piece plastic nose cone (two side halves and a bulkhead), a plastic body tube with integral bulkhead, a plastic tail bulkhead, four plastic decorative nozzles, four plastic fins, a paper engine tube, a ...
- Estes X-Prize Lucky Seven By John Thro
The Estes Lucky Seven is a 1:50 scale model of the rocket being designed and built by Acceleration Engineering. It features 95% plastic construction, Estes mini-engine power, and parachute recovery. Santa brought this kit for my 5 year-old son for Christmas 2004. This model is made entirely of plastic, except for the motor tube, motor hook, shock cord and parachute. Here is a reasonably ...
- Estes X-Prize Lucky Seven By Donald Besaw Jr
Brief: The Estes X-Prize Lucky Seven is a 1:50 scale model of Acceleration Engineering's Ansari X-Prize entry. This model flies on an A10-3T motor up to 200 feet and uses a 12 inch parachute for recovery. Construction: The kit came in a plastic bag with header card and included: 1 motor tube 1 motor retention hook 1 pack of clay weight 1 rubber shock cord 1 12 ...
 |
 |
Flights
 |
 |
Sponsored Ads
 |
 |


K.J. (January 30, 2005)