| Construction Rating: | starstarstarstarstar |
| Flight Rating: | starstarstarstarstar |
| Overall Rating: | starstarstarstarstar |
| Manufacturer: | DnD Rocketry  |
| Style: | Cluster |
Brief:
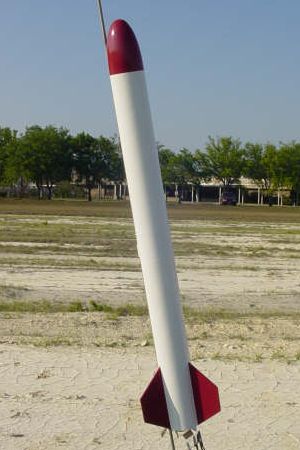
The DnD Rocketry Double D is a simple 2 x 24mm cluster rocket that is intended
to fly on a pair of Estes C11 or D12 motors and recovers with an 18 inch nylon
parachute. According to the manufacturer, flights to 675 feet are possible. I
think this altitude figure is rather conservative.
Construction:
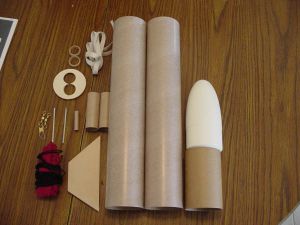
The kit came packaged in a plastic bag and contained several high quality
parts. The parts list for this kit are:
- 2 BT-80 size body tubes
- 1 tube coupler
- 2 motor mount tubes, hooks, and thrust rings
- 2 basswood centering rings
- 3 basswood fins
- 1 shock cord
- 1 1/4 inch launch lug
- 1 snap swivel
- 1 18 inch nylon parachute
- 1 shock cord mount
- 1 instruction booklet with fin marking guide
- 1 BT-80 Fat Boy style nose cone
The instructions for this kit consist of lots of text and hand drawn illustrations and seemed to be in a pretty logical order. Since the instructions come as individual sheets in a folder, you might want to staple them into a booklet like I did so none are damaged, lost, or misplaced. I found this rocket very easy to build. I would rate the skill level of this kit as a high 1 at most. The instructions intend for the construction to begin with joining the body tubes together but I decided to start with the motor mount assembly.
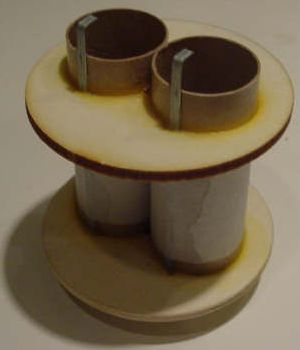
I started construction by test fitting the parts. The motor mount tube fit was very tight at first so I sanded the centering rings with 220 grit sandpaper until I got a rather snug but not too tight fit. I then added the retention hooks and thrust rings to the motor mount tubes. After the glue dried, I glued the centering rings at the locations shown in the instructions and added fillets for strength. I was left with a very solid motor mount assembly.
I then installed the motor mount into one of the body tubes and added fillets to secure it. I did not join the body tubes initially to make getting glue down to the motor mount assembly much easier. Once the motor mount was dry, I joined the body tubes together as intended.
 I sanded
the body tube assembly with 400 grit sandpaper to aid in installing the fins as
the glue tends to adhere much better to the tube once it has been slightly
scuffed. I cut out the fin marking guide, marked all the lines on the tube, and
attached the fins one at a time, allowing a few minutes drying time for each
one. DnD Rocketry recommends 5 minute epoxy for this but I just used my regular
Titebond II wood glue which also worked well and held the fins on securely.
After the fins dried, I applied several fillets to each tube/fin joint for
extra strength.
I sanded
the body tube assembly with 400 grit sandpaper to aid in installing the fins as
the glue tends to adhere much better to the tube once it has been slightly
scuffed. I cut out the fin marking guide, marked all the lines on the tube, and
attached the fins one at a time, allowing a few minutes drying time for each
one. DnD Rocketry recommends 5 minute epoxy for this but I just used my regular
Titebond II wood glue which also worked well and held the fins on securely.
After the fins dried, I applied several fillets to each tube/fin joint for
extra strength.
At this point, the launch lug is attached. I did make a change here by setting the single 1/4 inch launch lug aside and used two spare 1/4 inch launch lugs that I had. I just wasn't comfortable using a single short launch lug on a rocket this size but it probably would have been fine. I then attached one to the bottom of the body tube and the other at the tube joint then filleted the lugs.
The instructions then call for the shock cord mount to be assembled and mounted. The paper used for the shock cord mount is very stiff and doesn't fold easy so be sure to use a clothes pin or similar clamp to hold it together while the glue dries. I then mounted it into the body tube. The instructions intend for it to be mounted three inches down inside the tube. This seemed like a long way down but I test fitted it and there was still ample cord extending out of the tube so I went ahead and attached it. I also noticed that the completed shock cord mount was very stiff and had very little flex to it. Be sure to use plenty of glue to hold it in place and rub some more glue along the surface and edges to help keep it in place.
PROs: Very easy and quick to build.
CONs: None that I can think of.
Finishing:
I started by sanding the entire model, especially the fins as the basswood was
very rough at first. Then I sprayed the model with about three light coats of
white primer and sanded between each coat followed by a couple lightweight
coats of gloss white enamel. I also sprayed the nose cone with a gloss dark red
enamel.
The next day I masked off the body tube and sprayed the fins dark red to finish the model as shown on the front cover of the instructions then tied the nose cone to the shock cord and attached the parachute to finish the model.
No decals were included though which really didn't matter, but a name decal might have been nice.
PROs: Easy to finish as shown.
CONs: A name decal would have been a nice touch.
Construction Rating: 5 out of 5
Flight:
The recommended motors for the Double D are a pair of Estes C11 or D12 motors.
No delays were listed but I would recommend the C11-5s, even though they
recently have become OOP (out of production), and D12-5s.
For my first flight, I opted for a pair of D12-5s. I prepped each one by stuffing some wadding above the ejection caps. This is a technique that is highly recommended for cluster rockets and should be done as it could possibly save your model from serious damage caused by the backfiring of an unlit motor from an adjacent motor's ejection charge. I then inserted the motors into the mount and installed the igniters. Next, I inserted about three handfuls of dog barf wadding to protect the chute.
To launch this rocket, you need a pad with a 1/4 inch rod and a launch controller that can supply a minimum of 12 volts for proper cluster ignition. I used an Aerotech Mantis pad and Interlock controller which worked great.
At launch, both motors lit right away and the rocket leapt off the pad very quickly and arrow straight to an altitude quite a bit higher than the advertised 675 feet. It looked like at least 800 feet to me. The rocket then reached apogee, arched over, and two separate pops were heard as the parachute ejected.
PROs: Very nice straight and high flights.
CONs: None.
Recovery:
This rocket uses an 18 inch nylon chute for recovery, which appeared to be the
right size for it. Due to wind, it drifted quite a distance and bounced on
landing which put a small dent in the rear of the BT. I also noticed some
scorching on the rear centering ring and the motor mount tubes as well as some
minor scorching and peeling on the bottom of the body tube. I'm not sure what
caused it as I had the rocket about 8-10 inches above the blast deflector at
launch. Because of this, I would apply epoxy to this area to protect it and I
will be doing this before this rocket flies again.
PROs: Nylon chute, ideal descent rate.
CONs: None.
Flight Rating: 5 out of 5
Summary:
I really liked building and flying this cluster kit. It had some really nice
components, like the basswood centering rings and fins and the nylon chute.
I feel that it would make a great first cluster kit but make sure you have quite a bit of recovery space as this bird does tend to get significant altitude.
I also feel that due to the basswood fins and very rigid motor mount, this rocket would be able to fly on a pair of Aerotech 24mm E single use motors or 24mm RMS motors. This kit costs $29.99 from DND Rocketry and is worth the price.
Overall Rating: 5 out of 5
 |
 |
Flights
Sponsored Ads

|
|