Thrustline Aerospace F-19 Night Fighter
Thrustline Aerospace - F-19 Night Fighter {Kit}
Contributed by Todd Mullin
| Construction Rating: | starstarstarstarstar_border |
| Flight Rating: | starstarstarstarstar_border |
| Overall Rating: | starstarstarstarstar_border |
| Manufacturer: | Thrustline Aerospace |

Brief:
In the early days of rocketry if you wanted a rocket that looked like a jet, it was a Centuri kit for you.
Thrustline's F-19 Night Fighter is a futuristic fighter aircraft styled rocket that once again delivers the kind of
feel that could be found with these kits. The F-19 boosts on a single 24mm motor and recovers by parachute.
Construction:
All of the component of the kit were well packaged in a poly bag when I received my F-19 kit. The kit was well
packaged with several others in a sturdy mailing carton and arrived without damage despite the best efforts of the post
office to inflict it.
Included in the kit are:
- 1 BT-55 Body tube
- 1 Kevlar® and elastic shock cord kit
- 1 18" Mylar parachute
- 1 Steel screw eye
- 1 1/8" Launch lug
- 1 1/4" BT-50 Thrust ring
- 2 Black fiberboard centering rings
- 1 BT-50 Engine tube
- 1 24mm Engine hook
- 1 1/8" Wooden dowel stock
- 1 Balsa nose cone
- 3 3/16" Balsa sheets (for canopy)
- 2 1/8" x 16" Balsa sheets
- 1 Instructions and fin templates

The instructions for Thrustline's kits are great. The order of assembly is well thought out and logical. The F-19 set is no exception. The eight pages of instructions with photos to illustrate the steps are easy to follow. There are several pages of fin templates printed on light cardstock.
This kit is definitely not for the inexperienced builder. There are several things that would have been considered "normal" in the early days of rocketry that put this kit into the classification of a "builder's kit" today. If you are looking for a kit that will let you slap its laser-cut fins on and launch it the same day, this is not it.
The builder first assembles and installs the motor mount and Kevlar® recovery harness. The main body tube gets marked with the included body wrap. Next comes the first challenge. The fins are marked by the builder onto the sheets of balsa and cut by hand. The builder must be conscious of the direction of the grain. The suggested direction is marked on the templates. Some of the fins are fairly small for the thickness of the sheets and can be challenging to cut cleanly. If the builder doesn't follow the suggested cutting pattern they could be left short if fin stock. Several of the small pieces are joined together to for the wings and tail of the model. It is done this way to allow the grain to be aligned as to give maximum strength to the finished part. After the wing and tail assemblies are completed and sanded, they are attached to the airframe.
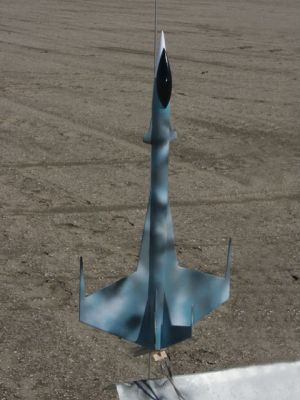
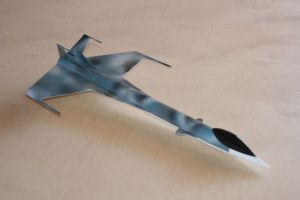
It was at this point I got an idea about how I'd like to make the F-19 more to my tastes. In the stock kit, the pilot's canopy is attached to the main airframe but this looks weird to me. After a couple of quick emails to Thrustline to confirm that it wasn't a terrible idea, I decided to attach the canopy to the nose. The kit comes with 3 sheets of balsa to be laminated together and carved by hand to form the canopy. I suspected (and later it proved to be correct) that by mounting the canopy on the nose cone I would need additional layers because of mounting to the pointed cone instead of to the straight tube. I cut the canopy pattern out as close to the edge of the supplied balsa as possible to save the excess for extra layers. I laminated the extras on top of the canopy after I had it cut. Lots of carving and sanding ensued, including on the bottom of the canopy to match the curve of the cone. I reversed the teardrop shape so that the pointy end was in the front instead of the back to match the taper of the cone. The finished canopy mated up to the cone nicely but had required a thickness equal to about five sheets instead of just three.
I hit one "gotcha" with this kit, which came up with the wing assembly. The supplied 1/8" dowel that is used to reinforce the wing tips and add projections to the ends of the tail fins was too short. I was holding a running email dialog with John from Thrustline at the time. I'm sure I could have asked him for a replacement piece of dowel, but I had enough in my parts bin to keep on building without the delay of having a small piece of dowel sent cross country. Thrustline's customer service is great, so I'm sure it wouldn't have been a problem if I had need to have it sent though.
Finishing:
There is a lot of sanding and filling required for all the balsa in this kit. The balsa for the kit is top notch
(firm and tightly grained), but there is lots of it!
I used my standard procedure for finishing. One light coat of Elmer's Fill 'n' Finish on the balsa and the tube spirals. The tubes barely had any spirals, so they were a breeze to finish. After sanding, the whole kit got a good heavy coat of Kilz primer and got another round of sanding to get it ready for paint.
This kit reminds me of the US Navy's F-18 Hornet so I set about looking for an interesting paint scheme on one. It seems the Hornet only comes in two paint schemes: Blue Angels and blah grey. After a bit of searching, I decided upon a camouflage scheme similar to the one used on the Russian SU-34/35. I started with an undercoat of white and freehanded the colors to the top of the aircraft afterwards. Lastly, the canopy was carefully masked and painted.
There are no decals for this kit. It might have been nice to have some but with my paint scheme, they would be a bit superfluous.
Construction Rating: 4 out of 5

Flight:
I decided to go with the larger of the two recommended motors, a D12-5. The weather was nice and calm--perfect flying
conditions! The motor clicked in solidly with the stock engine hook. A quick handful of "dog barf" wadding
and a fold of the chute finished the prep of the model for flight. The model leaped off the pad and boosted perfectly
straight, rolling slowly on the way up. The ejection went off perfectly at apogee and the rocket landed quite close to
the pad. The slight breeze pulled the chute of the F-19 and it fell onto its top on landing. The top of one of the
vertical stabilizers broke off cleanly.
After a touch of super glue, the Nightfighter was ready to fly again. The prep was just as simple for the second flight. This time, the model weathercocked slightly, rolling again on boost. The wind had come up a bit since the first flight, causing it to drift a bit on the semi-large chute. It landed just outside the border of the flying field, right at the edge of the water. This time it landed right side up without damage.
Recovery:
The shock cord on this kit is Kevlar®
and elastic that is attached to the motor mount. The parachute kit came with a snap swivel. I was a little leery of the
elastic cord as it was somewhat thinner than I am used to using, but it seems to be durable enough for the model.
The chute may be a little large for the model on a small field, but it does come down nice and gently, which is good with the large wings. After two flights the recovery system is showing only normal, expected wear and tear. After reading reviews of previous Thrustline kits, I added a couple of wraps of masking tape to the Kevlar® even with the end of the body tube to prevent zippering. This is the simplest answer that I have heard of with this style of recovery harness, and it seems to work well.
Flight Rating: 4 out of 5
Summary:
This was a somewhat challenging kit to build, but the end result is very rewarding. The kit requires craftsmanship
that reminds me of how kits used to be 30 years ago. It was nice to take a trip back to the days before the "major
manufacturers" dumbed down the rocketry experience to the lowest common denominator. I enjoyed the conversation
that I had with John from Thrustline and the encouragement that he gave me to customize the kit to my tastes. Great
customer service in a day and age where one gets used to receiving very little help from an outsourced, overseas
customer help line.
Overall Rating: 4 out of 5
Other Reviews
- Thrustline Aerospace F-19 Night Fighter By Todd Mullin
Brief: Single stage futuristic, jet fighter styled model rocket. Construction: Single glassine wrapped paper body tube, balsa nose cone, two main "wing" fins, two "vertical stab" fins, two canard fins, and two rear sub fins. Carved balsa canopy. Standard modroc motor mount with 2 laser cut black fiber board centering rings and 24mm paper tube w/ engine ...
 |
 |
Flights
Sponsored Ads
 |
 |


