| Manufacturer: | Scratch |

Brief:
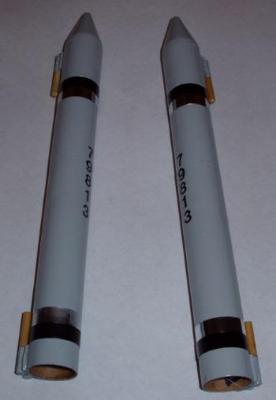
The PCR is a scratch built parallel cluster rocket. It flies with a 24mm core
motor, and 2 outboard 18mm motors in the attached boosters. The boosters pop
off at burnout, while the central core motor continues to burn.
Construction:
Parts list:
- 1 18" BT-60 body tube
- 1 4" BT-60 body tube
- 1 4" BT-60 coupler
- 4 6.5" BT-20 body tubes
- 2 PNC-20Y nose cones
- 1 sheet 1/8" balsa
- 1 small piece of 1/16" balsa
- 8 1" x 1/8" dowels
- 8 1/2" x 1/8" launch lugs
- 1 1.5" x 3/16" launch lug
- 2 BT-20 couplers
- 2 BT-20 engine blocks
- 1 3" BT-50 tube
- 2 BT-50 to BT-60 1/8" centering rings
- 1 PNC 60-MS nose cone
- 1 BT-60 coupler bulkhead (template)
- 1 small screweye
- 2 12" piece of elastic cord
- 2 12" piece of Kevlar® thread
- 1 12" nylon parachute
- 2 1"x20" streamers
- 1 Engine hook
- Fin Template
- Fin Wrapper Template
- Fin Alignment Template
This rocket waw pretty easy to construct. The main challenge was making the boosters attach and align correctly to the side. I made a good position wrapper using VCP that had 4 lines for the fins and two lines for the boosters. For the booster attachment I used the technique Mark Schrader described in his Project Omega rocket. This provides positive attachment for the boosters which helps prevent the scenario of one coming off under thrust and then igniting.


The booster tubes are cut one inch from the top with a one inch coupler glued half way in. The nosecone for each booser is glued into the opposite end of the one inch segment. 1/2 inch segments of 1/8" launch lugs are glued in pairs along the alignment lines between opposing sets of fins. The two bottom sets of launch lugs placed 3/8" inch from the bottom of the rocket. The two top sets are placed 5 3/8" from the bottom. The booster tubes have 1/8 dowels glued on top small squares of 1/16" balsa. For each booster, one dowel pair is glued on the one inch top segment at the very top of the tube. The bottom pair is placed at the bottom of the tube.
Finishing:
I pre-finished with two coats of fill n' finish on the tubes and fins. I also
treated the fins with this CA, and pressed between sheets of wax paper while
drying. I did all of this before attaching the fins to the body tube. For
finishing I used one coat of primer, and two light coats of pewter color paint.
I used some different color vinyl adhesive material for decoration. I made up
the design as I went along. I add my NAR number to the side boosters using
1/4" rub on numbers. I finished with a coat of krylon clear coat.
 Flight:
I purchased the 'Simulating Strap-on Boosters in Rocksim' CD from Apogee to
simulate different motor configurations. It is a fairly tedious process, but
once it's all setup it seems to work well. I simmed 2 B6-0s with 1 D12-7, 2
B6-0s with 1 E9-8, and 2 C6-0s with 1 E9-8. Here is the modified motor file (download).
At the time of this writing I've flown it on 2 B6-0s and 1 D12-7. The flight was perfect, except both booster tubes zippered. I should have known better, but used only Kevlar® thread for the shock cord. The Kevlar® doesn't give any, and needs to be used with something else that does. Also, the boosters had 9" mylar chutes. Both chutes ripped off the shroud lines.
I made repairs, replacing the zippered sections, and adding 12" lengths of 1/8" elastic shock cord to the Kevlar® thread. I replaced the 9" mylar parachutes with 1"x20" streamers.
Recovery:
I couldn't see exactly when the main deployed, but it looked like it was just
after apogee. For the sustainer I used a 12" nylon parachute, with a
1/8" elastic shock cord. The recovery of the sustainer was perfect. It
came down slowly, and landed with no damage to the rocket.
Summary:
This turned out to be a really nice looking rocket. It was fun to build, and I
learned a lot in the process.
Sponsored Ads
 |
 |


