BSD High Power Rocketry Horizon (3")
BSD High Power Rocketry - Horizon (3") {Kit}
Contributed by Peter Valenteen
| Construction Rating: | starstarstarstarstar_border |
| Flight Rating: | starstarstarstarstar |
| Overall Rating: | starstarstarstarstar_border |
| Manufacturer: | BSD High Power Rocketry  |
 Brief:
The 3" Horizon is an easy to build sturdy mid-power kit geared towards
mid-power beginners. It flies on a single 29mm motor, RMS or SU.
Modifications:
Recovery system as detailed below.
Construction:
-3" diameter tube 26" in length
-12" plastic nosecone with 2" shoulder
-three 1/8" thick plywood fins that go to the motor mount
-two plywood centering rings
-29mm motor tube
-motor retention system:two Allen head bolts,two T-nuts,and two retaining
clamps
-rail buttons
-10 feet of 1" wide elastic
-24" high-strength ripstop circular nylon chute
-grometed nylon strap 2 1/2
-vinyl decals
-fin alignment guide for 3" or 4" tubes
-4 page instructions
The contruction starts with the motor mount which is very simple. A motor retention system is included in this kit, which is a nice bonus. The aft centering ring (the forward one has a notch cut in it for the nylon strap) needs two 5/32" holes drilled 3/16" away from the 31mm hole in it for the T-nuts. Next, I put the T-nuts in and secured them with a drop of Balsa USA Gold CA, which I have found to be strong enough I can substitute it for epoxy in some cases. After that I attached the centering rings in the normal manner. After that the instructions tell you to pass the nylon strap through the notch and epoxy it to the forward centering ring. I opted to deviate from the instructions. I decided to drill a hole in the centering ring and replace the nylon strap with an equal length of tubular Kevlar®. I passed the Kevlar ® through the hole and CA'd about 4 inches of it to the outside of the motor tube. The next step was to cut the fin slots into the motor tube with an X-Acto knife - what fun! There are lines predrawn for the slots but cutting them correctly takes a lot of time and patience. After that I CA'd the motor mount assembly in to the rocket.(Note:I had a major problem here! Make sure when you put the motor mount in that neither of the Allen head bolts will be directly under a fin slot. If they are they will not go into the T-nuts all the way due to the fin-tabs. I had this problem with both bolts because there is no warning in the instructions. I managed to cut a piece off the bottom of each bolt to make them fit into the T-nuts.) I put a layer of CA on the rear centering ring with a shot of accelerator for added durability. Next comes the fins. First I put very sharp double wedge airfoils on them with only a sanding block. It took me about an hour. After that you test fit the fin slots to make sure they fit correctly. I then tacked the fins to the motor tube with CA and put epoxy fillets on them. I used Devcon 2Ton Clear Epoxy which is very strong, although it is hard to work with because it has the consistency and stickiness of pine sap. After I sanded the fillets I then went on to the next step. BSD includes rail buttons with all their kits now, but due to the size of this rocket I decided to use Acme Conformal Launch Lugs. I used lugs designed for a 2.26" diameter airframe because they are the biggest size available for a 1/4" rod. I used the same epoxy I used for the fillets to attach these. One little anoyance was that the nosecone shoulder was very loose inside the body tube. The shoulder only has two little 1/16" bands of plastic to make the nosecone the slightest bit tight in the tube. I ended up using about a quarter of a roll of masking tape to make the nosecone snug in the body of the rocket. Next I moved on to finishing.
Finishing:
Finishing was easy for this kit. I hit it with two coats of Krylon gray primer
with sanding in between. I then painted the entire rocket Krylon Stone Gray
gloss. I then masked parts of the rocket and painted 6 1/2" down from the
nosecone Krylon Regal Blue gloss. I also painted the fins blue except for the
outer 1/2" edge of the fins. I put the silver BSD vinyl decal in the
center of the blue section of tube. The decals are great.
Construction Rating: 4 out of 5
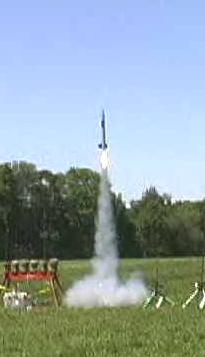
Flight:
I had an AeroTech G35-7 laying around and that was the motor that BSD
recommends for the first flight so I decided to use that. I used the masking
tape retention method which is easy and is fine for SU motors. BSD recommends
using cellulose wading but I used a Top Flight Recovery 9"x9"
Kevlar® square to protect the chute. When the LCO hit the launch button the
igniter(Copperhead) smoked then the motor roared to life. The Horizon took off
at a decent speed considering that it is a 3" diameter bird. It flew
straight as an arrow throughout the entire flight. It had a nice big flame on
it with a large smoke trail. I only have one flight on this kit so far, but I
plan to to fly it on a wide variety of motors in the future. I'm not sure if
this kit can really fly on the E30-4 like BSD says, but I plan to try it out. I
may fly it on an H motor one day.
Recovery:
The G35-7 is about 1 second too long, but it deployed fine with no zipper
regardless of the fact that I was using all 1/8" diameter tubular Kevlar
®(18')from Pratt Hobbies. I used a blue 24" Ultra X-Type parachute
from Top Flight Recovery for recovery with a swivel. The chute quickly but
gently brought the Horizon back down to earth. I think the included circular
chute would work fine but I prefer the quick low drift descent that TFR's
X-Type chutes provide. It was recovered with absolutely no damage.
Flight Rating: 5 out of 5
Summary:
I really think this is a great kit. It looks good and flies good. Although for
a cardboard, plastic, and plywood kit with no precut finslots or payload
section, it is a bit expensive ($60.00). It all depends on how much you want to
spend.
Overall Rating: 4 out of 5
Other Reviews
- BSD High Power Rocketry Horizon (3") By Mark Morris
Brief: The BSD 3" Horizon is a wonderful kit designed for the builder new to high power rocketry. It flies on 29mm SU or RMS motors from G to low H power. This was my first HPR rocket. Construction: The kit went together very easily with extremely clear, well written, and detailed instructions, including many black and white photos of the build process. Construction starts ...
 |
 |
Flights
Sponsored Ads


|
|