| Construction Rating: | starstarstarstarstar_border |
| Flight Rating: | starstarstarstarstar |
| Overall Rating: | starstarstarstarstar_border |
| Diameter: | 1.34 inches |
| Length: | 16.00 inches |
| Manufacturer: | Semroc  |
| Skill Level: | 1 |
| Style: | Sport |
Brief:
When Launch Magazine when on a roughly 6-month "hiatus" towards the end of 2008, as a gesture of
appreciation to their subscriber base they teamed up with Semroc to release a kit version of the rocket depicted within
their magazine's logo. When the kit release was announced at NARCON 2009, all current subscribers of Launch Magazine
got a free special edition of the kit. That's a pretty sweet present, retailing for just about the price of a year's
subscription to the magazine.
Construction:
First a note for the collectors out there: there are three versions of this kit that I know of, differing only in the
packaging. For magazine subscribers, there was a limited run of 300 kits, none numbered, each with header artwork
depicting the rocket against a blue background, and no bag tag header card. When the regular commercial version of the
kit was released, the first 100 were numbered per Semroc's typical procedure, and these shared the blue background
artwork but also included the Semroc bag tage/header card. After the first 100 shipped, the standard edition of the kit
features header art depicting the rocket against a yellow background.
OK, now on to the parts list, which is rather plentiful, supporting the $17.95 retail price for the kit:
Brief:
When Launch Magazine when on a roughly 6-month "hiatus" towards the end of 2008, as a gesture of
appreciation to their subscriber base they teamed up with Semroc to release a kit version of the rocket depicted within
their magazine's logo. When the kit release was announced at NARCON 2009, all current subscribers of Launch Magazine
got a free special edition of the kit. That's a pretty sweet present, retailing for just about the price of a year's
subscription to the magazine.
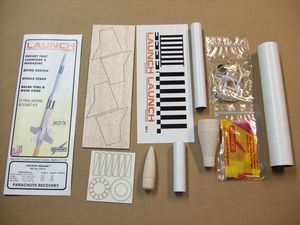
- Balsa nose cone
- Payload tube (Series 7 tube, slightly larger OD than BT-20 but heavier wall, so ID is 18mm)
- Balsa transition
- Main body tube (Series 130, roughly equal to BT-56)
- Aft motor tube (Series 7)
- Laser-cut balsa fins (4)
- Laser cut cardboard vanes, centering rings
- Metal engine hook
- Kevlar®/elastic shock cord
- 12" Plastic chute
- Waterslide decals
Semroc rates this a skill level 1, and while it looks a good bit more complex than the typical skill 1 kits, I think it's a fair overall assessment. In my case, I went with a slightly more challenging paint scheme that would bump it into 2 territory, but it's still a simple project that can be done in an hour or two plus finishing.
Construction consists of about 30 steps spanning 4 pages of nicely printed and illustrated instructions, the norm for Semroc.
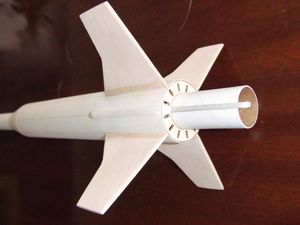
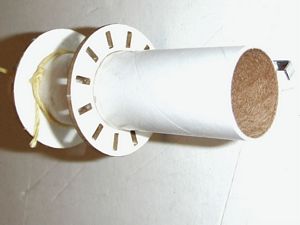
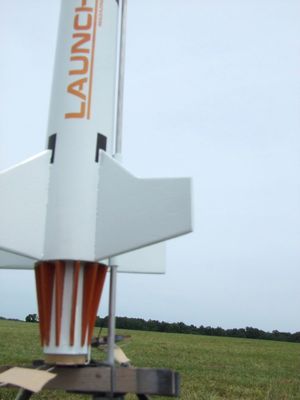
The motor mount uses a pre-slotted body tube, metal hook (2.75" for 18mm motors), and a centering ring acting as a block. Additionally, the Kevlar® shock cord is anchored to the motor mount by slipping a loop under the forward bend of the metal hook, then securing it in place by sliding the forward centering ring over it. The aft centering ring is handled a bit differently--it sits 1-1/2" forward of the aft end. This is to allow room for the vanes, which have small tabs that slide into cutouts on the aft ring (see photo). In my case, I had decided in advance that I wanted to give the rings an accent color, so I held off attaching them so that I could paint them first. Yes, it's not as strong a glue joint (bonding to a painted surface), but these really don't get much stress at all and masking 12 of them would be a real pain.
The main body tube is then marked using a template for 4 fins and a lug, and the completed (or in my case nearly completed) motor mount slides in the aft end. Extend the lines, attach the 4 main fins and a lug, and the main section of the rocket is complete.
The payload section is pretty standard. The balsa transition is glued to one end of the body tube, and the nose cone is friction fit to the other (or glued if you don't want to use it as a payload model). I wound up drilling a 1/32" hole for eventually loading an altimeter. A screw eye goes in the transition for shock cord attachment, completing the basic construction.
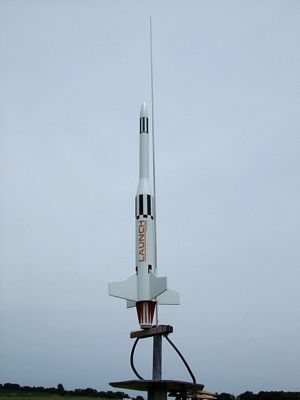
Finishing:
Looking at the cover art, the finished rocket is plain white with decals. As mentioned, I wanted to accent the vanes
a bit more, so after priming everything with two coats of Rustoleum gray primer (I'm slowly abandoning the newly
reformulated Krylon...), shot 3 light coats of gloss white over everything. The vanes got a sort of orange-like color
described as "pumpkin orange", but using just one coat, they picked up enough of the gray primer undercoat to
look fairly close to the light orange coloring of the magazine's title decal.
The waterslide decals are excellent quality, easy to work with. One warning, though: this has 4 C-shaped decals that go around the leading edge of each fin. You'll need to make sure you cut out the inside of this C, which is a fairly small area (3/32" fin thickness).
Construction Rating: 4 out of 5
Flight:
For the first flight, I was only about 150 yards upwind of a dense grove of trees on a 3-5 mph wind day, so I went
with a B6-4 motor rather than the max recommended C6-5. The flight was dead straight, not a trace of roll, and
deployment was just a hair early--the rocket was less than a second shy of apogee.
Despite the fact that I was mainly flying a research model recording apogee with an altimeter most of the day, I stupidly forgot to put the altimeter in this "sport" model flight, although would estimate it hit about 300 feet on the B, which was well below the estimated 500 feet on the header card. However, my painted/with chute weight of 1.44 ounces is also heavier than the header card's 1.2 ounce estimate.
Recovery:
The 12" plastic chute deployed fine, and everything came down nicely on fairly tall grass. Not a trace of damage
anywhere.
Flight Rating: 5 out of 5
Summary:
I'd have to say "free for subscribers" is a pretty huge PRO for this model, although being a collector I
stashed that one and built/flew the regular retail model. Additional pros would be the attractive styling features such
as the vanes and transition. I also like the tie-in to one of the hobby's best publications.
One small CON would be the boring all-white paint scheme that dampens some of the visual appeal of the design, but that's easy enough to overcome.
Overall Rating: 4 out of 5
Other Reviews
- Semroc Launch Missile By Steven Gill (April 20, 2018)
This is a kit by Semroc. This was the first time I have assembled a rocket like this. Assembled March 2018. Kit was dated February 2, 2009 Components 1 Balsa Nose Cone BC-720 1 Balsa Reducer BR-713 1 Body Tube ST-760 1 Body Tube ST-1380 1 Body Tube ST-730E 1 Ring Set CR-KN-4 4 Laser Cut Fins FN-4 1 Engine Hook EH-28 1 Chute Pak CP-12RY 1 Screw ...
- Semroc Launch Missile By Dick Stafford (July 20, 2009)
Brief: Well, it took me so long to fly this rocket that there are already a couple of good reviews. But since I already had started my review, I might as well offer my opinion too. Earlier this year, LAUNCH Magazine commissioned Semroc to produce a kit based on the missile depicted in their logo. The result is the LAUNCH Missile (i.e. The Rocket that Launched a Magazine ...
- Semroc Launch Missile By Jewel B. Butler Jr. (April 20, 2009)
Brief: This is a single stage rocket basically a BT-55 that transitions to a BT-20 with nose cone and four fins. This was a kit from Semroc, one of the best companies that I have ever bought supplies from. Semroc gave these kits as an incentive prior to NARCON. And the best part about this kit it was made in the United States of America Construction: These are Semroc part ...
 |
 |
Flights
 SEM-LL-100")

|
|