I received an evaluation copy of Rockets 3, Version 2.1, the Model Rocket Design and Simulation software packaged offered by 1021 Designs, Inc. It arrived on a CD-ROM and installed flawlessly onto my NT system.
The first thing that is noticed about the software once loaded in the heavy use of color. The opening screen is a white grid on blue background which is shaded from dark (bottom) to lighter (top). Truly catches your eye's attention.
As with any software, I also try my hand at making it work without reading any instructions. I was able to do so with this program too, with a couple exceptions. I contacted 1021 and they replied with the "how to" quickly.

Design Flow:
The first thing in design is selecting the Body Tube. This is the only "live" component design button on the top tool bar which helps point you to the right first step. After clicking on this button you are able to choose from BT20, BT50, BT55, BT60, BT70 or BT80 tubing. You can add your own by clicking on the inventory button and entering the component specs and giving it a name.
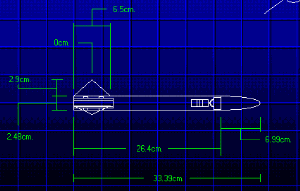 Once you select your body tube then the Tube Length and Nose Cone tool buttons become "live" on the tool bar. By clicking the Tube Length button you can use a slider or type in the length of the tube. After that, then you should select the Nose Cone button. Doing so brings up a selection of nose cones that match your body tube diameter (in my case the BT50 gave 4 different BT50 nose cones). Again, you can add your own by clicking on the inventory button and entering the nose cone specs and giving it a name.
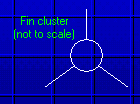 After selecting the Nose Cone, I expected the Fins button to become "live" however it didn't (I presume this is a bug). I was able to use the menu and choose Parts-Fins-Fins Setup to gain access to the Fin Design box. In this box you can choose four standard types: Rear Sweep, Tapered, Triangle, or Trapezoid. In addition, you can choose either 3 or 4 fin cluster and then fin tune the Inner, Outer and Span lengths. Finally you can select the thickness of Balsa you would like to use. Balsa is the only choice. There is no Inventory for fins or fin material.
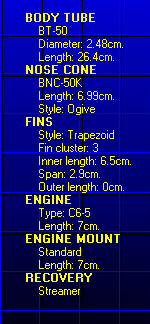 The next step for me was to add a motor mount, however, Rockets 3 has you choose a motor and then applies a motor mount to that motor selection. You can add motors by clicking the inventory button here too. The specs for motors that are entered are: Total Impulse, Time Delay, Max Lift Off Weight, Max Thrust, Thrust Duration, Total Weight, Propellant Weight, and Dimensions. Once the motor is selected you can go back and adjust the choice of motor mount or add a motor mount to the inventory. If you choose a motor that doesn't have an acceptable choice(s) for the motor mount you get a big red warning and words "NOTICE" bark out at you.
The last step in design is choosing your recovery device. There are a couple of parachutes and a streamer to choose from, however, as most other components you can add to the inventory.
Three other comments about the Design Flow:
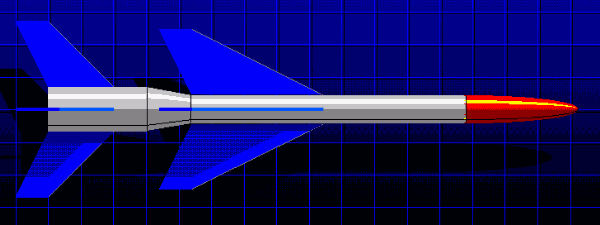
First you can look at your rocket in 3D mode and you have two steps of magnification (1.5x and 2.0x) for screen viewing. You can not rotate the view nor do you have control over the colors. The Nose Cone is red, the Body Tube is gray and the Fins are blue.
Second, you can design two-stage rockets by making that choice from the New menu. The program will automatically build the transition between stages even if the tube sizes are different.
Lastly, all of the measurements are in metric with no "universal" capability to change from metric to US, however, there is a conversion tool available at nearly every step. The tool allows for the conversion between centimeters and inches and grams and ounces.
 Printing:
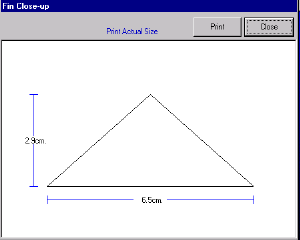
You can do a Fin Close-Up, which then has a print button to allow you to print your fin diagram in actual size. A parts list is also available for printing which contains all the parts specifications. And the overall design screen can be printed.
Flight Simulation:
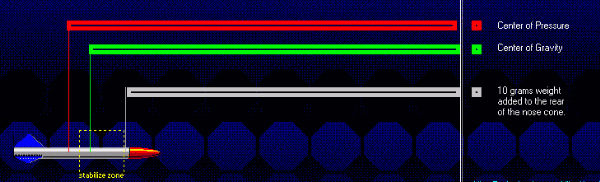
Now that a rocket is designed it is ready to be simulated. Rockets 3 provides two Utilities and they must be run in sequence (a common theme of the program). The first utility is the Stabilizer. By selecting that menu choice a new screen is build as a woman states, "stabilization mode". By pressing the Start button she then says, "calculating stability", and in my case she then says, "design is not stable". You can then press the Stabilize button and the program will determine how to stabilize the project. In my case it added 10 grams of weight to the nose.
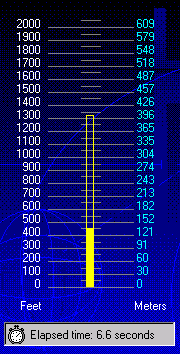
 After stabilization, you are then allowed to go into a Performance Test. Again, another screen is opened and various voices and activities are heard as the rocket launches. You are then presented a graph that shows the altitude of the rocket with a solid bar for under thrust and an open bar for the coast time. The woman's voice will tell you when the recovery system is activated and then in my case, "flight successful". The altitude at burnout and maximum altitude are provided as well as the maximum velocity. This performance test can then be printed.
The RockSim Challenge:
I took a standard Alpha from RockSim with the following weight parameters:
- Body Tube = 5.997 grams
- Nose Cone = 3.717 grams
- Fins = 2.173 grams
- Motor Mount = 4.633 grams
- Parachute = 2.041 grams
- Total = 38.323 grams (includes launch lug and B4-4)
- Added Weight = 9 grams
- Adjusted Total = 47.323 grams
I then constructed the Alpha in Rockets 3. I had to create inventory to match the components from RockSim, but here is what I came up with:
- Body Tube = 6.006 grams
- Nose Cone = 3.717 grams
- Fins = 1.284 grams (can not alter the weight except by choosing thicker balsa)
- Motor Mount = 5.522 grams (adjusted up to capture the missing Fin weight)
- Parachute = 2.0 grams
- Total = 38.129 grams (includes B4-4 motor)
- Added Weight = 9 grams
- Adjusted Total = 47.129 grams
The initial problem came about when running the Stabilizer. Rockets 3 added 9 grams of Nose Cone weight to make it stable. RockSim with the B4-4 indicated marginal stability (with a Barrowman of 0.58). I added 9 grams of weight to the nose cone of the Alpha in RockSim and the new Barrowman stability went to 1.65.
The results. Rockets 3 said that altitude at burn out was 175 feet, and maximum altitude was 611 feet with a maximum velocity of 296 feet/sec. RockSim said that altitude at burn out was 125 feet, and maximum altitude was 699 feet with a maximum velocity of 264 feet/sec.
 One Other Feature:
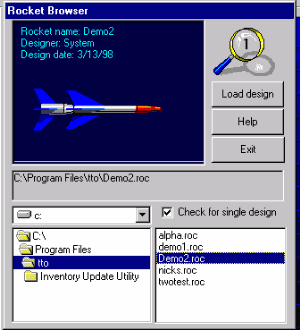
Rockets 3 includes another feature that should not go without mentioning. The Browser. This is nice. It allows you to preview the rocket diagram in 3D while scrolling through your rocket directory. A very nice touch and something that I would love to have for many programs.
Summary:
Rockets 3 is suitable for designing and doing basic performance testing on model rockets. I personally feel it is in its early stages of evolution, as it seems to have a fairly solid skeleton but is lacking in higher level functionality and substance. What do I mean? Well, it needs to have its libraries enhanced greatly to include as many motors as there are currently available, more nose cones, custom fin designs, more selection of materials especially for fins, and cluster motors. It also needs to add some functionality for flight analysis such as descent rate calculation and optimum delay calculation.
It graphics and interface are good. It has some "arcade-like" sound effects which are a "take 'em or leave 'em" feature, but I kind of liked it.
It carries a $60 price tag (as of 10/01) which is probably too much for the product as it exists, however, if there is a solid commitment to evolve the product and the enhancements are either free or minimal charge, it might be worth the wait.
 |
 |