Welcome
Welcome to RocketReviews.com (formerly EMRR).
RocketReviews.com is the home of almost 5000 reviews of rocketry kits and products. Written by visitors to RocketReviews.com like you, the reviews cover everything from low-power model rocket kits to high-power rocket motors.
The site's Flight Log allows you to record and share your rockets and their flights. The Builds feature helps you document your rocketry projects.
At RocketReviews.com, you'll also find a large collection of rocketry resources such as a list of rocketry clubs, and large libraries of OpenRocket design files and Rocksim design files. A number of rocketry tools and calculators are available to help you design, build, and fly your rockets.
As you explore RocketReviews.com, you'll also find a number of fun things such as a huge library of rocketry videos and a collection of photo albums.
 |
 |
Featured Review
Modification Der Red Max Army Patriot
Manufacturer: Modification

Contributed by Howard Smart
 Brief:
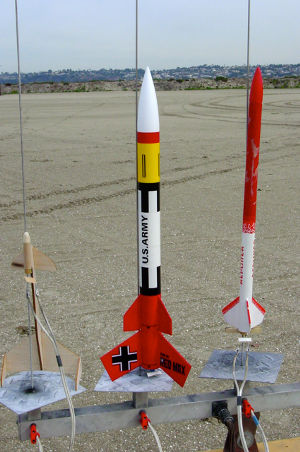
Stage bash of two Estes kits, Der Red Max (0651) and U.S. Army Patriot (2056). A two stage rocket is produced with gap staging, allowing both booster and sustainer to have engine hooks. The upper stage looks enough like the standard Patriot to be mistaken for a stock model, enough to use the Patriot decals for the sustainer and the Red Max decals for the booster. This brings a few laughs at the field.
Modifications:
At a glance it looks like I built the Patriot and then put a shortened Red Max at the bottom. It turns out it can be done more easily, without resorting to cutting body tubes. The upper yellow section of BT-60 from the Patriot kit is used for the booster body. The Red Max Fins fit on it perfectly. I just centered them fore and aft on the tube.
I wanted to have three fins on the sustainer as well as the booster. When I punched out the Patriot fins, one of them was about 1/16in smaller than the other three. That made up my mind for me. I used the three identical fins for the sustainer. To give it a look just slightly different from the stock Patriot, I cut the back corner off the fins and mounted them just overhanging the back end of the tube by 3/16in. This also shifts the CP back a little to help compensate for the loss of one fin.
I used an Estes fin alignment jig to align the fins on both the booster and sustainer. I found the alignment jig in the garage of a friend's house. It was the previous owner's. My friend is not a rocketeer (yet), so he let me keep it. I love this jig.
Because of the established length of the booster section, I needed to use gap staging. This was my first attempt. I really wanted both motors to be able to use hooks, since I find friction fitting to be hit-and-miss. To give the right amount of room between the stages I couldn't have the curvy end of the upper engine hook getting in the way. I mounted it upside down with the curvy end up and out of the way. I cut a channel in the upper end of the booster motor mount to allow room for the sustainer's hook. This channel is a little longer than it absolutely needs to be, which creates the escape hole I needed for the exhaust gases. One other hole was needed for the gap staging to work properly. A 5/64in hole about 1/4in from the top of the booster section allows the gases out so the stages do not separate prematurely.
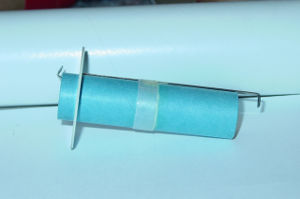
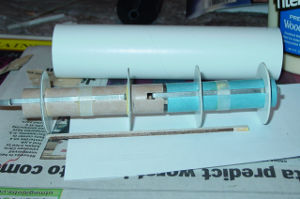
Placement of the motor mounts is important. First, note that I used the longer motor mount in the booster. Allow the engine hook to overhang 1/4in. Glue the engine block ahead of the hook, then cut a 3/16in by 7/16in slot in the forward end of the tube. This will align with the sustainer engine hook. Pay attention to the radial position of this slot when you glue the motor mount in if you want the fins of the booster and sustainer to line up. This arrangement prevents free rotation of the booster in relation to the sustainer. The centering rings are 1/2in from the aft end and 7/8in from the forward end. Install the motor mount tube flush with the aft end of the booster body. It will extend a little ahead of the forward end. I cut the coupler tube into two 3/4in long halves and used one as the stage coupler. It is glued in place flush with the forward end of the booster motor mount, which gives 1/4in of coupler exposed to join the booster to the sustainer.
The sustainer motor mount has the hook mounted in reverse orientation as previously described. The curvy end fits nicely around the engine block at the forward end. I left 3/8in of engine hook overhanging the aft end of the motor tube. The aft centering ring is 3/4in from the end of the motor tube. The forward centering ring is just ahead of the engine hook. Glue the motor mount into the sustainer so that the installed motor will be flush with the aft end of the body tube. That is to say, the engine hook extends past the aft end by just the thickness of the metal hook. Once again, pay attention to the radial alignment of this engine hook with respect to the slot in the booster motor mount.
Glue the long launch lug into a fin root on the booster body.
Remember to drill the pressure relief hole in the booster near the stage coupler.
Decorate to your taste.
Read the rest of the review ...
|
|