4 fins, 3 Motor Mounts, 2 Airstarts, and a Altimeter
By Greg Kurlinski
2012-04-13
Who says small rockets have to be simple?
What is this rocket? It is (or will be) a scratch built 24mm normal looking rocket, that just happens to have:
- 2 side pods that also have 24mm mmt's.. that will be air started electonicly after the center motor burns out (plus a second or two).
- est max altitude : over 4000'
- 8" of AV bay
- Dual deploy
- room for a bee line tracker, because of that 4000' "did you see where it landed" issue.
- weight : should be about a pound, even with all the glue, electonics, batteries, etc.
This is a down-scale proto-type for a 38mm mmt version I intend to build later in the summer. This proto-type will give me a chance to deal with all the design problems, wiring disconnect issues, and electronic mumbo-jumbo, before I spend a few hundred dollars on the higher end materials I will need for the 38mm version.
not counting the Altimeter and Bee Line, this proto-type project will cost about $60, while the 38mm MMT version will be more like $3-400 +
Below are the steps I have planed for this build. I will be adding pictures and re-working the narrative as I proceed down the list.
--------------------------------------------------------------------------------
- MMT
- Body
- Join MMT/Body
- AV
- Paint/Finish
- Flight!
1 MMT
2012-04-16
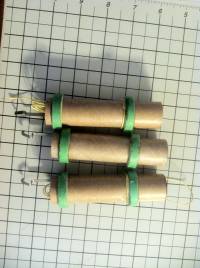
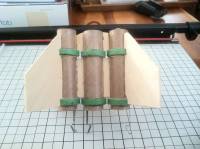
So, start with 3 "standard" estes 24mm (D and E) motor mount kits (p/n 303159). I built them with Epoxy, instead of white/yellow glue, just to insure strength, since this "Could" be launched on 3 F39's !
Attach 1-1/2 yard of kevlar shock cord to 2 of the mmts, and 3 yards to the mmt that will be the Center mmt.
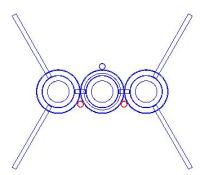
Mark both of the side pod tubes as if you were going to attach a normal 3-fin layup (ie 120 deg) starting at the base, draw the fin lines 4 inches up the tube.
-now figure out some way to cut out 3/16" slots over those lines, for the Through-the-wall fin tabs.
Cut out 4 fins with TTW tabs out of 1/8 basswood or birch. Also cut out rectangles measureing 4in x 5/8" (current guess).
mark on the TTW's where the Motor Mount centering rings will be, and cut the TTW's as needed to get a flush fit against the center of the MMT's.
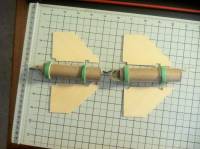
Spot tack just 2 Fins on one MMT and 2 more on another. Spot tack one rectangle where the 3rd fin would be on each mmt. (yes, after cutting out the material where the CR will sit)
spot tack the free ends of both rectangles to the 3rd MMT (the one with out anything glued to it yet).
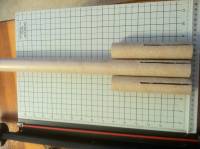
Test fit the MMT and the body tubes. Don't glue them in, nor glue the Bt-55's together, yet. Make adjustments as needed. The Aft CR's should be inside and flush with the aft of each BT-55.
once everything seems good, remove the mmt from the body tubes and layup that MMT assembly with Fiberglass.

What? fiberglass?.. ok, it really isn't nessasarly, I admitt. But for the Scaled up 38mm version it will be needed, and I need the practice.
Note: it would have been easier to attach the 3 mmt together first, with the rectangles, THEN to attach the fins. As the three mmts could lay flat on a surface to insure perfect alignment. Noted for next time.

2 body
2012-04-16
placeholder
3 Join MMT/Body
2012-04-16
placeholder
4 AV
2012-04-16
The AV bay is a 8" long, 29mm dia. (well actaully it is a bt-55 coupler, but close enough)
From Top - Down, this is a list of items planned for the av bay
- ejection cap (main)
- bulkhead
- BeeLine (with its own LiPo battery) (the antenna lead will be run down the AV bay wall)
- Altimeter II mounting space (more data!)
- balsa cork/spacer at midsection to provide mounting for quick-release connecters for airstart ignition wires
- Raven II with LiPo battery, in its own 29mm av bay case. customized with leads from the 4th pryo channel for airstart
- 9v bat, (to really kick the airstart igniters)
- bulkhead
- ejection cap (apo)
The 9v airstart battery will be wired with the Raven as per this:
 |
 |