AAA Model Aviation Fuels Pennsylvania Crude
AAA Model Aviation Fuels - Pennsylvania Crude {Kit} (5) [1986-?]
Contributed by March Briner
| Construction Rating: | starstarstarstar_borderstar_border |
| Flight Rating: | starstarstarstarstar_border |
| Overall Rating: | starstarstarstarstar_border |
| Diameter: | 2.60 inches |
| Manufacturer: | AAA Model Aviation Fuels |
| Style: | Payload, Sport |
Brief: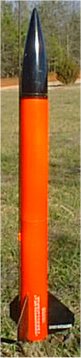
Sport rocket with relatively large payload section [45% of rocket]. 1990 price was $15. Out of Production sometime in the mid 1990s.
Construction:
When you get a better look at the parts, you understand why it didn't cost much. The nose cone is an Estes PNC-80 and is a very tight fit on the thick-wall body tube. The shoulder thickness on the nose cone is about 1/16" smaller. This isn't particularly critical as this is not where the recovery system deploys. Two 12" lengths of thick-wall body tube similar to LOC tubing were in good shape. The bulkhead plate is already glued in place in the coupler with a smallish screw eye threaded in place. The shock cord supplied was a skinny, 4 foot length of braided elastic. AAA is notorious for this. Replacing it with 5 feet of 1/4" braided elastic was definitely an upgrade. The instructions have you mount the shock cord directly to the upper centering ring. The parachute is thin orange nylon with 3 Estes-type threads for shroud lines. I dropped CA at each of the 6 places the lines are tied to the chute's edge. Surprisingly, it has withstood well over 20 flights with little more than a few scorch marks. The chute comes with its own snap swivel to attach and detach from the screw eye. The 3/32" plywood fins are surface-mounted. This is one the changes I made when building this kit; I used .031" G10 mounted on the motor tube. Motor mount parts, tube and centering rings, were in good shape. Motor mount is 8 inches long, leaving about 3 inches of room for the parachute, shock cord, and wadding when all parts are in place. This means I frequently push some wadding down into the motor tube. One upgrade I wish I had done was to replace the 3/16" launch lugs with 1/4" lugs.
The instructions are on a single sheet of paper and are sometimes unclear. Fortunately, the rocket's design is not complex, so experienced builders will have no problem. The instructions did include a flat fin marking guide that had you stand the tube up on the circle, and mark where the fins go. I cut slots in the tube for through the wall fin mounting. Anchoring the shock cord is a matter of drilling a small hole in the upper centering ring, pull one end of the shock cord through, and tying a knot that won't slip back through the hole. With a liberal application of epoxy, this has held up through 20 something flights of this rocket. With some upgrades, the rocket will last longer than if built from the stock parts. Finished weight on mine came out to around 8 ounces.
Finishing:
Finishing, like most any other mid or high power kit, is entirely up to the builder. There are a couple of water-transfer decals included in the kit.
Construction Rating: 3 out of 5
Flight:
My first few flights with this rocket [back in 1991] were on FSI F100s. Nice short boost to around 1000 feet. I've since flown this rocket on everything from a D12 to a G40. Its incredibly versatile. As noted above, there's very little room between the motor mount and the payload bulkhead for the parachute, shock cord, and wadding. Fortunately, the chute is a thin nylon material and folds up small. I usually put some of the wadding down into the top of the motor tube in addition to the little bit that will fit above the motor mount. After several years, the fit between the bulkhead coupler and the lower body section has become tight. I've been having to sand it once in a while to get it to fit again. I've also re-applied CA along the top of the airframe tube to keep the paper fibers from peeling away [making the fit tighter]. I suspect part of the reason that this joint became tight is because, for a while, I used romaine lettuce as wadding; the moisture from the lettuce was absorbed into the paper and expanded.
Recovery:
The worst of the damage to the recovery system after over 20 flights has been the usual scorch marks on the shock cord and parachute. There's no chance of the chute getting stuck inside the rocket.
Flight Rating: 4 out of 5
Summary:
This was one of my first mid-power rockets that I ever built. I'm glad I made the modifications to it that I did. I don't feel that the rocket would be as durable or versatile if it had been built with the stock parts. It can fly on quite a range of motors, from 20 N-sec to 120 N-sec. My favorite motor for this kit, while it was available, was the Rocketflite F50 Silver Streak. 7 second delay ejected RIGHT AT apogee.
Overall Rating: 4 out of 5
 |
 |
Flights
|
|
|
|
George Beever (December 29, 2012)
This is a great design. I built mine @1990, and flew the heck out of it throughout the 90's. It flew great on the old Estes BP E15-4 motors - before they developed "that little CATO problem." Sometine @ 2000, I flew it with an older Aerotech AP motor, and we know what happens when they get old - yup that "bonus" delay, which resulted in the PA Crude augering in, destroying the upper half of the model. The remains languished in my "Refit & Repair" bin for several years, until I replaced the payload section with new parts. For it's first post-rebuild flight I used.......another old AP motor. If you don't get a bonus delay, you might get a CATO, and this one did, destroying the lower half of the model this time. Not to be deterred, I built a new lower portion, and it flies great. Mind you, nothing of the model is original..........