Aerospace Speciality Products That Tube Rocket! (MicroMaxx)
Aerospace Specialty Products - That Tube Rocket! (MicroMaxx) {Kit} (KTTR-MM)
Contributed by Art Applewhite
| Construction Rating: | starstarstarstarstar |
| Flight Rating: | starstarstarstarstar |
| Overall Rating: | starstarstarstarstar |
| Diameter: | 0.28 inches |
| Length: | 6.88 inches |
| Manufacturer: | Aerospace Specialty Products  |
Brief:
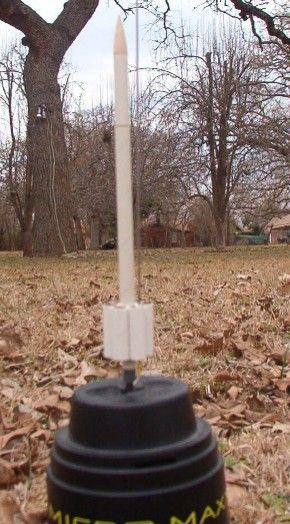
That Tube Rocket is a basic tube finned rocket for Micro Maxx motors. The
Micro Maxx Yahoo
group is an excellent resource if you want to find out more about these
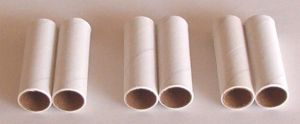
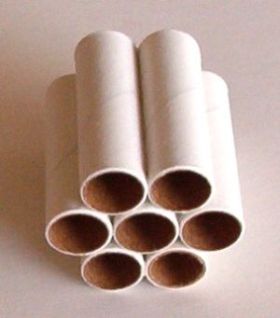
motors and rockets. The fins are made from 6 short sections of body tube glued
to the main body tube. This makes the rocket easy to assemble and potentially
more durable than a conventional rocket with balsa fins. The kit arrived 6 days
after I ordered it. It came double boxed and sealed in a plastic bag.
Construction:
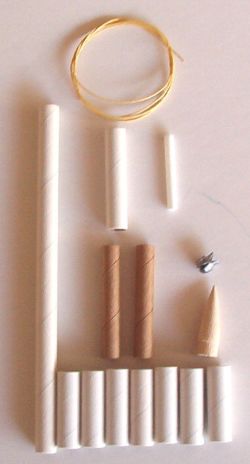
The parts list:
- basswood nosecone
- 1 4.625" Body tube
- 1 1.375" Body tube
- 7 1" x 5/16" Body tubes (fins)
- 2 1.5" Coupler tubes
- 1 1/8" plastic launch lug
- 2 gram lead weight
- 20" Kevlar® shock cord
- 9" x 1" Mylar streamer
All the parts were present and good quality. The sequence of the instructions was logical and there were excellent line drawings provided where needed. Assembly required only glue, a knife, and sand paper.
The fins are assembled first from the seven 1 inch pieces of 5/16" body tube. The plastic launch lug is glued inside one of the tube fins with a little medium CA.
 Next the shock cord is tied to the motor block which is made from
a 1/2" length of coupler. This is the only cutting required for this kit.
The motor block is glued inside the long body tube using the second coupler as
a guide.
Next the shock cord is tied to the motor block which is made from
a 1/2" length of coupler. This is the only cutting required for this kit.
The motor block is glued inside the long body tube using the second coupler as
a guide.
The only snag came when fitting the nose cone to the shorter body tube. The shoulder of the nose cone required some minor trimming to fit inside the body tube. The shock cord is threaded through the second coupler and tied to the lead weight. The lead weight and coupler are glued inside the short body tube. The streamer is attached to the shock cord with Scotch tape.
Once the glue on the fins are dry the unit is slipped over the lower part of the body tube and glued in place to complete the construction.
Finishing:
The instructions suggest that several coats of primer be applied. Given the
smooth finish of the basswood nosecone and the draggy nature of the tube fin
design, I felt it would be a waste of time and add too much weight to use
primer and filler on the rocket. Also the finish of the body tubes is a nice
shiny white already so a light coat of clear lacquer is all I used to finish
the model.
The completed rocket is very light, only 6 grams with motor. It is so strong that it should be possible to eliminate the streamer altogether. The rocket falls slowly enough with the payload and main body connected by the shock cord.
Construction Rating: 5 out of 5
Flight:
Flight preparation is similar to other rockets with streamer recovery except
you use far less wadding. For the first flight I friction fitted a Micro Maxx
II motor with just enough masking tape to go 1/3 of the way around the motor. I
pinched off a pea sized piece of dog barf and poked it into the body tube. The
accordion folded mylar streamer follow the wadding into the body tube along
with half the Kevlar®
shock cord. The payload section with the remainder of the shock cord top of the
rocket and it was ready to fly.
For those who have flown Micro Maxx rockets before, the following will sound familiar.
I snapped an ignitor into the Quest Micro Maxx silo-style launch pad, carefully threaded the 0.047" launch rod through the launch lug and rested the motor nozzle on the igniter. Inserting the launch interlock key caused the controller to beep annoyingly, 5, 4, 3, 2, 1, nothing. At first I thought the 9 volt battery must be dead. It had been in the controller for a while and they never last long. New battery and 3, 2, 1, nothing. I give up. I grabbed my 12 volt riding mower battery, my Pratt Hobbies SixPack Launch Controller, 25 foot 3 prong extension cable, and a short 2 prong extension cord terminated with two micro clips. I stripped off the plastic shell from the igniter wires careful not to disturb the tape and paper, made a 90 degree bend in the wires, attached the micro clips and lowered the rocket carefully onto the igniter wires. Finally 3, 2, 1, whoosh!
The rocket jumped off the pad faster and flew higher than any other Micro Maxx I've flown. I momentarily lost it against the clouds but regained sight of it when the ejection charge popped the shiny streamer at apogee. It fluttered down gently but got caught in a tree limb. This is why I prefer flying saucers. Fortunately I was able to reach it with the 11 foot Christmas light hanger pole I got on sale at Wal-Mart shortly after the New Year. It was a quarter of its original pre-Christmas price and it's been worth every one of the 500 pennies it cost me.
The second flight was much like the first except it missed the tree and landed 30 feet from the pad. The the third and final flight started out the same but I was trying so hard to snap a take off picture that I never saw it again. I heard it when the ejection charge went off and from the sound it must have been over the jungle that is my neighbor's yard. It is lost forever. It was good while it lasted. I'll paint the next one day-glo orange and launch it in a larger field.
Flight Rating: 5 out of 5
Summary:
Pros:
- Easy to build and fly
- Flies and recovers very well
Cons:
- Easy to lose
Overall Rating: 5 out of 5
 |
 |
Flights
|
|