| Manufacturer: | Aerotech  |

(Contributed - by Tim Burger)
 Brief: An easy to assemble mid-power rocket complete with an
ejection baffle and a pair of Econojet motors.
Brief: An easy to assemble mid-power rocket complete with an
ejection baffle and a pair of Econojet motors.
Forward: One of the members of my NAR section saw a bulk pack of Aerotech kits advertised for an amazing special price by one of the on-line vendors. He asked if anyone was interested in going in on a pack (a dozen kits) and splitting them up. He pointed out that each kit and pair of motors would run about $25 bucks so you were essentially getting a mid-power rocket kit for less than ten bucks since the motors run nearly $18 alone. There was so much interest that we ordered two dozen, with one of the kits being made the grand prize for the club's 2001 Rocketoberfest open meet.
The kits came with all the parts and motors together in one container with a single copy of the instructions. These were split into individual kits by Nick and Jerome and distributed to the interested parties. I would like to express a heartfelt thanks to these two for their work in getting everything "together." The kits appear to be Aerotech Mustangs without the 24mm adapter and no decals. It would appear that the idea behind them is to encourage the use of Econojet motors.
Construction: My kit was very easy to construct. It came with a pre-slotted airframe tube, plastic nose, 29mm motor tube, and a variety of small plastic parts. It also came with a very nice 16" rip-stop nylon 'chute and hard plastic fins. The instructions are clear and complete, yet brief, with illustrations to help the builder along. They clearly indicate that the design of the rockets is such that flight stresses are transferred to the airframe in such a way that the strength of the glue being used is not in question. The only cement recommended is medium viscosity CA. The motor tube is first marked with a reference line running the length of the tube. Marks are also made at the fin lock ring locations using the diagram printed on the plans. The motor block and flange are glued into the motor mount, and a slot is cut for the very stout motor hook. There was a little confusion determining which part is the motor block, there is another, longer ring in the kit that is used to space out the mount for Econojet G and F motors. These two rings are very similar and it would be easy to get the wrong one. The motor hook is installed with the hook end in the slot previously made. Next the fin lock rings are slipped over the ends of the motor tube and located at the marks and over the hook. This sounds a lot easier than it is. The instructions indicate that the rings will be very snug on the tube and they are not kidding. I was able to get them on with some effort after rounding off the end of the tube with my fingernail. Once you get them on the tube and moving it's important not to stop until they are in position because it's truly hard to get them moving again. A flange ring is then glued to the forward edge of the forward ring. Finally, the stainless steel mesh is installed in the top of the motor tube, and the hard plastic baffle top is glued into the end. A screw eye in the top of the baffle is used to anchor the recovery system.
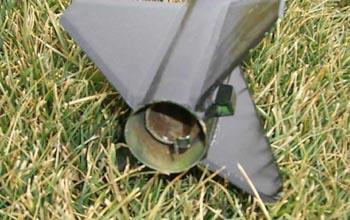 The fin lock system used by Aerotech is very unique.
The fins have a tab that is shaped to match the locks glued to the motor tube -
a sort of upside down taper that is grabbed by the locks. The bottom of each
fin is wide and flat forming a sort of molded in fillet. The fins themselves
are made of a very dense plastic with nice beveled edges. The fit and precision
of the tabs/locks is very good, matching exactly the diameter of the airframe
such that the fin bottoms mate firmly with the airframe but do not cause it to
cave even slightly under them. The motor assembly is slid into the airframe and
the fins are test fit into the slots and locks. When satisfied with the
location, everything is glued together. I must confess at this point that I
used epoxy here, not because I have any doubts about CA, but because I was
laying up fin fillets on my Interceptor G and didn't want to waste any left
over epoxy. I placed a thin layer of epoxy on the root edges, tab ends and
edges and then installed the fins until the locks clicked loudly confirming a
firm latch-up. It did take an alarming amount of force to get the fins to lock
in; I don't know if that's due to the epoxy or just that the locks are very
tight by accident or design. The epoxy that squeezed out from under the fin
plates was wiped clean. The final flange ring was then installed against the
back of the aft lock ring. The launch lugs are a square shape with a raked
leading edge and are molded of hard plastic. These were glued into the provided
holes in the airframe tube using epoxy.
The fin lock system used by Aerotech is very unique.
The fins have a tab that is shaped to match the locks glued to the motor tube -
a sort of upside down taper that is grabbed by the locks. The bottom of each
fin is wide and flat forming a sort of molded in fillet. The fins themselves
are made of a very dense plastic with nice beveled edges. The fit and precision
of the tabs/locks is very good, matching exactly the diameter of the airframe
such that the fin bottoms mate firmly with the airframe but do not cause it to
cave even slightly under them. The motor assembly is slid into the airframe and
the fins are test fit into the slots and locks. When satisfied with the
location, everything is glued together. I must confess at this point that I
used epoxy here, not because I have any doubts about CA, but because I was
laying up fin fillets on my Interceptor G and didn't want to waste any left
over epoxy. I placed a thin layer of epoxy on the root edges, tab ends and
edges and then installed the fins until the locks clicked loudly confirming a
firm latch-up. It did take an alarming amount of force to get the fins to lock
in; I don't know if that's due to the epoxy or just that the locks are very
tight by accident or design. The epoxy that squeezed out from under the fin
plates was wiped clean. The final flange ring was then installed against the
back of the aft lock ring. The launch lugs are a square shape with a raked
leading edge and are molded of hard plastic. These were glued into the provided
holes in the airframe tube using epoxy.
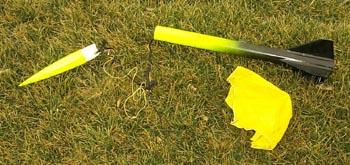
The recovery system was finished by tying off the free end of the elastic to the nose and then clipping the 'chute to that. I chose to add a long length of Kevlar (tm) line to back up the elastic strap; it's sized to be long enough to allow the elastic to stretch. I also added a steal split ring to the shock cord and a snap swivel to the 'chute to make attaching the 'chute easier.
Rating: 4
There is no challenge to building this kit; it goes right together. There were some problems with the rings going on the motor tube, but the instructions warn that it will be that way.
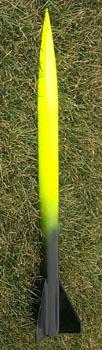
 Finish: A simple finish was put on this rocket.
The nose cone seam was sanded smooth, and the whole rocket given a good once
over with sandpaper to give the paint some "tooth." A light coat of
white primer was laid down, and sanded lightly with 400-grit paper. I didn't
take the time to fill the spirals, they are noticeable if you look for them,
but the tubing has a fine enough spiral that it doesn't stand out. I then laid
down two coats of Rustoleum Fluorescent Yellow on the forward section of the
rocket. I followed that about an hour later with flat black on the after end
feathering the paint above the fins. I didn't intend to mist quite so high, but
it sort of snuck up there when I went to even it out, then I had to even out
the "evening out", etc. After curing for a day or two I misted the
entire thing with Rustolem gloss clear coat, and applied a "wet" coat
of clear an hour or so later.
Finish: A simple finish was put on this rocket.
The nose cone seam was sanded smooth, and the whole rocket given a good once
over with sandpaper to give the paint some "tooth." A light coat of
white primer was laid down, and sanded lightly with 400-grit paper. I didn't
take the time to fill the spirals, they are noticeable if you look for them,
but the tubing has a fine enough spiral that it doesn't stand out. I then laid
down two coats of Rustoleum Fluorescent Yellow on the forward section of the
rocket. I followed that about an hour later with flat black on the after end
feathering the paint above the fins. I didn't intend to mist quite so high, but
it sort of snuck up there when I went to even it out, then I had to even out
the "evening out", etc. After curing for a day or two I misted the
entire thing with Rustolem gloss clear coat, and applied a "wet" coat
of clear an hour or so later.
Rating: 4
Flying: I've flown this rocket on several occasions. The first one was at one of the club launches using one of the Econojet F20s that the kit came with. To quote my friend Max; "That's hauling the mail!" It gets 'way the heck up there on an F; I haven't had good enough weather or the fortitude to launch it on a G yet. One of these days though! Some of the club members lost theirs earlier that same day, one because it weathervaned off the launch rod or experienced rod whip, another landed in a tree, etc. I have also burned a pair of E16-7 reloads in it. The first time it was a little windy and I was launching into the wind some and thought the seemingly long delay was due to the resulting low altitude. However, it did the same thing launched straight up on a calm day. It caused some tense seconds and a few gasps when it finally cut loose with the laundry, but I wasn't surprised. An E16-4 would be preferable to a -7, I think. And I've flown it only once with a D12-3 and though it turned out OK, I wouldn't recommend it and won't be doing it again!
Rating: 5
This rocket will really "haul the mail!" It is also quite tame on E's. Overall 5/5 If you are looking for a basic rocket that is inexpensive, can be assembled in an evening, and will perform well on mid power motors this is the kit for you.
Cheers: No worries getting the fins on straight. Good, clearly written and illustrated instructions. Quick building. Flies beautifully. Performance is simply amazing on F motors, but nice and tame on E's.
Jeers: None
Specs: Length: 31 inches Diameter: 1.9 inches Weight: 11.5 oz, finished (this is what mine actually weighs) Recovery: 16" Nylon 'chute Motors: The manufacturer recommends all seven second delay Econojets. One could also use these reloads: E16-7 (my personal experience is that a -4 would be better), E23-5, F40-10, F22-7, F52-8, G33-7, and G64-10. And in single use: F25-9, F50-9, G40-10, and G80-10.
 |
 |
Flights
|
|