| Manufacturer: | Aerotech  |
Brief:
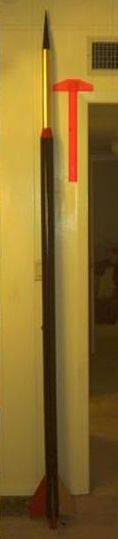
Recycled of bottom 1/4 of Mirage with different parts and design.
Modifications:
Due to an unfortunate misunderstanding between myself and instructions for the
Slimline retainer, the Mirage shown here on EMRR (as Mirage Tail cone mod) lawn
darted from 800'. Single use motors require the spacer ring with the Slimline.
All that remained intact (in fact, recognizable) was the bottom 2 feet, the
Slimline up through the first body section. Rather than rebuild it exactly, I
went off on a tangent.
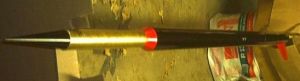
Two sections of PML Quantum tube were coupled together to the bottom tube and a urethane tail cone added upside down on top of the top tube as a transition. The 1.5" phenolic tube was fitted with a bulkhead, turning it into a payload section and this was epoxied into the 2" transition.
The Mirage is intended to recover in two pieces, top and bottom sections. The mismatch in sizes isn't much of a problem, but this bird was way more lopsided with a much larger top. Also, the Mirage top half recovers nose down. With this long phenolic payload section I foresaw problems with this. I took the advice of others on The Rocketry Forum and changed the recovery profile significantly.
After extending the shock cord with 8' of additional elastic and 8' of tubular nylon, I tied the sections together. The chute gets attached just at the coupler at the bottom of the forward section. This leaves the tail section dangling down 10 feet below the inverted nose of the top section. It hits the ground well before the nose, relieving most of the pull on the chute and allowing the top to descend the last 10 feet much slower and any drift increasing so it lands being pulled sideways.
 Still
not content with the integrity of the phenolic, I further strengthened the
payload section. First I wrapped it with 5 layers of self-adhesive vinyl (also
using 3M 77 spray adhesive to beef up the glue). After letting it sit so the
glue could cure, I covered the tube (and half the transition) with 2" heat
shrink tubing and held it in the oven to shrink it. I ended up with a
1.75" tube, laminated and rubber coated, strong enough to support my 215
lbs. weight. Now when it hits the ground, it'll bounce.
Still
not content with the integrity of the phenolic, I further strengthened the
payload section. First I wrapped it with 5 layers of self-adhesive vinyl (also
using 3M 77 spray adhesive to beef up the glue). After letting it sit so the
glue could cure, I covered the tube (and half the transition) with 2" heat
shrink tubing and held it in the oven to shrink it. I ended up with a
1.75" tube, laminated and rubber coated, strong enough to support my 215
lbs. weight. Now when it hits the ground, it'll bounce.
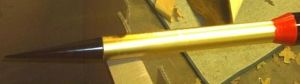
 I
trimmed off the heat shrink and fitted the conical nose. There's a bit of a lip
where the tube has a greater OD than the nose cone shoulder but it's hardly
noticeable at the scale of this rocket.
I
trimmed off the heat shrink and fitted the conical nose. There's a bit of a lip
where the tube has a greater OD than the nose cone shoulder but it's hardly
noticeable at the scale of this rocket.
Now weighing in at 4 lbs, I added rail buttons rather than trust my extended 1/4" rod to carry this weight. It should still launch fine from the 7.5' long rod given no wind, but no wind is a rarity in Texas. Now it can use either.
Construction:
Modification parts list:
- 2 full length section 2.6" PML Quantum Tube
- 2 2.6" couplers
- 1 PML urethane tail cone, 2.6 to 1.5" (as transition)
- 1 18" long 1.5" phenolic tube
- 1 1.5" bulkhead
- 1 PML 1.5" urethane conical nose
- 2' of 2" heat shrink tube
- 8' of 1/2" elastic shock cord
- 8' of 5/16" tubular nylon shock cord
- 1 roll 18" wide self-adhesive vinyl
- Bottom 24" of an ex-Mirage
The result is an extremely heavy duty rocket. I believe it could handle almost anything short of another full speed lawn dart.
Finishing:
Heat shrink tube makes an excellent strengthening device for phenolic. It has a
very smooth finish. However, being made of rubber does not allow all paints to
stick, and some that do won't dry well. I used white appliance epoxy as a base
coat, and a week later it was still tacky on the tubing. I later painted the
red and gold over it and that dried just fine. That was pure luck. You should
test first.
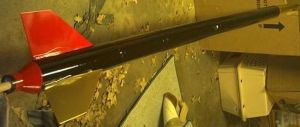
The old finish (a beautiful cobalt blue metal flake with deep clear coat) was simply primed, covered with white appliance epoxy and given a week to dry. Then it was painted with gloss cherry red, metallic gold, and black appliance epoxy.
Flight:
One other minor mod: I slid two 4" square sheets of fiberglass cloth down
the shock cord before tying together, to serve as extra ejection charge
protection. The recovery gear sits right on the AT ejection baffle, so I felt
it needed more.
It hasn't flown yet since the repair. At 4 lbs dry, it'll barely reach 500' on a G80. Luckily I built the motor mount for the 11" long Ellis Mountain 29mm H50 and H275 single use motors. As soon as I can get it to an HPR launch and get an Ellis H50-6, it'll get its shake down.
As for the name, when it lawn darted at a club launch, it looked hopeless. I'd never seen heavy paper body tube so shredded. Others saw the mess and said it looked like a write off. I told them "You'll see it again." And when they do, they'll see what they saw before. Hence, Deja Vu--"seen before".
Recovery:
It also has a 70" Top Flight X-form chute for a slow descent (this chute
is rated for 7.5 to 9.5 lbs rockets by Top Flight) and reduced drift.
Summary:
Although the angle isn't as steep as I'd like, the PML tail cones make for
serviceable transitions. Just use the entire internal length to coat with
strong epoxy for plenty of strength because there's nothing under it to take
the G forces.
 |
 |