Balsa Machining Service School Rocket
Balsa Machining Service - School Rocket {Kit}
Contributed by Bernard Cawley
| Construction Rating: | starstarstarstarstar |
| Flight Rating: | starstarstarstarstar |
| Overall Rating: | starstarstarstarstar |
| Manufacturer: | Balsa Machining Service  |

Brief:
The BMS School Rocket is a basic four fin and a nose cone streamer recovery beginner rocket that is well thought out
and well executed. It has a few interesting features including through-the-wall fin mounting for extra ruggedness and
laser etched lines to tell you where to put the centering rings on the motor mount and the launch lug on the body. It's
a little larger and more complex to build than some starter rockets, but this, to me, is a good thing. The fins are
laser-cut balsa, and the nose cone is a typically high-quality BMS balsa turning. The School Rocket is also good
looking (in my opinion).
All of that would be for nothing though if it weren't a nice flyer. But it flies very nicely indeed.
At $5.25 each, it's also an extremely good value.
Construction:
Introduction:
I'm a BAR coming back to the hobby after well over 30 years, at the behest of a group of homeschool students for whom I was teaching an "Aeronautics" course last school year. I'm also an engineer by training and have a penchant for testing and evaluating things. As such, after last spring's foray into rockets, I was looking for a rocket for the this year's students that met a particular set of requirements. I laid them out in a post on Ye Old Rocket Forum in a thread asking for what aspects of a model rocket one was looking for. Here's what I posted there last March 30th:
"First, in opposition to many of the others, I'm looking for a simple (but not TOO simple) introductory model to use with students. 3 (or 4) FNC is OK for this. Requirements and objectives are:
- Balsa fins (and preferably nose cone), though pre cut (laser) is OK
- Larger than BT-20/ST-7 tube diameter (so that one has to build a motor mount assembly)
- Rugged, streamer recovery (small fields)
- Either TTW fins (ala Quest Astra) or some clever fin alignment scheme like on the FlisKits Triskelion would be a plus.
- Modern recovery mounting (long enough shock cord and probably a Kevlar® line to the engine mount rather than a trifold paper mount) would also be desirable.
- Related to that, maybe even a baffle system so as to obviate the need for wadding would be really cool. I've yet to try this myself but I really like the concept. [Since I wrote this I have tried a baffle and love 'em.]
- An optional short payload section to accommodate the Winged Shadow/Quest How High SP altimeter would also be a plus.
I'd really want a couple of these for myself too, especially if all this list was met (though I have less need for the fin alignment help - I hope)."
Recently I stumbled across the Balsa Machining Service School Rocket - I'm not sure where I first read about it - and doggone if it doesn't meet just about all the requirements I laid out last Spring. The only objective it doesn't meet is using a baffle. There is even a payload section option (for an additional dollar!).
As I understand it, the current configuration of the BMS School Rocket was developed over a number of years and with the input of a number of teachers who have used it in their classes. This is apparent from all the carefully thought-out details of the design.
Components:
Specifically the School Rocket is based on an 11 1/4 inch long 0.976 inch OD body tube, with four
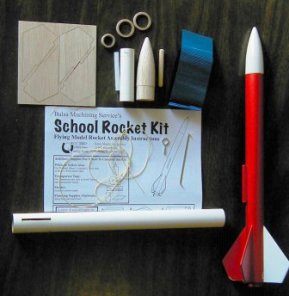 through-the wall mounted 3/32 inch balsa laser-cut fins. It is streamer recovery, using a blue metallized
and crinkly plastic streamer material that is 1 3/4 inches wide and 24 inches long. Bill at BMS tells me this material
is sold as metallic party streamers in party supply stores. It reminds me of an over-sized version of that ribbed
ribbon sold for gift wrapping that you can curl by dragging it over a sharp edge.
through-the wall mounted 3/32 inch balsa laser-cut fins. It is streamer recovery, using a blue metallized
and crinkly plastic streamer material that is 1 3/4 inches wide and 24 inches long. Bill at BMS tells me this material
is sold as metallic party streamers in party supply stores. It reminds me of an over-sized version of that ribbed
ribbon sold for gift wrapping that you can curl by dragging it over a sharp edge.
The all-Kevlar® shock cord (no elastic element) is about 3 feet long. I was skeptical about this at first but after six flights I find it works just fine without having any stretchy bits.
The motor mount assembly features a laser-cut hole in the motor tube for the Kevlar® shock cord, a laser-cut slot for the upper end of the motor hook, and laser-scribed lines showing where the fiber centering rings should end up when glued in place (so that they're well out of the way of the tabs on the fins that are glued to the motor tube). There is both a motor block and a motor hook in the mount assembly. The hook is nice and springy and made in the style of the original Centuri/Estes hooks without the extra "handle" on the end.
Laser etching is also used to mark the launch lug position on the body. By the way, the launch lug is 3/16 inch in diameter, so as to make it easier for kids to thread it onto a regular 1/8 inch diameter launch rod.
The nose cone is a nice, smooth 2 5/8 inch ogive (with rounded tip) balsa cone. Would you expect anything else from a company called Balsa Machining? It has a large diameter central hole into which you glue a supplied ribbed dowel. The supplied screw eye is threaded into a pilot hole in that dowel. The Kevlar® shock cord is tied to the eye and the streamer attached to the it.
The payload section option consists of a laser-cut 1/4 inch ply disk which is piloted for the screw eye, a stage coupler and a 2 3/4 inch-long section of body tube. I haven't tried it yet, but have one in hand to try.
Construction:
The instructions are clearly and profusely illustrated with drawings. They take up most of both sides of two 8 1/2 x 11 inch sheets. Half of one side is taken up by the NAR Safety Code - a handy reference for a student. As appears to be customary with bulk packs of kits, you get one set of instructions no matter how many kits you order and are expected to reproduce them as needed for your group.
The assembly order is conventional - first the motor mount assembly, then the fins, then the nose cone and recovery system. The only tiny departure I took from the instructions was to use the double-gluing technique rather than "hold and wait" to attach the fins. By the way, the instructions can be downloaded as a .pdf from the BMS site here: http://www.balsamachining.com/school.pdf
I used regular Elmers White Glue for all assembly.
The motor block was a surprisingly loose fit in the motor tube. I asked Bill at BMS about this and he said that it was intentional - so that inexperienced hands could put too much glue on it and still get it into place without worrying about it getting stuck part way in. I also thought that the fin tabs could be just a laser beams' width longer and he said this, too, was intentional, and for the same reason - to easily cope with heavy-handed application of glue.
Once the mount/shock cord assembly is ready, it's installed. Then the fins are mounted to both the body tube and through the laser-cut slots in the wall of the BT to the motor tube. This, of course, guarantees that the fins are parallel to the direction of flight and helps get them nice and perpendicular to the body.
The next step is to apply glue fillets to the fin/body joints and glue the launch lug on the body tube in the laser-scribed rectangle. The resulting fin joints are VERY sturdy, and the School Rocket is the only one of my streamer-recovered fleet that hasn't popped a fin on a landing. I really had a chance to test the fin attachment on the fifth flight - but I'm getting ahead of myself...
The instructions next have you install the screw eye in the dowel and then glue the dowel into the nose cone. It might make more sense to do this in the opposite order so as to be able to insert the glue laden dowel all the way into its place in the nose cone by simply pressing the assembly down on a flat surface. Unlike the motor block, the dowel is a fairly snug fit in the nose cone and one wouldn't want the glue to grab while it was still sticking out some.
Finally the streamer is taped to the shock cord about six inches from the nose cone, then the end is folded over and stapled. I like this attachment better than, say, tying a plastic streamer to either the nose cone or the shock cord directly (as I've seen in some other basic streamer recovered rockets), and it's simpler than having a separate line attachment.
Finishing:
The instructions make finishing the rocket optional - it certainly could be flown naked. I applied several coats of
Varathane sanding sealer on the fins and nose cone, then sprayed one coat of Kilz primer from a rattle can. Final
finish was red and white Ace Hardware spray paint that has the characteristics of the old Krylon. I managed to find
some this past spring as I was reading about the change in Krylon's formula on YORF.
There are no decals supplied - but then, for $5.25, I didn't really expect any. I still think I should use some adhesive backed model airplane trim material to put a stripe or something on it, but I haven't, yet.
My SR's finished weight (no wadding or motor) was 0.98 ounce.
Construction Rating: 5 out of 5
Flight:
 The
only recommended motor is an A8-3. Since the SR only weighs an ounce before wadding and a motor, an A is definitely the
way to go unless you have a good sized field and little or no wind. Since the tube is BT-50 sized, four squares of
Estes wadding is about right.
The
only recommended motor is an A8-3. Since the SR only weighs an ounce before wadding and a motor, an A is definitely the
way to go unless you have a good sized field and little or no wind. Since the tube is BT-50 sized, four squares of
Estes wadding is about right.
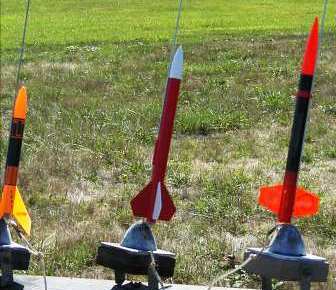
As of this writing I have six flights on the one in the pictures. The first four flights were at the monthly Boeing Employees Model Rocket Club (BEMRC) launch in September. The site is not large and is bordered on the north by the Boeing Kent facility and on the south by a very active four-lane street, so staying on the field is important.
The first flight was on an Estes A8-3. It was nice and straight and very pleasingly high, with ejection occurring a little early. Deployment was good and the streamer is quite effective at slowing the descent while not having the rocket drift too far.
Next I tried a Quest A8-3 (this is a German-made motor that Quest is currently substituting for their Chinese A6-4s when you order directly from them - Here's a discussion on Ye Olde Rocket Forum). The flight profile was similar, but with a more appropriate ejection point. It appears that these really do have 3 second delays.
After that I got cocky and tried an Estes B6-4. Wow, what a nice high flight. Tracking smoke was a good thing this time. Ejection appeared to be very near apogee. The field almost didn't contain it, though as it came down maybe 30 feet from the road.
The next flight, also on an Estes B6-4, was on a nearly windless morning after my class, from a nearby park. Again a spectacularly high boost, good deployment and recovery...until it just brushed the leaves of a tree on the edge of the soccer field I was operating out of. The good news was that the tree didn't eat it. The bad news was that there was an asphalt trail next to the tree, so it landed, hard, on the asphalt. Just about anything else would've popped a fin, but the through-the-wall mounts meant that they stayed on. Two of them were cracked, and the engine hook was loosened (it's the lowest point on the rocket). The nose cone also acquired a few dents.
A few drops of thin CA took care of of the fins and the motor tube tear and she's ready to go again. She's not as pretty as she was, but she still flies fine.
The most recent flight was at the October BEMRC launch. This time I used a Chinese-made Quest A6-4. Even though the breeze was quite light, it tipped upwind coming off the rod. The oversize launch lug lets it angle a few degrees from a 1/8 inch rod, and the slow thrust buildup of the Quest A6-4 (see the time/thrust curves on the NAR site) means it's not moving as fast as it might be with another motor choice.
The net result was an arcing flight with a quite late ejection that ended again testing the TTW fins by landing on an asphalt parking lot. One of the fins cracked in the prior asphalt landing got chipped again, and there are a couple more dents in the nose cone....but a little thin CA on the fin returned it to flying status. At some point I should fill all the nose cone dents and maybe shoot another coat of white on it. But I'll probably just keep flying it.
Recovery:
As I alluded to above, the shock cord is only a Kevlar®
line. It is attached to the motor mount through a precut hole and looped around the motor block. The streamer is then
attached as I described above.
The streamer seems to be just about perfect for the SR's weight - a good compromise between slow descent and drift. I have had a little melting (when I used three squares of Estes wadding instead of four) so I am in search of a party store that has this neat material available so that I can replace it when needed. I haven't found it yet, though.
So far (six flights on a combination of American, German and Chinese-made motors) the shock cord is doing well.
I may fit a larger streamer or a small 'chute (BMS also has a $2 9-inch ready-to-use ripstop nylon parachute option) when I try the payload section. I will definitely fly one of my Winged Shadow/Quest How High altimeters in one of these in the future.
It would also be really cool to fly one on a C motor, but I have no idea when I'll have a venue suitable to try that with a reasonable chance of getting it back. :-)
If there were one thing I'd change, it would be to use ST-9 rather than BT-50 tubing for the body so it would be a little more rugged, not that I've seen a need for this yet in actual flying.
Flight Rating: 5 out of 5
Summary:
The Balsa Machining Service School Rocket is easy to build (but not so simple as to not teach a new rocketeer basic
building techniques). Building it yields a rugged, good flying and pleasant-looking rocket. Its recovery system works
well yet helps keep it in the park or school yard. It is obvious that those who help beginners get started in model
rocketry have had their inputs to the design.
The through-the-wall fin mounting is almost unique in this type of starter rocket and the combination of TTW fins, streamer recovery and balsa nose cone IS unique so far as I can tell. It's a good combination.
I really can't think of anything I'd call a "con". In my opinion the BMS School Rocket hits the center of the target. I'll be using it in my Aeronautics class this year, so soon I'll see if it works as well with inexperienced young builders as I expect it to. Perhaps I can check back in here after we've flown them.
Overall Rating: 5 out of 5
Other Reviews
- Balsa Machining Service School Rocket By Geof Givens (October 4, 2008)
Brief: The BMS School Rocket is a small, traditional 4-fin rocket. BMS is a good low-power parts supplier for scratch builders. This the first time I built a pre-packaged kit from them. It is 14" long with BT-50 airframe and 18mm motor mount, weighing only about 1 1/2oz finished, much of which was extra nose weight we added (see below). My daughter and I built this kit ...
 |
 |
Flights
|
|
L.D. (April 14, 2009)
Jeff Curtis (November 2, 2019)
I used this rocket with an A8-3 to win one of the spot landing prizes at NARAM 61. It has such a straight flight it was perfect for spot landing.
|
|
M.G. (March 28, 2009)