| Manufacturer: | Binder Design  |
 Brief:
Let me start by telling you that my Level 2 certi-fication flight was not
successful. But that has not deterred me from recommending this kit. The
re-build was very successful and the rocket re-built won Model of the month for
the Novem-ber meeting of NIRA. With a few adjustments, I know this model will
make it during my second attempt. Completed, this model is quite impres-sive.
The Velociraptor was not only a challenging rocket to build it was a lot of fun. To start, the buying experience of selecting and ordering through Binder Design was incredible. I ordered the Velociraptor on-line on a Sunday and re-ceived it in the mail on the following Thursday. You could tell I just bought a top shelf kit. The packaging was done with care. Everything was wrapped individually and all of the parts were in place and in excellent condition. The 11 page instruction manual with illustrations was very well thought out and easy to follow. The website is very well thought out and the and very easy to order a number of different kits and supplies. This website is the best kept secret in Rocketry, the buying experience alone scores a (5). Mike Fisher, the owner of Binder Design an-swered all of my questions on e-mail or on the phone. He was very accessible.
Kit specifications:
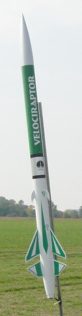
Designed for the advanced builder and sport flyer, the Velociraptor is a
4” diameter High Power Rocket with an aggressive look. It comes with
unique anti-zipper baffle design, aluminum motor retainer, and rail buttons!
Fly it on an H or I for your level one certification, then stick a J motor in
it for your level two flight and watch it scream.
Kit included cut and sanded 3/16” aircraft quality plywood fins, high strength airframe tube and couplers, centering rings, bulkhead plate, high quality hardware package, 54 mm motor tube, plastic nose and tail cone, computer designed and cut vinyl decals. A 45” premium nylon parachute was included.
Construction:
With the instruction manual being very thor-ough, all you need to be able to do
is read left to right. The longest part of this project was the building of the
aft section. With a boat tail as-sembly and 9 fins to sand and align, the
slower I went produced terrific results. As the instruc-tions tell you, the
care that you take during these steps will insure a well built and solid
rocket. A hand sander and dremel came in very handy, especially with the talon
fins.
I used a Slim Line motor retainer that was in-cluded with the kit. I am sold on these, and plan on using them in all future rockets. Sleek, easy, strong and better than masking tape. This rocket also incorporated a Binder Baffle System, the first time that I had built and used a baffle. This also worked well.
I purchased an avionics bay for this rocket, but chose not to use it. The rocket and can be built two ways, with or without the bay. I did not feel that I was ready for the electronics, but I now realize that if I am going to play in the higher power stuff, I am going to have to get involved with electronics.
I took my time and made sure that the rocket was going to be solid. I wanted to have it able to use a K550W. So I built it strong. The rocket weigh in at 5.5 lbs. loaded and ready to go.
Finishing:
I had built this stock, so my intentions were to finish it exactly as it showed
in the instructions. After sanding and prep, I applied two coats of primer
followed by three coats of finishing paint. I used white high gloss paint for
the aft section and Green Krylon for the forward section. The Nose cone was
finished in silver. Binder pro-vided excellent decals to finish the rocket and
give its great look. Using my garage as my paint studio never sits well with my
wife, but she has gotten use to it.
 Flight:
My level 2 certification flight was set for WTGG in September. I arrived at the
field a late morn-ing, to find that a lot of people were looking for me; I had
the only rail for the launch. It became very popular that day. I checked in
with every-one that was going to help me with the flight. After watching 4-6
flights to gage the wind, I started to build the J350W motor that I was gong to
use.
As I said in the first paragraph, this was not a successful flight. When you start to investigate why something went wrong, here was my first mistake of the day. The motor came with a long delay. I was advised based on what Space Cad had recommended to change to a medium delay. Going with the medium delay led to a premature separation. After talking to Binder, the long de-lay should have been the choice. Space Cad does not do a very good job when using boat tails. The Rocket probably reached an altitude of 3300-3500 feet. Where Space Cad had it toping out at 2800 feet, this extra 500-700 feet was the difference in coming in perfect or with w 9 inch zipper.
Back to the launch. As a mentioned the rocket is quite impressive when finished, and I believe this was to be the only Level 2 launch of the day. So it got a little of attention. The rocket was loaded on the Impulse Aerospace Quad Pod, and we were reading to go. The wind was at about 5 miles an hour out of the south west. I adjusted the angle of the pad to take advantage of the wind and to try to keep the rocket out of the corn field.
5,4,3,2,1 Lift off, the rocket lifted off the pad. It looked great. With everyone watching we saw the separation and chute deploy. The chase was on.
Recovery:
With the chute fully deployed with the rocket appearing in good shape. The
extra height that we saw allowed to drift into the corn field about two hundred
yards in. After two hours and a sec-ond attempt I was able to recover the
rocket with the help of a flag pole and walking talking.
I was very disappointed in finding the zipper damage. I also lost two talon fins. When the post opt was completed, we realized the following things that could have lead to a successful flight:
- A Long delay.
- A wider lead line coming out of the body tube, the 1/2” shock cord allowed the cord to zipper through the body tube more easily.
- Electronics would have allowed for dual de-ployment and brought the rocket closer to the launch pad.
- Fiber glassing the body tube.
Summary:
The next day I had e-mailed Mike Fisher at Binder and had the parts that I
needed to rebuild the rocket. It is now ready to go at the next op-portunity
for a HPR launch. I have learned a lot in the last 15 months, and have found
that this is a great hobby to be a part of. I will continue to learn and gain
experience, and will always seek the advice from others that have gone before
me.
This is a great rocket, and I recommend it to anyone. The failed attempt was not that of the rocket, but a lack of experience – I know I won’t make the same mistakes again.
 |
 |
|
|
R.D.P. (April 9, 2003)